CatsEyeXI is home to various custom quests. This began in earnest with the creation of the
Crystal Warrior mode.
Please Note: Repeatable quests default to "No".
Players will need to establish if they can be repeated and change this by entering "y".
Previous Quest defaults "None" as well.
Content Quests
| Featherweight 🔗
|
Requirements
|
| Fame:
|
File:Windurst-Flag.jpg Windurst: 1
|
Level Restriction:
|
50+
|
|
| NPC:
|
Yagudo Outlaw, Castle Oztroja (I-9)
|
| Repeatable:
|
Yes
|
Type Restriction:
|
CW Only
|
Reward
|
| Previous Quest:
|
None
|
Next Quest:
|
None
|
|
| Walkthrough
|
- This quest is repeatable after every JP Midnight.
- Find the Yagudo Outlaw on the second floor of the north courtyard. *F exit on map 2*
- He will ask you to retrieve both a [Seven-knot quipu] and [Thirteen-knot quipu]. This is a one-time cost.
- Return them to the Yagudo to complete the quest and earn access to the Yagudo Arena in Meriphataud Mountains.
- Trade 4 File:Silver Beastcoin icon.png Silver Beastcoins to the Yagudo Outlaw to be eligible for the fight. You will also receive
 500 Gil. 500 Gil.
- This must be paid every entrance.
- Gather a group of people in Meriphataud Mountains (K-8) to fight in a Level Capped 50 fight, so gear appropriately. The fight can be fought in an alliance.
- You will spawn a group of NM (random each time, see the Yagudo Arena section on CatsEyeXI Content/Crystal Warrior)
- After you kill all three enemies, inspect the shiny spot again to spawn a coffer an get your reward.
|
| Rock Cooking 🔗
|
Requirements
|
| Fame:
|
N/A
|
Level Restriction:
|
65+
|
|
| NPC:
|
Dusty Footprint, Oldton Movalpolos (E-5)
|
| Repeatable:
|
Yes
|
Type Restriction:
|
CW Only
|
Reward
|
| Previous Quest:
|
None
|
Next Quest:
|
None
|
|
| Walkthrough
|
|
Walkthrough information needed! Be the first!
|
| Thread Bare 🔗
|
Requirements
|
| Fame:
|
File:Bastok-Flag.jpg Bastok: 1
|
Level Restriction:
|
45+
|
|
| NPC:
|
Mathias, Metalworks (I-9)
|
| Repeatable:
|
No
|
Type Restriction:
|
None
|
Reward
|
| Previous Quest:
|
None
|
Next Quest:
|
None
|
|
| Walkthrough
|
- Speak with Mathias in the Presidential Aide's Office (located to the right of the President's Office) and he will lament the lack of cloth supplies in the republic. Speak to him again and choose "For the Republic!" and he'll suggest that Crawlers' Nest might be a suitable source if an investigation is performed.
- Investigate the Vantage Point at J-9 on Map #1.
- Return to Mathias.
|
| Clink to the Past 🔗
|
Requirements
|
| Fame:
|
 Aht Urghan: 1 Aht Urghan: 1
|
Level Restriction:
|
60+
|
|
| NPC:
|
Dadaroon, Nashmau (H-7)
|
| Repeatable:
|
No
|
Type Restriction:
|
None
|
Reward
|
| Previous Quest:
|
None
|
Next Quest:
|
None
|
|
| Walkthrough
|
|
|
| Broken Bones 🔗
|
Requirements
|
| Fame:
|
?
|
Level Restriction:
|
60+
|
|
| NPC:
|
Felyna, Mhaura (G-9)
|
| Repeatable:
|
No
|
Type Restriction:
|
None
|
Reward
|
| Previous Quest:
|
None
|
Next Quest:
|
None
|
|
| Walkthrough
|
- After speaking to Felyna, head to Fort Karugo-Narugo [S].
- Enter the Fort and take the West exit.
- Run to the most northern portion of the cliff at the southern end of (E-8)
- Interact with the Buried Note to receive a crumpled note.
- Return to Felyna in Mhaura to complete the quest.
|
| Goblin's Gambit 🔗
|
Requirements
|
| Fame:
|
N/A
|
Level Restriction:
|
65+
|
File:Gold Beastcoin icon.png Gold Beastcoin x4 x4
|
| NPC:
|
Bagatrix, Oldton Movalpolos (G-8)
|
| Repeatable:
|
Yes
|
Type Restriction:
|
CW Only
|
Reward
|
| Previous Quest:
|
None
|
Next Quest:
|
None
|
- Pick from one of three loot chests that change each Vanadiel Day:
Attachment Chest:
Scroll Chest:
text=Trust ChestTrust Chest:
- Adelheid
- Elivira
- Joachim
- Koru-moru
- Mihli Aliapoh
- Uka Totlihn
- Valaineral
|
| Walkthrough
|
- This quest is repeatable Daily (JP Midnight).
- Travel to Oldton Movalpolos and talk with Bagatrix.
- Trade File:Gold Beastcoin icon.png Gold Beastcoin x4 to them.
- The party will be drawn in to a fight against two goblins (WHM and BST) and a pet bat.
- Suggested Order: Bat -> BST (Hog) -> WHM (Long)
- WHM will use benediction and cast Cure VI. He can be Silenced and Slept.
- BST will not charm, nor resummon pet. Can be Slept.
- All goblins use debuff dice. Prepare to wake party with Divine Waltz/Curaga.
- Once victorious talk with Bagatrix again and choose a reward from one of the three chests.
- The contents of each chest changes each Vanadiel day. Coordination between party members may be required to sus out which chest holds what type of loot.
- One chest contains 1x spell scroll, an augmented weapon, and some miscellaneous items.
- Another chest contains 1x trust cipher, an augmented weapon, and some miscellaneous items.
- The other chest contains 1x PUP attachment, an augmented weapon, and some miscellaneous items.
|
System Quests
| Finding Nemosyne 🔗
|
Requirements
|
| Fame:
|
File:Jeuno-Flag.jpg Jeuno: 1
|
Level Restriction:
|
15+
|
|
| NPC:
|
Letheb, Lower Jeuno (H-9)
|
| Repeatable:
|
No
|
Type Restriction:
|
CW Only
|
Reward
|
| Previous Quest:
|
None
|
Next Quest:
|
None
|
|
| Walkthrough
|
- Speak to Letheb in Waag-Deeg's Magic shop twice and accept his request.
- Go to Dragon's Aery and collect the water at G-7. (Do NOT go past the initial pond room. Otherwise you WILL have to start the run again!)
- Return to Letheb for the rewards.
- Nemosyne is in the Upper Jeuno cathedral.
|
| Digging Up Dirt 🔗
|
Requirements
|
| Fame:
|
File:Jeuno-Flag.jpg Jeuno: 1
|
Level Restriction:
|
30+
|
|
| NPC:
|
Sebastian, Lower Jeuno (I-7)
|
| Repeatable:
|
No
|
Type Restriction:
|
CW or WEW only
|
Reward
|
| Previous Quest:
|
None
|
Next Quest:
|
None
|
|
| Walkthrough
|
- Talk to Sebastian, Lower Jeuno (I-7) at the Tenshodo front desk.
- Visit the Balga's Dias (Giddeus) BCNM room. Interact with the Dirt hidden inside the room.
- Return to Sebastian in Lower Jeuno.
- Visit the Waughroon Shrine (Palborough Mines) BCNM room. Interact with the Dirt hidden inside the room.
- Return to Sebastian in Lower Jeuno.
- Visit the Horlais Peak (Ghelsba) BCNM room. Interact with the Dirt hidden inside the room.
- Return to Sebastian in Lower Jeuno to complete the quest.
- You can now talk to Domenic (J-7) to access teleports to BCNMs for Ghelsba Outpost, Horlais Peak, Waughroon Shrine, Balga's Dias and Qu'Bia Arena.
|
| Up, Up and Away 🔗
|
Requirements
|
| Fame:
|
File:Jeuno-Flag.jpg Jeuno: 1
|
Level Restriction:
|
30+
|
|
| NPC:
|
Disarmed Knight, Lower Delkfutt's Tower (E-10) (Map 1)
|
| Repeatable:
|
No
|
Type Restriction:
|
None
|
Reward
|
| Previous Quest:
|
None
|
Next Quest:
|
None
|
|
| Walkthrough
|
- The disarmed knight is on the first floor on the path to the door at C, do not go up the stairs.
- The training supplies are located on the Upper Delkfutt's Tower Map 1, Tenth floor I-9, in the same room as the Porphyrion NM and Elevator. May be located behind secret chest.
- If using the elevator, you can summon your Trust before going up.
- Speak with the disarmed knight to complete the quest
Note: ACE players still need to unlock each outpost by doing the supply quest to use this service.
Note2: Following command can be used to have Emilia provide signet on warp: !config emilia_signet true
|
| Gobbie Travels 🔗
|
Requirements
|
| Fame:
|
File:Jeuno-Flag.jpg Jeuno: 1
|
Level Restriction:
|
?+
|
|
| NPC:
|
Portalix, Lower Jeuno (H-9)
|
| Repeatable:
|
No
|
Type Restriction:
|
None
|
Reward
|
| Previous Quest:
|
None
|
Next Quest:
|
None
|
|
| Walkthrough
|
- Speak to Portalix (Inside Muckvix's Junk Shop) to flag this quest.
- Collect the requested items, available off of beastmen connected to each region.
- Meriphitaud Mountains Yagudo for Astrum, Quadavs in Pashhow Marshlands for Luna and Orcs in Jugner Forest for Lux.
- Once you have collected all 3, return to Portalix for your rewards.
|
| Out of Stock 🔗
|
Requirements
|
| Fame:
|
File:Bastok-Flag.jpg Bastok: 1
|
Level Restriction:
|
10+
|
|
| NPC:
|
Shady Dealer, Port Bastok (K-13)
|
| Repeatable:
|
No
|
Type Restriction:
|
ACE Only
|
Reward
|
| Previous Quest:
|
None
|
Next Quest:
|
None
|
|
| Walkthrough
|
|
Note: This quest can be picked up at any Curio Vendor Moogle's location.
|
| Near Death Experience 🔗
|
Requirements
|
| Fame:
|
File:Tavnazia-Flag.jpg Tavnazia: 1
|
Level Restriction:
|
60+
|
|
| NPC:
|
Andrus, Lufaise Meadows (E-8)
|
| Repeatable:
|
No
|
Type Restriction:
|
ACE Only
|
Reward
|
| Previous Quest:
|
None
|
Next Quest:
|
None
|
|
| Walkthrough
|
- Exit from the upper exit Tavnazian Safehold (I-5) or take the Survival Guide/Outpost warp.
- Speak to Andrus Lufaise Meadows (E-8).
- Andrus tells you find his missing pages.
- You do not need to return back to Andrus after finding each page before you get the next one.
- 1st page is in the tower at (F-7) - Torn Page
- 2nd page is at the shack at (G-6) - Tattered Page
- 3rd page is at the lagoon at (I-8) - Shredded Page
- Clicking on the Shredded Page will spawn a Bugard NM.
- Level 60 Sync Fight
- Trusts are despawned when fight starts.
- Buffs will carry over into the fight.
- Once the NM is defeated, return to Andrus to complete the quest.
|
| Blast to the Past 🔗
|
Requirements
|
| Fame:
|
File:Jeuno-Flag.jpg Jeuno: 1
|
Level Restriction:
|
60+
|
|
| NPC:
|
Ash, Batallia Downs (S) (G-5)
|
| Repeatable:
|
No
|
Type Restriction:
|
None
|
Reward
|
| Previous Quest:
|
None
|
Next Quest:
|
None
|
|
| Walkthrough
|
- Speak to Ash at Batallia Downs (S) (H-5) - Be wary of 60+ goblins in the area.
- Ash tells you find his missing pages.
- You do not need to return back to Ash after finding each page before you get the next one.
- 1st page to the west in (G-5) - Torn Page
- 2nd page to the south in (H-6), just north of where the trail intersects - Tattered Page
- 3rd page to the south in (H-7), towards the bottom of the map square - Shredded Page
- Clicking on the Shredded Page will spawn a Cockatrice NM, Assassin Coq.
- Level 60 Sync Fight.
- Trusts are despawned when fight starts.
- Buffs will carry over into the fight.
- Once the Assassin Coq is defeated, return to Ash to complete the quest.
|
San d'Oria
| A Crystal Prelude 🔗
|
Requirements
|
| Fame:
|
File:San d'Oria Flag.jpg San d'Oria: 1
|
Level Restriction:
|
None
|
|
| NPC:
|
Robineaux, King Ranperre's Tomb (J-6)
|
| Repeatable:
|
No
|
Type Restriction:
|
CW Only
|
Reward
|
| Previous Quest:
|
None
|
Next Quest:
|
None
|
|
| Walkthrough
|
|
Walkthrough information needed! Be the first!
|
| Ring Around the Roses 🔗
|
Requirements
|
| Fame:
|
File:San d'Oria Flag.jpg San d'Oria: 1
|
Level Restriction:
|
None
|
|
| NPC:
|
Aeolia, Southern San d'Oria (M-8)
|
| Repeatable:
|
No
|
Type Restriction:
|
CW Only
|
Reward
|
| Previous Quest:
|
None
|
Next Quest:
|
None
|
|
| Walkthrough
|
|
Go to I-8 in North Sand'Oria next to the fountain and click on the flower bed.
Return to Aeolia.
|
| Hungry Customer 🔗
|
Requirements
|
| Fame:
|
File:San d'Oria Flag.jpg San d'Oria: 1
|
Level Restriction:
|
None
|
|
| NPC:
|
Couquillard, Southern San d'Oria (K-6)
|
| Repeatable:
|
Yes
|
Type Restriction:
|
CW Only
|
Reward
|
| Previous Quest:
|
None
|
Next Quest:
|
None
|
- 900 Gil
|
| Walkthrough
|
- Conquillard, inside the "Lion Springs" Inn, requires File:Hare Meat icon.png Hare Meat x12.
- This quest is repeatable, and Conquillard keeps track of the amount of meat given to him.
|
| In Sheep's Clothing 🔗
|
Requirements
|
| Fame:
|
File:San d'Oria Flag.jpg San d'Oria: 1
|
Level Restriction:
|
5+
|
|
| NPC:
|
Chilly Wolf, Northern San d'Oria (C-9)
|
| Repeatable:
|
Yes
|
Type Restriction:
|
CW Only
|
Reward
|
| Previous Quest:
|
None
|
Next Quest:
|
None
|
- 250 Gil
|
| Walkthrough
|
- Chilly Wolf requests File:Sheepskin icon.png Sheepskin x3.
- This quest can be repeated, and he keeps track of the number of sheepskins handed in.
|
| On Guard 🔗
|
Requirements
|
| Fame:
|
File:San d'Oria Flag.jpg San d'Oria: 1
|
Level Restriction:
|
5+
|
|
| NPC:
|
Somnelius, West Ronfaure (H-5)
|
| Repeatable:
|
No
|
Type Restriction:
|
CW Only
|
Reward
|
| Previous Quest:
|
None
|
Next Quest:
|
On Watch
|
|
| Walkthrough
|
|
Somnelius is located in the watchtower via exit 3 from Northern San d'Oria.
|
| On Watch 🔗
|
Requirements
|
| Fame:
|
File:San d'Oria Flag.jpg San d'Oria: 1
|
Level Restriction:
|
10+
|
|
| NPC:
|
Somnelius, West Ronfaure (H-5)
|
| Repeatable:
|
No
|
Type Restriction:
|
CW Only
|
Reward
|
| Previous Quest:
|
On Guard
|
Next Quest:
|
None
|
|
| Walkthrough
|
- Somnelius is located in the watchtower via exit 3 from Northern San d'Oria.
- Go to F-5 in West Ronfaure.
- Find a sparkling Orcish Marking at the slope.
- Interacting with it will cap you to level 10 and spawn the NM Orcish Watcher.
- Can at least use Arm Block.
- Has around 170 HP.
- Can be easily soloed as skilled-up & equipped MNK/THF without Hundred Fists.
- After the battle interact with the Orcish Marking again.
- Go back to Somnelius and get your reward.
|
| Counting Lost Sheep 🔗
|
Requirements
|
| Fame:
|
File:San d'Oria Flag.jpg San d'Oria: 1
|
Level Restriction:
|
?
|
|
| NPC:
|
Frerehn, Southern San d'Oria (E-7)
|
| Repeatable:
|
Yes
|
Type Restriction:
|
CW Only
|
Reward
|
| Previous Quest:
|
None
|
Next Quest:
|
None
|
|
| Walkthrough
|
|
Investigate the disturbance in East Ronfaure
- Talk to Frerehn at Southern San d'Oria (E-7)
- Inspect the Wool Clump at East Ronfaure (J-6)
- Inspect the Wool Clump at East Ronfaure (G-8/G-9)
- Inspect the Wool Clump at East Ronfaure (J-10) which will spawn a hound NM.
- Defeat te Faarwulv NM in an uncapped fight. It has less than 180hp.
- Return to Frerehn
|
| Staying Afloat 🔗
|
Requirements
|
| Fame:
|
File:San d'Oria Flag.jpg San d'Oria: 1
|
Level Restriction:
|
10+
|
|
| NPC:
|
Archimedes, Northern San d'Oria (F-6)
|
| Repeatable:
|
Yes
|
Type Restriction:
|
CW Only
|
Reward
|
| Previous Quest:
|
None
|
Next Quest:
|
None
|
- 800 Gil
|
| Walkthrough
|
- Use Logging or Chocobo Digging in West or East Ronfaure to obtain 12 Acorns.
- Archimedes keeps track of how many Acorns you have delivered thusfar.
|
| Rambling Around 🔗
|
Requirements
|
| Fame:
|
File:San d'Oria Flag.jpg San d'Oria: 1
|
Level Restriction:
|
10+
|
|
| NPC:
|
Glenda, Southern San d'Oria (K-8)
|
| Repeatable:
|
No
|
Type Restriction:
|
CW Only
|
Reward
|
| Previous Quest:
|
None
|
Next Quest:
|
Rambling Around II
|
- 1500 Gil
|
| Walkthrough
|
- Talk to Glenda twice and accept the quest.
- Glenda is inside of Rosel's Armour
- Go to south H-11 in West Ronfaure.
- Examine the glowing Ram Wool to spawn and defeat a Wild Ram.
- It's not level capped.
- Wild Ram has around 474 HP.
- Wild Ram can use Great Bleat.
- Care, at night there will be a Tainted Hound who aggroes by sound.
- Go back to Glenda.
|
| Rambling Around II 🔗
|
Requirements
|
| Fame:
|
File:San d'Oria Flag.jpg San d'Oria: 1
|
Level Restriction:
|
12+
|
|
| NPC:
|
Glenda, Southern San d'Oria (K-8)
|
| Repeatable:
|
Yes
|
Type Restriction:
|
CW Only
|
Reward
|
| Previous Quest:
|
Rambling Around
|
Next Quest:
|
None
|
- 1800 Gil
|
| Walkthrough
|
- Glenda will request File:Lanolin icon.png Lanolin x2.
- This quest can be repeated, and she keeps track of the number handed in.
|
| Saving My Hide 🔗
|
Requirements
|
| Fame:
|
File:San d'Oria Flag.jpg San d'Oria: 1
|
Level Restriction:
|
20+
|
|
| NPC:
|
Alutanie, Southern San d'Oria (D-8)
|
| Repeatable:
|
Yes
|
Type Restriction:
|
CW Only
|
Reward
|
| Previous Quest:
|
None
|
Next Quest:
|
None
|
|
| Walkthrough
|
- Talk to Alutanie at D-8 on the balcony of the Leathercrafter's Guild.
- You must talk to her a 2nd time to accept the quest, you will see Quest Accepted in your chat log
- Go to Jugner Forest I-6 on the edge of the lake to find Tiger Tracks.
- When ready click on the tracks and say yes to begin the fight.
- A Greater Tiger will spawn, no level cap and trust can be used. *roughly 500 hp*
- Once you kill the tiger click once more on the tracks to receive "a hide of the greater tiger."
- Return to Alutanie at D-8 for your reward.
|
| A Matter of Trust (San d'Oria) 🔗
|
Requirements
|
| Fame:
|
File:San d'Oria Flag.jpg San d'Oria: 1
|
Level Restriction:
|
10
|
|
| NPC:
|
Keenajaques, Port San d'Oria (G-8)
|
| Repeatable:
|
Yes
|
Type Restriction:
|
CW Only
|
Reward
|
| Previous Quest:
|
None
|
Next Quest:
|
A Matter of Trust II (San d'Oria)
|
|
| Walkthrough
|
- Talk to Keenajaques in Port San d'Oria at G-8 (Inside the Rusty Anchor)
- Prepare to fight a Crystal Weapon in a Level Synced 10 fight. Crystal Weapon has about 265 HP.
- Inspect the Crystal Anomaly at La Theine Plateau at L-8/L-9, at the cermet structure behind the Crag of Holla. Select the dialogue option to begin the fight.
- After defeating the Crystal Weapon, inspect the Crystal Anomaly again for a cutscene.
- Return to Keenajaques to receive your first trust slot and Trust: Curilla.
|
| A Matter of Trust II (San d'Oria) 🔗
|
Requirements
|
| Fame:
|
File:San d'Oria Flag.jpg San d'Oria: 1
|
Level Restriction:
|
25+
|
|
| NPC:
|
Keenajaques, Port San d'Oria (G-8)
|
| Repeatable:
|
Yes
|
Type Restriction:
|
CW Only
|
Reward
|
| Previous Quest:
|
A Matter of Trust (San d'Oria)
|
Next Quest:
|
A Matter of Trust III (San d'Oria)
|
|
| Walkthrough
|
- Talk to Keenajaques in Port San d'Oria at G-8
- Enter Ordelle's Caves from La Theine Plateau F-7 and travel to I-3 on the first map to find Vertiumaix.
- When ready and with your trust out speak with Vertumaix to summon a goblin named Snoring Somatix. *He has roughly 400HP*
- After defeating Somatix talk to Vertiumaix again.
- She will tell you to interact with the glowing spot in front of her to get a "piece of bedrock."
- Return to Keenajaques and speak with him to hand in the bedrock to finish the quest.
|
| A Matter of Trust III (San d'Oria) 🔗
|
Requirements
|
| Fame:
|
File:San d'Oria Flag.jpg San d'Oria: 1
|
Level Restriction:
|
40+
|
|
| NPC:
|
Keenajaques, Port San d'Oria (G-8)
|
| Repeatable:
|
No
|
Type Restriction:
|
CW Only
|
Reward
|
| Previous Quest:
|
A Matter of Trust II (San d'Oria)
|
Next Quest:
|
None
|
|
| Walkthrough
|
- Speak with Keenajaques again and he will ask that you acquire File:Sunsand icon.png Sunsand x1 from Valkurm Dunes.
- Inspect the boat at H-9 during earth weather to get the sunsand.
- Trade the sunsand to Keenajaques, and he will ask you to go to Davoi.
- Inspect the Rendezvous Point on the top of the cliff at H-9. This will spawn two bat trio NM's which must be defeated in a level 40 sync'd fight.
- The path up to the point is highly dangerous. A significant number of level 45-49 orcs spawn around the rendezvous point, which should be killed before starting the battle. Consider bringing enough friends to make an alliance -- the quest can be completed in one go by an alliance, as everyone gets credit.
- One possible strategy is to start at the bridge at I-10 and clear orcs up to the rendezvous point one or two at a time.
- Once the bats are defeated, inspect the point again to start a brief cutscene.
- Return to Keenajaques for your rewards.
|
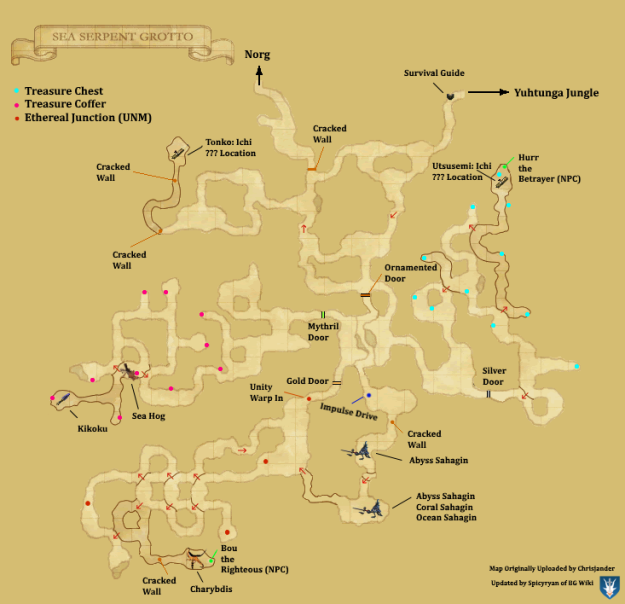
| Chasing the Light 🔗
|
Requirements
|
| Fame:
|
File:San d'Oria Flag.jpg San d'Oria: 1
|
Level Restriction:
|
75
|
|
| NPC:
|
Megasolus, North San d'Oria (M-8)
|
| Repeatable:
|
No
|
Type Restriction:
|
None
|
Reward
|
| Previous Quest:
|
None
|
Next Quest:
|
None
|
|
| Walkthrough
|
- Speak to Megasolus in the cathedral basement of Northern San d'Oria (M-8).
- Travel to Sea Serpent Grotto, and past the Gold Door at (I-14), Map 1.
- Proceed to Charybdis' room at (H-11), Map 4 and investigate the Thief's Trail.
- Talk once more to Megasolus.
- Visit Misareaux Coast and use the Vortex at (G-5).
- Investigate the Thief's Trail next to Dremi at (H-10).
- Examine the Crystal Casting at (I-10) to spawn the Eschan Gorger.
- Return to Megasolus after defeating the Eschan Gorger for your reward.
|
Bastok
| A Crystal Prelude 🔗
|
Requirements
|
| Fame:
|
File:Bastok-Flag.jpg Bastok: 1
|
Level Restriction:
|
None
|
|
| NPC:
|
Iron Wolf, Dangruf Wadi (G-8)
|
| Repeatable:
|
No
|
Type Restriction:
|
CW Only
|
Reward
|
| Previous Quest:
|
None
|
Next Quest:
|
None
|
|
| Walkthrough
|
|
Walkthrough information needed! Be the first!
|
| Running Rings Around 🔗
|
Requirements
|
| Fame:
|
File:Bastok-Flag.jpg Bastok: 1
|
Level Restriction:
|
None
|
|
| NPC:
|
Verona, Bastok Markets (K-9)
|
| Repeatable:
|
No
|
Type Restriction:
|
CW Only
|
Reward
|
| Previous Quest:
|
None
|
Next Quest:
|
None
|
|
| Walkthrough
|
|
Talk to Julberg west in Carmelide's Jewelry store @ (I-8) > Then return to Verona,
do this back and forth multiple times until you get the ring
|
| Birdsearch 🔗
|
Requirements
|
| Fame:
|
File:Bastok-Flag.jpg Bastok: 1
|
Level Restriction:
|
5+
|
|
| NPC:
|
Neavias, Bastok Markets (H-9)
|
| Repeatable:
|
Yes
|
Type Restriction:
|
CW Only
|
Reward
|
| Previous Quest:
|
None
|
Next Quest:
|
None
|
- 400 Gil
|
| Walkthrough
|
|
After talking to Neavias he requests 4 bird feathers. Trade him 4 for 400g.
|
| Mining My Business 🔗
|
Requirements
|
| Fame:
|
File:Bastok-Flag.jpg Bastok: 1
|
Level Restriction:
|
5+
|
|
| NPC:
|
Iron Digger, Zeruhn Mines (J-9)
|
| Repeatable:
|
No
|
Type Restriction:
|
CW Only
|
Reward
|
| Previous Quest:
|
None
|
Next Quest:
|
None
|
|
| Walkthrough
|
|
|
| Buzz Off 🔗
|
Requirements
|
| Fame:
|
File:Bastok-Flag.jpg Bastok: 1
|
Level Restriction:
|
5+
|
|
| NPC:
|
Sinister Moon, Bastok Mines (K-6)
|
| Repeatable:
|
Yes
|
Type Restriction:
|
CW Only
|
Reward
|
| Previous Quest:
|
None
|
Next Quest:
|
Buzz Kill
|
|
| Walkthrough
|
|
|
| Buzz Kill 🔗
|
Requirements
|
| Fame:
|
File:Bastok-Flag.jpg Bastok: 1
|
Level Restriction:
|
10+
|
|
| NPC:
|
Sinister Moon, Bastok Mines (K-6)
|
| Repeatable:
|
Yes
|
Type Restriction:
|
CW Only
|
Reward
|
| Previous Quest:
|
Buzz Off
|
Next Quest:
|
None
|
|
| Walkthrough
|
|
Sinister Moon will tell you to find a Horrid Hornet up on Vomp Hill by looking for a Sickly Sap.
- Go onto Vomp Hill 3rd floor (of 4) in South Gustaberg.
- Go to (I-8) and find a sparkling Sickly Sap at the bottom of a tree.
- Interacting with it will cap you to level 10 and spawn the NM Horrid Hornet.
- Can at least use Pollen.
- Has around 175 HP.
- Can be easily soloed as skilled-up & equipped MNK/WAR without Hundred Fists.
- After the battle interact with the Sickly Sap again.
- Go back to Sinister Moon and get your reward.
|
| A Little Courage 🔗
|
Requirements
|
| Fame:
|
File:Bastok-Flag.jpg Bastok: 1
|
Level Restriction:
|
?
|
|
| NPC:
|
Nangst, Bastok Mines (I-7)
|
| Repeatable:
|
Yes
|
Type Restriction:
|
CW Only
|
Reward
|
| Previous Quest:
|
None
|
Next Quest:
|
None
|
|
| Walkthrough
|
|
Find the brave Galka lost in the hills of Gustaberg
- Talk to Nangst at Bastok Mines (I-7), on the top floor
- Inspect the Tiny Breadcrum at South Gustaberg (H-9), at the bottom of the south ramp to Vomp Hill
- Inspect the Tiny Breadcrum at South Gustaberg (J-8), at the bottom of the ramp to the next level
- Inspect the Tiny Breadcrum at South Gustaberg (8-8), at the top of the hill which will spawn a quadav NM.
- Defeat the Duadav Dougher in an uncapped fight. It has less than 180hp.
- Inspect the Tiny Breadcrum again
|
| Chasing Tails 🔗
|
Requirements
|
| Fame:
|
File:Bastok-Flag.jpg Bastok: 1
|
Level Restriction:
|
7+
|
|
| NPC:
|
Shining Stone, Bastok Mines (K-7)
|
| Repeatable:
|
Yes
|
Type Restriction:
|
CW Only
|
Reward
|
| Previous Quest:
|
None
|
Next Quest:
|
None
|
- 600 Gil
|
| Walkthrough
|
- The Galkachemist asks you to bring him File:Lizard Tail icon.png Lizard Tail x12.
- This quest is repeatable and he will keep track of the number of tails brought.
|
| That's All Folks 🔗
|
Requirements
|
| Fame:
|
File:Bastok-Flag.jpg Bastok: 1
|
Level Restriction:
|
10+
|
Investigate and Defeat the Gustaberg Hare!
|
| NPC:
|
Conchata-Potata, Port Bastok (E-6)
|
| Repeatable:
|
No
|
Type Restriction:
|
CW Only
|
Reward
|
| Previous Quest:
|
None
|
Next Quest:
|
In a Bucket
|
- 1500 Gil
|
| Walkthrough
|
|
Head to (D-8) The Fumaroles and examine the Hare Tracks. A Gustaberg Hare will spawn(Appx 100-120hp). Return to Conchata for your reward.
|
| In a Bucket 🔗
|
Requirements
|
| Fame:
|
File:Bastok-Flag.jpg Bastok: 1
|
Level Restriction:
|
12+
|
|
| NPC:
|
Conchata-Potata, Port Bastok (E-6)
|
| Repeatable:
|
Yes
|
Type Restriction:
|
CW Only
|
Reward
|
| Previous Quest:
|
That's All Folks
|
Next Quest:
|
None
|
- 1800 Gil
|
| Walkthrough
|
|
Conchata-Potata will pay you * 1800 Gil for every three Crab Shell you deliver to him. He keeps track of the total amount delivered.
|
| Wanting Ore 🔗
|
Requirements
|
| Fame:
|
File:Bastok-Flag.jpg Bastok: 1
|
Level Restriction:
|
20+
|
|
| NPC:
|
Ferredec, Metalworks (F-9)
|
| Repeatable:
|
Yes
|
Type Restriction:
|
CW Only
|
Reward
|
| Previous Quest:
|
None
|
Next Quest:
|
Wanting Ore 2?
|
|
| Walkthrough
|
- Speak with Ferredec twice (inside the Blacksmith's Guild - 1st floor) and select "Let's get wet" to accept the quest
- Travel to (I-7) in Pashhow Marshlands to find a 'Soft Spot' near the pond's edge.
- Touch the spot to spawn Swamp Scylla, an NM crab with high defense and typical crab abilities.
- After defeating Swamp Scylla, touch the spot again to receive chunks of swamp ore.
|
| Wanting Ore 2? 🔗
|
Requirements
|
| Fame:
|
File:Bastok-Flag.jpg Bastok: 1
|
Level Restriction:
|
20+
|
|
| NPC:
|
Ferredec, Metalworks (F-9)
|
| Repeatable:
|
No
|
Type Restriction:
|
CW Only
|
Reward
|
| Previous Quest:
|
Wanting Ore
|
Next Quest:
|
None
|
|
| Walkthrough
|
|
|
| A Matter of Trust (Bastok) 🔗
|
Requirements
|
| Fame:
|
File:Bastok-Flag.jpg Bastok: 1
|
Level Restriction:
|
10
|
|
| NPC:
|
Reisle, Bastok Markets (H-5)
|
| Repeatable:
|
No
|
Type Restriction:
|
CW Only
|
Reward
|
| Previous Quest:
|
None
|
Next Quest:
|
A Matter of Trust II (Bastok)
|
|
| Walkthrough
|
- Talk to Reisle to start the quest. He will ask you to help him in Konschtat Highlands.
- Examine the Crystal Anomaly on the side of the cermet structure at the South-East corner of K-5 & L-6, behind the mesa, to spawn a Crystal Weapon NM.
- There is a normal poltergeist weapon not far from the spot, so be careful if using magic.
- Examine the spot again after winning to start a short cutscene.
- Return to Reisle in Bastok to finish the quest.
|
| A Matter of Trust II (Bastok) 🔗
|
Requirements
|
| Fame:
|
File:Bastok-Flag.jpg Bastok: 1
|
Level Restriction:
|
25+
|
|
| NPC:
|
Reisle, Bastok Markets (H-5)
|
| Repeatable:
|
No
|
Type Restriction:
|
CW Only
|
Reward
|
| Previous Quest:
|
A Matter of Trust (Bastok)
|
Next Quest:
|
A Matter of Trust III (Bastok)
|
|
| Walkthrough
|
|
Travel to Gusgen Mines and inspect the Upturned Minecart at J-7 to spawn skeleton NM Fear Apparition. After defeating the NM, inspect the cart again and return to Reisle.
|
| A Matter of Trust III (Bastok) 🔗
|
Requirements
|
| Fame:
|
File:Bastok-Flag.jpg Bastok: 1
|
Level Restriction:
|
40+
|
|
| NPC:
|
Reisle, Bastok Markets (H-5)
|
| Repeatable:
|
No
|
Type Restriction:
|
CW Only
|
Reward
|
| Previous Quest:
|
A Matter of Trust II (Bastok)
|
Next Quest:
|
None
|
|
| Walkthrough
|
- Talk with Reisle again, and he will ask you to retrieve a File:Dangruf Stone icon.png Dangruf Stone x1 for him.
- After trading him the stone, he asks you to investigate a guard house in Beadeaux. The guard house is located on the upper level at E-7.
- Inspecting the Guard House will spawn two quadav NM's in a level 40 sync'd fight. You cannot use trusts for this fight. Bring a lot of friends.
- After the fight Reisle will appear in another mini-cutscene. Return to him one last time in Bastok to receive your rewards.
|
| Runic Insurrection 🔗
|
Requirements
|
| Fame:
|
File:Bastok-Flag.jpg Bastok: 1
|
Level Restriction:
|
None
|
Level 75 Job.
|
| NPC:
|
Octavien, Bastok Markets (F-10)
|
| Repeatable:
|
No
|
Type Restriction:
|
CW Only
|
Reward
|
| Previous Quest:
|
None
|
Next Quest:
|
None
|
|
| Walkthrough
|
- Speak to Octavien Bastok Markets (F-10) [above Dragon's Claws] as 75 job.
- Instructs you to visit Hetfield in Chateau d'Orguille (H-9) inside Prince Regent's Room.
- Speaking with Hetfield, instructs you to travel to Carpenter's Landing to fetch fireflowers [North Sandy Entrance -> Carpenter's Landing (H-7)].
- Checking Fireflowers spawns a sandworm named Diabolos Minion NM. Uncapped fight that will not desummon Trusts.
- Return to Hetfield after defeating Diabolos Minion. You'll be sent to Fort Karugo-Narugo to find the sun gate (J-8) outside.
- Checking the Sun Gate will spawn Diabolos Zealot. Uncapped fight that will not desummon Trusts. After defeating Diabolos Zealot check the Sun Gate again, you'll receive the message:"You should report your findings back to Hetfield in Chateau d'Oraguille."
- Return and speak with Hetfield. Upon interacting with the door to leave the Prince Regent's Room you'll obtain a Scroll of Foil and Job gesture: rune fencer.
|
Windurst
| A Crystal Prelude (Windurst) 🔗
|
Requirements
|
| Fame:
|
File:Windurst-Flag.jpg Windurst: 1
|
Level Restriction:
|
None
|
|
| NPC:
|
Erudu-Faludu, Toraimarai Canal (H-8)
|
| Repeatable:
|
No
|
Type Restriction:
|
CW Only
|
Reward
|
| Previous Quest:
|
None
|
Next Quest:
|
None
|
|
| Walkthrough
|
- Talk to Erudu-Faludu to start the quest. Crystal Warrior quests seem to parse without locking movement, so it may seem like nothing has happened when talking to them.
- He will give you a File:Sickle icon.png Sickle to use on (trade to) the Dangling Roots in the room to the west, through the marble door.
- It is easily visible and targetable on your left.
- Trade the File:Revival Root icon.png Revival Tree Root back to Erudu-Faludu to get your job-specific starting weapon.
- Talk to Erudu-Faludu again afterward to agree to help with a book.
- Check the books around the room, and you will eventually spawn a Dusty Tome to fight.
- Defeat it, talk to Erudu-Faludu, and he will warp you out into East Sarutabaruta with an File:Adventurer Cpn. icon.png Adventurer Coupon to trade.
|
| Give Me a Ring 🔗
|
Requirements
|
| Fame:
|
File:Windurst-Flag.jpg Windurst: 1
|
Level Restriction:
|
None
|
|
| NPC:
|
Moyeyo, Windurst Woods (K-11)
|
| Repeatable:
|
No
|
Type Restriction:
|
CW Only
|
Reward
|
| Previous Quest:
|
None
|
Next Quest:
|
None
|
|
| Walkthrough
|
- Talk to Moyeyo to start the quest. Again, text will parse without locking movement.
- Travel to Windurst Walls and examine the Dim Sparkle at (I-4).
- Down the ramp, near the water by the House of Heroes.
- Return to Moyeyo and talk to them again.
- She will send you over to Abu Dabudabu at (H-9), near the Homepoint crystal.
|
| Only the Dose 🔗
|
Requirements
|
| Fame:
|
File:Windurst-Flag.jpg Windurst: 1
|
Level Restriction:
|
None
|
|
| NPC:
|
Perah Celehsi, Windurst Woods (J-8)
|
| Repeatable:
|
Yes
|
Type Restriction:
|
CW Only
|
Reward
|
| Previous Quest:
|
None
|
Next Quest:
|
None
|
- 300 Gil
|
| Walkthrough
|
|
|
| Rustling Feathers 🔗
|
Requirements
|
| Fame:
|
File:Windurst-Flag.jpg Windurst: 1
|
Level Restriction:
|
5+
|
|
| NPC:
|
Puluki-Culuki, Port Windurst (B-4)
|
| Repeatable:
|
Yes
|
Type Restriction:
|
CW Only
|
Reward
|
| Previous Quest:
|
None
|
Next Quest:
|
None
|
- 400 Gil
|
| Walkthrough
|
|
|
| Down to Earth 🔗
|
Requirements
|
| Fame:
|
File:Windurst-Flag.jpg Windurst: 1
|
Level Restriction:
|
10+
|
|
| NPC:
|
Hermin-Harmon, Windurst Waters (F-7)
|
| Repeatable:
|
Yes
|
Type Restriction:
|
CW Only
|
Reward
|
| Previous Quest:
|
None
|
Next Quest:
|
None
|
|
| Walkthrough
|
- Talk to Hermin-Harmon on the western roof of the Optistery.
- Trade him a Meteorite obtained from killing Crawlers on Starfall Hillock.
- He will extract the metal from the meteorite and give it to you, completing the quest.
|
| Say Peas 🔗
|
Requirements
|
| Fame:
|
File:Windurst-Flag.jpg Windurst: 1
|
Level Restriction:
|
5+
|
|
| NPC:
|
Perara, Windurst Waters (E-9 (North))
|
| Repeatable:
|
Yes
|
Type Restriction:
|
CW Only
|
Reward
|
| Previous Quest:
|
None
|
Next Quest:
|
Get Cracking
|
|
| Walkthrough
|
|
|
| Get Cracking 🔗
|
Requirements
|
| Fame:
|
File:Windurst-Flag.jpg Windurst: 1
|
Level Restriction:
|
10+
|
|
| NPC:
|
Perara, Windurst Waters (E-9 (North))
|
| Repeatable:
|
Yes
|
Type Restriction:
|
CW Only
|
Reward
|
| Previous Quest:
|
Say Peas
|
Next Quest:
|
None
|
|
| Walkthrough
|
- Travel to H-8 in West Sarutabaruta and investigate the fallen nest under the tree.
- This will sync the party level to 10 and spawn a level 10 Angry Bird.
- Defeat the upset avian and investigate the nest again to retrieve the eggs, and return them to Perara.
|
| Fowl Tales 🔗
|
Requirements
|
| Fame:
|
File:Windurst-Flag.jpg Windurst: 1
|
Level Restriction:
|
?
|
|
| NPC:
|
Hoi-Boi, Windurst Walls (E-7)
|
| Repeatable:
|
Yes
|
Type Restriction:
|
CW Only
|
Reward
|
| Previous Quest:
|
None
|
Next Quest:
|
None
|
|
| Walkthrough
|
|
Help three Tarutaru brothers return their uncle's gold
- Talk to Hoi-Boi at Windurst Walls (E-7), on top of Koru-Moru's Manor
- Talk to Doi-Boi at Windurst Waters (K-4), behind the Acolyste Hotel
- Talk to Loi-Boi at Windurst Woods (G-9), in the tall grass in front of the Manustery
- Inspect with the Buried Treasure at Giddeus (F-4) which will spawn a yagudo NM.
- Defeat the Yagudo Pilferer NM in an uncapped fight. It has less than 180hp.
- Inspect the Buried Treasure to obtain a sack of gold coin
- Return to Hoi-Boi
|
| Neck and Neck 🔗
|
Requirements
|
| Fame:
|
File:Windurst-Flag.jpg Windurst: 1
|
Level Restriction:
|
10+
|
|
| NPC:
|
Erbelie, Windurst Woods (G-8)
|
| Repeatable:
|
No
|
Type Restriction:
|
CW Only
|
Reward
|
| Previous Quest:
|
None
|
Next Quest:
|
Neck and Neck II
|
- 1500 Gil
|
| Walkthrough
|
- Talk to Erbelie as she ponders dhalmels, and agree to help her find some evidence of the animals roaming northern Sarutabaruta before the Great War.
- Travel to I-4/5 in West Sarutabaruta where you'll find Dhalmel Bones next to a tree.
- This will spawn Ghost Dhalmel
- Return to Erbelie for reward
|
| Neck and Neck II 🔗
|
Requirements
|
| Fame:
|
File:Windurst-Flag.jpg Windurst: 1
|
Level Restriction:
|
12+
|
|
| NPC:
|
Erbelie, Windurst Woods (G-8)
|
| Repeatable:
|
Yes
|
Type Restriction:
|
CW Only
|
Reward
|
| Previous Quest:
|
Neck and Neck
|
Next Quest:
|
None
|
- 600 Gil
|
| Walkthrough
|
- Erbelie: A dhalmel's favorite treat is papaka grass. Collect three springs and I'll pay.
|
| Feather Forecast 🔗
|
Requirements
|
| Fame:
|
File:Windurst-Flag.jpg Windurst: 1
|
Level Restriction:
|
20+
|
|
| NPC:
|
Pennana, Windurst Woods (G-12)
|
| Repeatable:
|
Yes
|
Type Restriction:
|
CW Only
|
Reward
|
| Previous Quest:
|
None
|
Next Quest:
|
None
|
|
| Walkthrough
|
- Speak with Pennana and agree to help her. She will mention that there is a bird with fabulous feathers due in Meriphataud Mountains.
- "Look for something shiny to lure outaru the bird-wirdy."
- Travel to G-10 in Meriphataud Mountains and inspect the Shiny Rock. Because you are, in fact, a bird, you must not only take the shiny object, but also fight a Shrill Jubub for it.
- Inspect the rock again after the fight, and return to Pennana with it.
|
| A Matter of Trust (Windurst) 🔗
|
Requirements
|
| Fame:
|
File:Windurst-Flag.jpg Windurst: 1
|
Level Restriction:
|
10
|
|
| NPC:
|
Sharara, Windurst Walls (K-6)
|
| Repeatable:
|
Yes
|
Type Restriction:
|
CW Only
|
Reward
|
| Previous Quest:
|
None
|
Next Quest:
|
A Matter of Trust II (Windurst)
|
|
| Walkthrough
|
- Talk to Sharara near the Jeuno consulate.
- Travel to the Crag of Mea in Tahrongi Canyon, and investigate the Crystal Anomaly on the north side of the crag, in I-5. This will spawn a Crystal Weapon NM, which must be defeated.
- Investigate the Anomaly again to get a cutscene.
- Return to Sharara to complete the quest.
|
| A Matter of Trust II (Windurst) 🔗
|
Requirements
|
| Fame:
|
File:Windurst-Flag.jpg Windurst: 1
|
Level Restriction:
|
25+
|
|
| NPC:
|
Sharara, Windurst Walls (K-6)
|
| Repeatable:
|
Yes
|
Type Restriction:
|
CW Only
|
Reward
|
| Previous Quest:
|
A Matter of Trust (Windurst)
|
Next Quest:
|
A Matter of Trust III (Windurst)
|
|
| Walkthrough
|
- Speak with Sharara again and agree to help. You will be sent to the Maze of Shakhrami to collect readings from some strange emanations.
- Inspect the Odd Emanation at F-8 on Map 1, and defend yourself from the source of the emanation.
- Once the NM is defeated, inspect the point again to collect the readings.
- Return to Sharara.
|
| A Matter of Trust III (Windurst) 🔗
|
Requirements
|
| Fame:
|
File:Windurst-Flag.jpg Windurst: 1
|
Level Restriction:
|
40+
|
|
| NPC:
|
Sharara, Windurst Walls (K-6)
|
| Repeatable:
|
No
|
Type Restriction:
|
CW Only
|
Reward
|
| Previous Quest:
|
A Matter of Trust II (Windurst)
|
Next Quest:
|
None
|
|
| Walkthrough
|
- Talk to Sharara again and agree to help.
- Collect and bring a File:Starfall Tear icon.png Starfall Tear from the Twinkle Tree in West Sarutabaruta.
- Sharara will then want to travel to Castle Oztroja basement.
- Prepare for a group fight at sync level 40. Gear appropriately and be properly skilled. 6-man fight suggested.
- In castle Oztroja, travel to I-8 and open the false lever to fall down.
- Inside the cavern, interact with the lid (no name) on the floor to fall down to the basement.
- Clear the basement of yagudo and bat spawns, optionally build more TP outside the tunnel.
- Interact with the Low Point to spawn 2 NM Yagudo, Yagudo Sage (Job Unknown) and Yagudo Koga (NIN).
- After the NMs are defeated, interact with the Low Point again for a final cutscene.
- Return to Sharara for your rewards.
|
| The Unamed Way 🔗
|
Requirements
|
| Fame:
|
File:Windurst-Flag.jpg Windurst: 1
|
Level Restriction:
|
None
|
Level 75 job.
|
| NPC:
|
Master Lao, Windurst Waters (South) (K-8)
|
| Repeatable:
|
Yes
|
Type Restriction:
|
None
|
Reward
|
| Previous Quest:
|
None
|
Next Quest:
|
None
|
|
| Walkthrough
|
- Speak with Master Lao on a 75 job in Windurst Waters (K-8 HP#3) south map, located at the end of the dock behind the Rhinostery.
- "Listen to the sound..." to spawn and defeat elemental NMs in Uncapped fights in the following order:
- Investigate Scorched Earth of Ifrits Cauldron (G-9) Lindwurm Map, at the lava pit.
- Spawn and defeat Baelfyr [resistant to Silence].
- Dry crumbled earth of Western Altepa (E-9) north of the Oasis of Hubol.
- Investigate Frozen earth of Uleguerand (D-8)(E-8) border.
- Spawn and defeat Gefyrst [resistant to Silence and Paralyze].
- Investigate Scattered Earth of Cape Terrigan (G-6) NW corner of wall before climbing towards the tunnel.
- Spawn and defeat Ungeweder.
- Can open with Sleep II.
- Return to Master Lao
- Rewarded with Matre Bell, Plate of Indi-Poison & Job gesture: geomancer
|
Jeuno
| Leg Day 🔗
|
Requirements
|
| Fame:
|
File:Jeuno-Flag.jpg Jeuno: 1
|
Level Restriction:
|
15+
|
|
| NPC:
|
Pedro, Port Jeuno (G-8)
|
| Repeatable:
|
No
|
Type Restriction:
|
CW Only
|
Reward
|
| Previous Quest:
|
None
|
Next Quest:
|
Leg Day II
|
- 800 Gil
|
| Walkthrough
|
- Talk to Pedro and accept becoming his research assistant.
- He asks you to collect a soil sample from the river bank in Davoi.
- The River Bank can be found at J-11.
|
| Leg Day II 🔗
|
Requirements
|
| Fame:
|
File:Jeuno-Flag.jpg Jeuno: 1
|
Level Restriction:
|
20+
|
|
| NPC:
|
Pedro, Port Jeuno (G-8)
|
| Repeatable:
|
No
|
Type Restriction:
|
CW Only
|
Reward
|
| Previous Quest:
|
Leg Day
|
Next Quest:
|
Leg Day III
|
- 1,600 Gil
|
| Walkthrough
|
- This time Pedro sends you to Beadeaux.
- The Beadeaux Sludge can be found at G-7.
|
| Leg Day III 🔗
|
Requirements
|
| Fame:
|
File:Jeuno-Flag.jpg Jeuno: 1
|
Level Restriction:
|
25+
|
|
| NPC:
|
Pedro, Port Jeuno (G-8)
|
| Repeatable:
|
No
|
Type Restriction:
|
CW Only
|
Reward
|
| Previous Quest:
|
Leg Day II
|
Next Quest:
|
None
|
- 2,400 Gil
|
| Walkthrough
|
- As expected Pedro will ask for a sample from Castle Oztroja.
- The Gravel Sample can be found at I-8 on map #5.
- Same room as Quu Domi the Gallant(NM)
|
| Leg Work 🔗
|
Requirements
|
| Fame:
|
File:Jeuno-Flag.jpg Jeuno: 1
|
Level Restriction:
|
35+
|
|
| NPC:
|
Pedro, Port Jeuno (G-8)
|
| Repeatable:
|
Yes
|
Type Restriction:
|
CW Only
|
Reward
|
| Previous Quest:
|
Leg Day III
|
Next Quest:
|
Leg Work II
|
|
| Walkthrough
|
- Next, Pedro sends you to Qufim Island.
- Locate the Qufim Source at G-6, and defeat the doll that is attracted when you place the device.
|
| Leg Work II 🔗
|
Requirements
|
| Fame:
|
File:Jeuno-Flag.jpg Jeuno: 1
|
Level Restriction:
|
35+
|
|
| NPC:
|
Pedro, Port Jeuno (G-8)
|
| Repeatable:
|
Yes
|
Type Restriction:
|
CW Only
|
Reward
|
| Previous Quest:
|
Leg Work
|
Next Quest:
|
None
|
|
| Walkthrough
|
- Qufim itself is not good enough, so into the tower you go.
- Enter Delkfutt's Tower and take the first left, then go up the stairs.
- Go to E-8 on map #2 and click the Delkfutt's Source
- Defeat the pot it summons.
- Return to Pedro
|
| Decrypting Antiquity 🔗
|
Requirements
|
| Fame:
|
File:Jeuno-Flag.jpg Jeuno: 1
|
Level Restriction:
|
45+
|
|
| NPC:
|
Lectilas, Upper Jeuno (F-7)
|
| Repeatable:
|
No
|
Type Restriction:
|
CW Only
|
Reward
|
| Previous Quest:
|
None
|
Next Quest:
|
None
|
- 3,000 Gil
|
| Walkthrough
|
- Talk to Lectilas and agree to help him.
- Acquire a
 Parchment and copy an inscription in The Eldieme Necropolis. Parchment and copy an inscription in The Eldieme Necropolis.
- Travel to the main entrance of the necropolis at I-10 in Batallia Downs.
- Enter the Necropolis and trade the parchment to the Ancient Text at J-8.
- Return to Lectilas.
|
| Decrypting Antiquity II 🔗
|
Requirements
|
| Fame:
|
File:Jeuno-Flag.jpg Jeuno: 1
|
Level Restriction:
|
50+
|
|
| NPC:
|
Lectilas, Upper Jeuno (F-7)
|
| Repeatable:
|
Yes
|
Type Restriction:
|
CW Only
|
Reward
|
| Previous Quest:
|
Decrypting Antiquity
|
Next Quest:
|
None
|
|
| Walkthrough
|
- Delve into The Eldieme Necropolis again and collect an File:Ancient Papyrus icon.png Ancient Papyrus x1.
- Trade it to Lectilas to receive a random mage's scroll.
- Keeping any scrolls in the Ephemeral Box/Gramateus, or your inventory, will prevent Lectilas from giving you that same scroll again.
|
| Harboring Fugitives 🔗
|
Requirements
|
| Fame:
|
File:Jeuno-Flag.jpg Jeuno: 1
|
Level Restriction:
|
50+
|
|
| NPC:
|
Agent M97, Lower Jeuno (J-7)
|
| Repeatable:
|
Yes
|
Type Restriction:
|
CW Only
|
Reward
|
| Previous Quest:
|
None
|
Next Quest:
|
None
|
- Artifact armor quest materials of associated job
|
| Walkthrough
|
- This quest is repeatable Daily (JP midnight).
- Talk to Agent M97, and he will ask you to find Dafoe in Castle Zvahl Baileys.
- Dafoe is located in Zvahl Baileys (E-8) at the Castle Zvahl Keep zoneline.
- Inspecting Dafoe will spawn a Level Capped 50 Quadav Excision M-72, removing Buffs and Trusts.
- After killing Excision M-72, inspect Dafoe one more time, then return to Agent M-97 on the Job you want Artifact Armor Quest materials for and talk to him twice.
- Answer Yes to a vow of silence and inspect the Treasure Coffer.
- You should receive the artifact armor quest materials and/or a Dragon Chronicles.
|
| Daddy Issues 🔗
|
Requirements
|
| Fame:
|
File:Jeuno-Flag.jpg Jeuno: 1
|
Level Restriction:
|
DANCER 66+
|
Dancer Main Job lvl66+
|
| NPC:
|
Brittany, Upper Jeuno (G-7)
|
| Repeatable:
|
Yes
|
Type Restriction:
|
None
|
Reward
|
| Previous Quest:
|
The Road to Divadom
|
Next Quest:
|
None
|
Level cap increased to 75
|
| Walkthrough
|
- Interact with Brittany in Upper Jeuno, and she will request that you trade her a Dancer's Testimony.
- Trade her a Dancer's Testimony and she'll tell you a story.
- Travel to Jugner Forest (S) K-9 and speak to Mindy. She may appear on the wide scan as Coyote coffer.
- She will eventually ask if you are ready, and when you are you will be drawn into a fight with a Molboro NM named Daddy.
- Speak to her again after the fight.
- Speak to Brittany again in Upper Jeuno G-7 for your reward; Level Cap Will be brought to 75.
|
| Empty Handed 🔗
|
Requirements
|
| Fame:
|
File:Jeuno-Flag.jpg Jeuno: 1
|
Level Restriction:
|
25+
|
|
| NPC:
|
Faded Footprint, Ru'Lude Gardens (H-7)
|
| Repeatable:
|
No
|
Type Restriction:
|
CW Only
|
Reward
|
| Previous Quest:
|
None
|
Next Quest:
|
None
|
|
| Walkthrough
|
- Visit each Promyvion zone in the order given (Holla, Dem, Mea)
- Examine the echo in each zone
- Holla at H-6, SW corner, first floor
- Dem at K-12, behind the tree, first floor
- Mea at F-4, first floor
- Defeat the NM which spawns
- Holla, a thinker named Dwelling Memory
- Dem, a gorger named Bursting Memory
- Mea, a craver named Piercing Memory
- Examine the echo again
Restoring the Artifacts: Cassus will ask you to bring them to Steel Teeth who is at the Smithing Guild in Mhaura.
Steel Teeth will restore each artifact in exchange for the following materials:
Total: 4 File:Fleeting Memory icon.png Fleeting Memory, 4 File:Malevolent Mem. icon.png Malevolent Memory, 2 of everything else
|
Aht Urghan
| Insult to Gingery 🔗
|
Requirements
|
| Fame:
|
Aht Urghan: 1
|
Level Restriction:
|
40+
|
|
| NPC:
|
Gordo-Bordo, Aht Urhgan Whitegate (I-10)
|
| Repeatable:
|
Yes
|
Type Restriction:
|
CW Only
|
Reward
|
| Previous Quest:
|
None
|
Next Quest:
|
None
|
|
| Walkthrough
|
|
|
| Pecking Battles 🔗
|
Requirements
|
| Fame:
|
Aht Urghan: 1
|
Level Restriction:
|
50+
|
|
| NPC:
|
Vermali, Bhaflau Thickets (I-10)
|
| Repeatable:
|
Yes
|
Type Restriction:
|
CW Only
|
Reward
|
| Previous Quest:
|
None
|
Next Quest:
|
None
|
|
| Walkthrough
|
- Vermali: Please get rid of these birds! Hand over six Cobrili beaks and I'll pay.
- Vermali: Give me enough and you'll earn a special prize! Haha...
- 1800 Gil for the first turn in.
- Turn in 100 beaks to receive the Wivre Mask.
|
| The Purse Strings 🔗
|
Requirements
|
| Fame:
|
Aht Urghan: 1
|
Level Restriction:
|
10+
|
|
| NPC:
|
Carlo, Aht Urghan Whitegate (I-6)
|
| Repeatable:
|
Yes
|
Type Restriction:
|
CW Only
|
Reward
|
| Previous Quest:
|
None
|
Next Quest:
|
None
|
|
| Walkthrough
|
- Must be on Puppetmaster to start, can change jobs after speaking to Carlo.
- Carlo will ask you to go steal some gold from the trolls near the Decorative Bronze Gate in Halvung.
- Enter Halvung from Bhaflau Thickets (F-8) Entrance 2.
- Sneak and invisible will be necessary for the run, both through Bhaflau and Halvung.
- Interact with the Troll Cache near the Decorative Bronze Gate at (L-5) in Halvung to spawn a Troll Treasurer.
- This is a level 10 capped fight, and trusts are lost upon pop.
- The fight is trivial, the Troll Treasurer has around 100~150hp.
- Interact with the Troll Cache again after the fight.
- Return to Carlo for your choice of Automaton Frame items.
- Note: It is just the items, NOT the Imperial Currency.
|
| X Marks the Spot 🔗
|
Requirements
|
| Fame:
|
File:Bastok-Flag.jpg Bastok: 1
|
Level Restriction:
|
COR 75
|
|
| NPC:
|
Captian Farrell, Nashmau ()
|
| Repeatable:
|
Yes
|
Type Restriction:
|
None
|
Reward
|
| Previous Quest:
|
None
|
Next Quest:
|
None
|
|
| Walkthrough
|
- Speak with Captian Farrell in Nashmau as a 75 Corsair to start quest.
- You may change to any other job after starting it.
- Proceed Arrapago Reef and to retrieve a map. Located on Map 2 (G-8).
- The Arrapago Staging Point is is reccomended.
- Return to Captain Farrell and speak with them again.
- Proceed to Talacca Cove and inspect the coffer there to spawn a Lamia NM.
- There is no map for the zone, follow the right path along the water.
- After defeating the NM inspect the coffer again.
- Return to Captain Farrell to obtain the File:Caster's Die icon.png Caster's Die.
- Speak to Captain Farrell as a 75 Corsair once again.
- Once again a job change is fine.
- Take the boat from Mhaura to Al Zahbi.
- Inspect the the artifact at the bow of the boat to spawn a Kraken NM.
- Inspect the artifact again after defeating the NM.
- Return to Captain Farrell to obtain the File:Bolter's Die icon.png Bolter's Die.
|
Other Areas
| The Way of the Wadi 🔗
|
Requirements
|
| Fame:
|
File:Bastok-Flag.jpg/File:San d'Oria Flag.jpg Selbina: 1
|
Level Restriction:
|
None
|
|
| NPC:
|
Passing Sunrise [Galka Footprint], Dangruf Wadi (I-12)
|
| Repeatable:
|
Yes
|
Type Restriction:
|
CW Only
|
Reward
|
| Previous Quest:
|
None
|
Next Quest:
|
None
|
|
| Walkthrough
|
- Interact with the Goblin Footprint (I-12) [SW corner of room] to speak with Passing Sunrise (NPC) to begin quest.
- Sunken Junk (H-11) [NW corner of same room] - Spawns Weary Crab, Examine after defeat for Shattered Sword
- Return to Passing Sunrise, tells you to seek out more pieces.
- Damaged Debris (H-13) [southern tunnel from room] - Spawns Weary Hare, Examine after defeat for haggard hilt.
- Return to Passing Sunrise with hilt. Contine seeking.
- Dusty Rust (J-13) [center of room] - Spawns Weary Worm, Examine after defeat for broken blade.
- Return to Galka Footprint spawns Gobby Grindalox.
- Examine Galka Footprint a second time for Passing Sunrise to give you an Onion Sword to take to Brave Fang in Metalworks.
- Talk to Brave Fang, who can be found in the Darksteel Forge (G-9) of Metalworks to receive your final reward: augmented Degen.
|
| Head First 🔗
|
Requirements
|
| Fame:
|
File:Bastok-Flag.jpg Bastok: 1
|
Level Restriction:
|
10+
|
|
| NPC:
|
Hume Footprint, Konschtat Highlands (L-8)
|
| Repeatable:
|
Yes
|
Type Restriction:
|
CW Only
|
Reward
|
| Previous Quest:
|
None
|
Next Quest:
|
None
|
|
| Walkthrough
|
|
|
| Likely Tails 🔗
|
Requirements
|
| Fame:
|
File:Windurst-Flag.jpg Windurst: 1
|
Level Restriction:
|
10+
|
|
| NPC:
|
Mithra Tracks, Tahrongi Canyon (J-8)
|
| Repeatable:
|
Yes
|
Type Restriction:
|
CW Only
|
Reward
|
| Previous Quest:
|
None
|
Next Quest:
|
None
|
|
| Walkthrough
|
|
|
| Helping Hands 🔗
|
Requirements
|
| Fame:
|
File:Bastok-Flag.jpg/File:San d'Oria Flag.jpg Selbina: 1
|
Level Restriction:
|
15+
|
|
| NPC:
|
Manusiel, Selbina (J-9)
|
| Repeatable:
|
Yes
|
Type Restriction:
|
CW Only
|
Reward
|
| Previous Quest:
|
None
|
Next Quest:
|
None
|
|
| Walkthrough
|
- Talk to Manusiel (inside the Shepherd's Muster), who requests a damselfly worm.
- Note: Trading him the damselfly worm will remove it from your inventory.
- Upon receiving the worm, Manusiel will ask for damselfly eggs.
- These can be found at (G-7) in Valkurm Dunes, in a small nook along the northern wall (behind all the goblins).
- Summon your trust(s) and inspect the eggs to spawn three unique damselflies.
- Kill the flies and inspect the eggs again to gather a sample, then return to Manusiel for your reward.
|
| Rolling With Punches 🔗
|
Requirements
|
| Fame:
|
File:Windurst-Flag.jpg Windurst: 1
|
Level Restriction:
|
20+
|
|
| NPC:
|
Raving Fist, Mhaura (I-9)
|
| Repeatable:
|
Yes
|
Type Restriction:
|
CW Only
|
Reward
|
| Previous Quest:
|
None
|
Next Quest:
|
None
|
|
| Walkthrough
|
- Talk to Raving Fist and he will ask you to bring him a File:Dhalmel Saliva icon.png Dhalmel Saliva.
- Mating Ground I-7, spawns 3 Dhalmels that link with surrounding Dhalmels. Beware of Goblins nearby.
- After defeating the Dhalmels, inspect the Mating Ground, then return to Raving Fist.
|
| Running on the Range 🔗
|
Requirements
|
| Fame:
|
File:San d'Oria Flag.jpg San d'Oria: 1
|
Level Restriction:
|
None
|
|
| NPC:
|
Nefari, East Ronfaure (K-4)
|
| Repeatable:
|
No
|
Type Restriction:
|
CW Only
|
Reward
|
| Previous Quest:
|
None
|
Next Quest:
|
None
|
|
| Walkthrough
|
|
Note: Sneak and Invisible are recommended.
- Speak to Nefari, the NPC just next to the Ranguemont Pass zone line. You will be asked to prove that you are capable in battle by finding the Roasted Remains.
- The Roasted Remains are are in K-5 in the bottom right of the square (in the corner).
- Click the Roasted Remains to spawn The Malignant Worm, a Worm type NM easily killable by a Level 30 with a trust out.Once it has been killed return to Nefari.
- Nefari will now ask you to obtain 5 artifacts in Ranguemont Pass, you need to get them 1 at a time, returning to Nefari with each.
The locations of the artifacts are as follows (and you must follow this order)
- (F-9) = In the top right of the map square, 'Dented Crown' is on the eastern side of the tunnel in the water. Return to Nefari to hand in.
- (J-8) = On the Eastern side of the map, 'Ragged Mitts' are in the pool in the room. Return to Nefari to hand in.
- (J-10) = The 'Ragged Slacks' are in the room south of the previous, again in a pool. Return to Nefari once retrieved to hand in.
- (D-5) = The 'Ragged 'Pumps' are in the north west room on the map. Return to Nefari to hand in.
- (H-6) = The 'Ragged 'Tunic' is in the middle/north room. Return to Nefari to hand in.
Once all artifacts are handed to Nefari, the quest is completed.
Restoring the Arifacts: Nefari will ask you to bring them to Renovio who is at the Weaver's Guild (H-9) in Selbina.
Renovio will restore each artifact however will require the following materials:
Trade the items to Renovio to receive each piece of gear. Enjoy!
|
| Searching the Citadel 🔗
|
Requirements
|
| Fame:
|
File:Windurst-Flag.jpg Windurst: 1
|
Level Restriction:
|
30+
|
|
| NPC:
|
Cramp, Garlaige Citadel (G-8)
|
| Repeatable:
|
No
|
Type Restriction:
|
CW Only
|
Reward
|
| Previous Quest:
|
None
|
Next Quest:
|
None
|
|
| Walkthrough
|
- Talk to Cramp, who is located right behind the first Banishing Gate.
- The Pouch of Weighted Stones can be found at G-8 on map #1.
- She will tell you to slay a raptor NM in Sauromugue Champaign, which can be found at the Creature Tracks at I-9.
- Consider bringing some friends. The thunderbolt breath attack can do upwards of 500 damage to a level 50 Curilla trust.
- Cramp will inform you that the armor pieces you are looking for can be found scattered about the Citadel, in Scrap Piles. She will provide a clue to the next location as you bring her pieces.
- The first is located at I-8 on Map #4.
- The second is located at F-8 on Map #3, right behind Banishing Gate #2.
- The third is located at G-6 on Map #2, right behind Banishing Gate #3.
- The fourth is located at I-7 on Map #2.
- The fifth is located outside in Sauromugue Champaign, through the back entrance, at J-10.
- Return to Cramp. She will determine the relics too tattered for her to repair.
- Travel to Renovio in Selbina, located inside the weaver's guild salesroom.
- He requires some materials to repair the equipment:
|
| Navigating the Nest 🔗
|
Requirements
|
| Fame:
|
File:Bastok-Flag.jpg Bastok: 1
|
Level Restriction:
|
30+
|
|
| NPC:
|
Bella, Crawlers' Nest (J-9)
|
| Repeatable:
|
No
|
Type Restriction:
|
CW Only
|
Reward
|
| Previous Quest:
|
None
|
Next Quest:
|
None
|
|
| Walkthrough
|
- Note: As soon as you talk to Bella, a lizard NM named Larping Larzy will spawn and likely link with several lizards.
- The NM is really easy but the lizards are not.
- After beating the NM, interact with Bella again.
- You'll have to collect the 5 damaged pieces of the set one at a time and bring them back to Bella.
- You'll get a new clue after each turn in.
- Each interaction spot is named after the item.
- First (Buried beret) is north of Bella in the scorpion room, between (I-7) and (J-7). Aggro free with sneak on.
- Second (Buried gloves) is in the first lizard room on the second map under the ledge (I-8).
- You can get to the second map northwest of Bella. Aggro free with sneak on.
- Third (Buried brais) is under the ledge in the beetle room (H-7) north of the lizard room where you got the gloves.
- Beetles aggro on sight so dropping invis here is very risky. Be quick and reapply invis.
- Fourth (Buried boots) is in the soldier crawler room under the ledge (G-7), just southwest of the beetle room. Aggro free with sneak on.
- Fifth (Buried doublet) is outside in Rolanberry Fields through the back of the cave.
- The exit is northeast of the three ledge rooms with the other items.
- The interact is by the lake (D-11).
- Interacting will trigger an NM encounter with Misurgh.
- Extremely easy with a level 50+ in the group, probably a level 30ish NM. Collect the last item.
- Make your way back to Bella with the last item. You can grab sneak/invis from the GoV book if you go back into the cave.
- She'll send you to Renovio in Selbina who can repair your gear if you bring the materials.
- Materials required:
- Beret: 2 File:Chocobo Fthr. icon.png Chocobo Feather, 2 File:Flax Flower icon.png Flax Flower
- Doublet: 3 File:Saruta Cotton icon.png Saruta Cotton, 1 File:Sheep Leather icon.png Sheep Leather
- Gloves: 2 File:Saruta Cotton icon.png Saruta Cotton, 2 File:Flax Flower icon.png Flax Flower
- Brais: 6 File:Flax Flower icon.png Flax Flower
- Gaiters: 2 File:Sheep Leather icon.png Sheep Leather
|
| Negotiating the Necropolis 🔗
|
Requirements
|
| Fame:
|
File:San d'Oria Flag.jpg San d'Oria: 1
|
Level Restriction:
|
30+
|
|
| NPC:
|
Aletta, The Eldieme Necropolis (J-8)
|
| Repeatable:
|
No
|
Type Restriction:
|
CW Only
|
Reward
|
| Previous Quest:
|
None
|
Next Quest:
|
None
|
|
| Walkthrough
|
- Travel to the main entrance of The Eldieme Necropolis, at I-10.
- Talk to Aletta, then go back outside to Batallia Downs to search for her love.
- Investigate the Charred Remains on the coast at J-11. Osu, a bee NM will spawn, which must be defeated. It has about 700hp and the fight is uncapped.
- Check the remains again after winning, then return to Aletta.
- She will request that you collect the pieces of armor scattered across the Necropolis, and provides clues to their locations after bringing each back in succession.
- The first, the damaged sallet, is located in the southeastern brazier room at H-9.
- The second, the damaged gauntlet, is located in the southwestern brazier room at F-9.
- The third, the damaged hose, is located in the northwestern brazier room at F-7.
- The fourth, the damaged greaves, is located in the northeastern brazier room H-7.
- The final piece, the damaged breastplates, is located in the room below the central drop, A, at G-8.
- After returning the last one to Aletta she will send you to Steel Teeth, in the Mhaura blacksmith salesroom, to have them repaired.
|
| All Thine Heart 🔗
|
Requirements
|
| Fame:
|
File:San d'Oria Flag.jpg San d'Oria: 1
|
Level Restriction:
|
40+
|
|
| NPC:
|
Door: Chantry, Northern San d'Oria (M-7)
|
| Repeatable:
|
Yes
|
Type Restriction:
|
CW Only
|
Reward
|
| Previous Quest:
|
None
|
Next Quest:
|
None
|
|
| Walkthrough
|
- Interact with the door in the cathedral, and the voice behind it will request that you seek out the cave-dwelling hermit in Batallia Downs.
- The hermit is hiding inside a cave at K-7.
- He will ask you to retrieve a book from Davoi for him. The Abandoned Campsite can be found in the river at H-8.
- Return it to the hermit to enjoy a nice little cutscene, and receive both the armor and a book to return to the Sandoria cathedral.
- Talk to the voice behind door again to receive the wing and complete the quest.
|
| Here Be Dragons 🔗
|
Requirements
|
| Fame:
|
?
|
Level Restriction:
|
None
|
|
| NPC:
|
Khartes, Selbina (I-9)
|
| Repeatable:
|
No
|
Type Restriction:
|
CW Only
|
Reward
|
| Previous Quest:
|
None
|
Next Quest:
|
None
|
|
| Walkthrough
|
- Travel to Gustav Tunnel by the Cape Terrigan zoneline
- Interact with the Miner's Helmet at (D-11) to spawn Ore Melter, a Wyvern Notorious Monster.
- The fight is uncapped, but trivial at lv60
- It has about 1250 HP
- After killing the Wyvern, return to Khartes to complete the quest.
- Talk to Carnelian in Provenance to unlock mining in Gustav Tunnel.
|


_description.png)


_description.png)


_icon.png)
_description.png)
_icon.png)
_icon.png)
_icon.png)
_icon.png)
_icon.png)
_icon.png)
_icon.png)
_icon.png)
_icon.png)
_icon.png)
_icon.png)
_icon.png)