Community Scholar Guide
|
Latest Updates
- Filled out and Tiered Free Nuking section. Entry all the way up to High Tier. Still need to fill in relevant stats in the captions. --Brahmsz (talk) 20:19, 30 January 2023 (EST)
- Added Immanence Self Skillchain section under Abilities. Was a question I've seen more often than expected and wanted to add the information here for reference. --Brahmsz (talk) 22:02, 7 December 2022 (EST)
- Added merits sections, weapon section, some assorted tips that I find a lot of SCHs either don't know or don't care about, reworked various sets. Probably will keep updating since I can't sleep till I get stuck on something! --Neviskio (talk) 22:56, 9 November 2022 (EST)
- Updated a few things from discord DMs and ffxiah forum. I do not know anything about SCH I'm just copy pasting what other players say. If it's wrong fix it! --Neviskio (talk) 18:11, 5 November 2022 (EDT)
- Fully updated the templates, but almost no gear changes as I'm not a SCH player yet. --Neviskio (talk) 14:23, 31 July 2022 (EDT)
- Updated the nuke/mb/kaustra sets, also with new template, will try to add it to the rest of the guide at some point --Neviskio (talk) 12:42, 31 July 2022 (EDT)
- Added occult acumen and cataclysm sets that were from the BLM guide on ffxiah but seem very relevant to SCH anyway as they're identical. Go melee and cataclysm things! --Neviskio (talk) 04:49, 19 July 2022 (EDT)
- Attempted to cleanup a bit the formatting to be more similar to other guides but touched no sets cause I have 0 idea about SCH. Make sure to add a note here for when you revise the sets tho so everyone knows how up-to-date the guide is! --Neviskio (talk)00:53, 29 January 2022 (EST)
- A lot of this gear was pulled from the Scholar guide on ffxiah.com. Please refer to the following link for the guide notes: https://www.ffxiah.com/forum/topic/32145/a-scholars-education-guide/74/
- Feel free to update as you see fit or ask me questions ~Xagashi:Bismarck
General Information
- Scholar (SCH) is a Mage class. More specifically, a Hybrid Support and Utility Mage. Scholar is also an Advanced Job, introduced in the expansion Wings of the Goddess.
- It utilizes various abilities to enhance magic casting, providing extensive utility, and is arguably one of the strongest solo (and collaborative) jobs in FFXI.
- Through the use of solo Skillchains and Helix spells; coupled with high Magic Burst damage; as well as its ability to kite out mobs; makes SCH one of the most rewarding and high skill-cap jobs in the game.
Roles
- Scholar can be used to Heal and Buff allies, Debuff enemies, as well as deal out major Magic Damage to enemies.
- Following a theme of acting as military strategists, Scholar utilizes abilities know as "Strategems" to provide unique benefits to spell casting.
- Can create, extend, and close Skillchains via spells.
- Provides its own unique hybrid line of damage over time spells known as Helixes; as well as a unique line of weather-influencing "Storm" enhancements and Klimaform.
- Is able to extend several single-target spells (restrictions based on tiers) to Area of Effect status.
- Following a theme of acting as military strategists, Scholar utilizes abilities know as "Strategems" to provide unique benefits to spell casting.
- The use of this job in any major Endgame activity is highly dependent upon the group and the target at hand.
As a Healer
In a Healer role, Scholar's strong suit and proficiency is in casting Regen (a healing over time series spells) and spot healing with the Cure line of spells. Scholar doesn't gain as strong of a direct healing focus as WHM does but makes up for it through having access to the highest tier of Regen (Tier V) and extending the duration of Regen upwards of 10 minutes.
Assorted tips
- If you have spare stratagems and don't need to actively heal but want to contribute in supporting, consider using Accession Stoneskin to burn extra strats.
- Don't forget Stormsurge gives stat bonuses if merited when you cast storms, most weapon skills have stat modifiers so it does help throwing a Firestorm II to the damage dealers to squeeze more damage.
- You might have to learn what weapon skills benefit from which stats. Adding a +6 stat bonus is sometimes comparable to half an extra ring or earring! Some examples are:
- Savage Blade: STR or MND.
- Aeolian Edge and most magic based WS: INT.
- Most RNG and COR ranged WS: AGI.
- You might have to learn what weapon skills benefit from which stats. Adding a +6 stat bonus is sometimes comparable to half an extra ring or earring! Some examples are:
- Omniscience and Shattersoul debuffs, provided you can land them, can help in various fights.
- Klimaform can't be used with Accession, but it can be used with Manifestation since it is a Black Magic spell!
- Adloquium and Animus Minuo are nice buffs for your party. Be careful not to overwrite Crusade off the tanks with either Animus Minuo or Animus Augeo!
- Some strategies don't use a real tank (at the time of writing RDM/RUN is used in some Sortie runs.) Animus Augeo helps significantly in these situations.
- Caper Emissarius can completely remove all enmity from a party if used on someone /DRG that can Super Jump.
- Don't do this in your tank party!
- Impact is often forgotten but it's a 3 minute (unresisted) non-decaying -20% to all base stats. This debuff is a massive help in a lot of situations and if no one else can cast it you should definitely try to keep it up when MP allows.
Endgame Content Tips
| Scholar Sheol C Walkthrough |
|---|
|
Your primary role will be, healing and buffing the party throughout the run. If you have the discounts to efficiently pop NMs (from defeating multiple NMs in the zone) and open chests (from being in runs where a total of x chests have been opened), these duties should fall to you as well. You should have ample time to perform these tasks while other jobs kill or pull mob families. Before the run: Ask your party to gather at the Conflux for pre-buffs. If you take a look at your buff bar, anything that is present to the left of your Food icon will transfer with you to a new zone, while anything that is present to the right of the Food icon will not. What this means is that you can apply valuable long duration buffs to your party members before even entering the battlefield. These prebuffs allow your party to be in effective fighting shape right out the gate, and save you valuable Stratagems down the line. This makes applying these buffs prior to entering Sheol C an important part of the run. Alternatively: if you also have Corsair, ask everyone to gather at the Nomad Moogle for prebuffs. Swap to Corsair, give it your best Crooked Cards Naturalist's Roll, then switch back to Scholar and give everyone else long duration buffs. Once your group is gathered, kindly yell at your Corsair to give the group Naturalist’s Roll. If they don’t have it, they best be going to buy it right now. Naturalist’s Roll will give your Enhancing Magic a percentage-based increase to their durations. After Reraise III, Protect V and Shell V should be next up. Though, if you have a Paladin you should defer to their more potent Majesty Protect V. Barspells are your choice to start out with, you will be changing them out between families in the instance anyways. I always start with Barthundra to help prevent Stuns, and Barparalyzra since it is the most annoying debuff for melees to have. Whichever you choose, you can also give these spells a Perpetuance to greatly enhance their duration. Next is the biggest one: Regen V. Duration versus Potency is, again, a player-specific choice, but note that you will be recasting this at least once in the run during Tabula Rasa for the increased potency it provides. A couple other minor spells to note that will carry over into Sheol are Stoneskin, Blink, and Aquaveil. Apply these if you have spare time or Statagems, but they will not have a large impact for most of your party members. You, of course, should always have Aquaveil up.
We just entered the zone, now what? Follow the group to the first camp. Some prefer to have everyone go downstairs at the start. Others prefer to skip the downstairs area entirely, choosing to gather at the ramp just beyond the teleporter. Still others will gather most of the party at the ramp while the tank runs downstairs to pull that family; this is where prebuffs like Regen are very important. Get yourself into Light Arts and Addendum: White as soon as you enter. A Perpentuance Aurorastorm II on yourself should be one of the first things you do. You don’t want that double Dark weather nerfing your Cures. Sublimation is up to you; if you find yourself needing MP more often, then get it charging early (you can even charge it outside the zone). Otherwise, I don’t press Sublimation until I encounter a group of mobs capable of using Sleepga of some sort. If you are /RDM, take a moment to give everyone an AoE Perpetuance’d Phalanx. Call out before you use this to allow those who have sets for Phalanx Received+ to get their gear on. Buffing and pulling can sometimes happen very quickly here, but if you have a spare moment AoE out a Perpetuance’d Adloquium. It doesn’t make a huge impact, but the free TP is nice when moving between camps. A word on Storms. You have Aurorastorm II up on yourself, great. But what about the rest of your group? Do you have a Paladin, a Ninja, a Samurai, or a Corsair? Consider giving jobs who are performing Elementally-aligned abilities a Storm also. Giving your Paladin Aurorastorm II will help them in similar ways to how it helps you. A Ninja or Samurai using the correct Hybrid Weapon Skills against appropriate enemies can deal insane amounts of damage, and it can even be boosted by giving them a Storm (Sand/Rain/Hail for Ninja, or Fire/Wind/Thunder for Samurai). Corsairs may also benefit from Firestorm II for their Wildfires and Hot Shots. It will then be up to them to cancel the buff if they want the benefit of zone wide weather for Leaden Salute. Once you have all these buffs up, it’s now just a matter of keeping everyone else, and yourself alive and free of debuffs, all while maintaining the buffs you have given up to now. As mentioned above, you’ll want to be changing up your barspells to handle specific threats from some families. Barwater: Lamiae in Agon Halos. This will help players resist Torrent, a TP move that strips equipment. Special note: Dahaks. There’s no reason to fear these enemies with proper preparation. If you are /RDM, Enwater will reduce the odds of getting btfo by Nullsong. When encountering these enemies, let your group know you will be doing an Accession Enwater and that they need to gather together. Special note: Clots: Another commonly feared mob family. With proper DT and Phalanx, Fluid Toss and Fluid Spread's damage should be mitigated to acceptably low levels. Consider giving out Accession Stoneskins, but be certain you are also in an appropriate DT set if approaching these.
Apart from botched pulls, these are the biggest threat to the rest of your party. Each needs special consideration and attention from the Scholar. Behemoth: Be sure the group has Barthunder to reduce Stun frequency. Do not stand in front of this NM, Wild Horn is a long range conal from its head that can kill an unsuspecting player. It will Hundred Fists at some point, resetting Enmity on the player who is #1 and targeting the #2 player. Be ready to adapt to this hate shift, either with an AoE Cure if you are unsure of who will be #2, or a targeted Cure if you know who it will be. Dia 2 will help this NM fall over more quickly, and Paralyze/Slow can reduce the threat of Hundred Fists. Cerberus: Barfire to reduce incoming Fire damage from its TP moves. Ululation is an AoE Paralyze from Cerberus, so stay out of range and be ready to Accession+Paralyna. The same warning about Behemoth’s Hundred Fists applies here. Dia 2, Paralyze, and Slow are all good ideas to use against this NM. Dvergr: One of the most annoying NMs. It will often open up with Sleep or Sleepga 2 after spawning, so be sure to have Sublimation on or your Prime Weapon ready. It will apply a billionty debuffs if left alive for too long. Prioritize the most debilitating ones, such as Paralyze and Curse. Dia 2 and Paralyze are good choices here, but you will never Silence this NM in any meaningful amount of time. Wyrm: As with all Wyrms, don’t stand directly in front of, or behind this. Unlike the other two, this NM will not use Hundred Fists, but Mighty Strikes instead. The Enmity reset will still occur, but the risk of death is much lower here. Instead, be aware of long duration Terror that may hit your tank or a DD. Horrid Roar has a possibility of dispelling a single buff on a player, so be ready to recast important buffs. Again, Dia 2/Paralyze are good choices here. Adamantoise: Most people don’t fight this unless they are looking to increase their Moogle Mastery. Its capability to remove all Songs and Rolls, as well as ability to use Invincible, all lead to a big time loss when fighting this. Avoid this unless specifically targeting Moogle Mastery. Do not spawn this without talking to your group about it beforehand. Hydra: Another NM that most groups don’t fight. Polar Bulwark can give this NM a long-lasting Physical Defense Immunity, and may be used multiple times. As such, you can be fighting this NM for several minutes without ever making a dent in its HP. Avoid fighting this one also, unless specifically targeting Moogle Mastery. Do not spawn this without talking to your group about it beforehand. Khimaira: Less annoying than the previous two, but still not typically fought. Perfect Dodge leaves your DDs whiffing for 30 seconds, and AoE Stun can reduce DPS. Only spawn this if you are targeting Moogle Mastery. Halos: As mentioned before, respect the Lamia and Troll mobs’ TP moves. The Mamool Ja Halo does not present any unique challenges. The Halo on the fourth floor, however, contains two of each Beastmen type, all of which are their respective “Kings”. These NMs each threaten your party in their own way. Agon Viscount: Capable of plowing through your entire party with Hundred Fists. Paralyze and Slow can help here, but you need to keep a close eye on whomever is engaged on this NM. If the DD(s) cannot kill it quickly, it will make short work of said DD(s), then you, then your run, then your will to keep playing the game. Do your best not to let its first target die, else you may be next. Agon Dignitary: Nothing special to note. Agon Monarch: Be careful of Petrify here, as well as Eagle Eye Shot. EES should not kill anyone outright, but can leave the target at low HP, and thus vulnerable to other sources of damage. Agon Praetor: Nothing special to note for the healer. It will use Invincible at some point, but it should be up to the Corsair to manage that. Agon Marquess: Potentially dangerous if it manages to use Mijin Gakure. Contrary to popular belief, this TP move is not Fire-based and its damage cannot be mitigated by Barfire. This NM is typically saved for last, allowing you to put up an Accession+Stoneskin to mitigate damage. Do not stand in range of this NM if your gear is not full of Magic Evasion and -DT%. Agon Footsoldier: Nothing special to note.
Embrava is one of the most impactful spells you can provide your group in a Sheol C run. But when should you be using Tabula Rasa? Ideally, you want Embrava active for the most dangerous parts of the run: floors 3 and 4. You will want to be coordinating with your COR and BRD about when everyone’s SPs are being used. Embrava is best paired with Soul Voice songs, as it allows the Bard to drop one of their Marches and give another Minuet, Etude, or even a defensive song. Wild Card is then best used after both of these abilities are spent to try to get them back. Timing of Embrava can be important. With the best duration gear possible, Embrava will last just over 7 minutes. Tabula Rasa’s duration is 3:30 with Relic pants. What this means is that you can effectively have Embrava active for almost 10 minutes. Do everything you can to recast a fully Perpetuance’d Embrava on the group just before Tabula Rasa’s duration ends to maximize uptime. Embrava isn’t the only spell you will want to be casting during Tabula Rasa. Regen V gets a modest boost to potency when cast while under the effect of your SP, so make sure you are getting this spell re-applied as well. There are times where shit hits the fan and you find yourself having to rebuff people after death. It happens. It can happen as early as the first mob camp on floor 1. Don’t be afraid to spend Tabula Rasa early here to catch back up on Stratagems. You may or may not get it back later, but losing the momentum of the early floors due to lack of buffs is a bigger loss than not having Embrava on the later floors. |
Food and consumables
Food
Magic Options:
- File:Tropical Crepe icon.png Tropical Crepe
- Stats: INT+2, MND+2 Magic Accuracy+20% (Max. 90),"Magic Def. Bonus"+1
- If you need magic accuracy, this is one of the best foods for it.
- Purchased from the Auction House. Crafted only.
- If you need magic accuracy, this is one of the best foods for it.
- File:C. Snow Cone icon.png C. Snow Cone
- Stats: MP+20% (Cap: 100), INT+5, MND+5, Magic Attack Bonus+13, Lizard Killer+5
- This is the food to eat if you don't need Magic Accuracy and are heavily into nuking. All the stats are good and relevant. The biggest downside is that both NQ and HQ are super pricey considering their effect. Still worth using if you are (1) close to killing Ongo or Sortie basement bosses, (2) not getting resists, and (3) can use some extra ooph.
- Purchased from the Auction House. Crafted only.
- This is the food to eat if you don't need Magic Accuracy and are heavily into nuking. All the stats are good and relevant. The biggest downside is that both NQ and HQ are super pricey considering their effect. Still worth using if you are (1) close to killing Ongo or Sortie basement bosses, (2) not getting resists, and (3) can use some extra ooph.
- File:Cornbread icon.png Cornbread
- Stats: Magic Burst Damage II +2, "Fast Cast"+5%!!!
- "Ain't nothing wrong with that." Very interesting food with a duration of 5 minutes but stacks to 99. Great for short battles.
- NPC purchasable only. Available for purchase during The Green Festival in Lower Jeuno. Grab some and keep it on standby.
- "Ain't nothing wrong with that." Very interesting food with a duration of 5 minutes but stacks to 99. Great for short battles.
Hybrid Options:
- File:Oden icon.png Oden
- Stats DEX+5 INT+5, Accuracy+15% (Max. 70), Magic Accuracy+15% (Max. 70).
- File:Marine Stewpot icon.png Marine Stewpot
- Stats: HP+90, Accuracy/R. Accuracy/M. Accuracy +90, Mirrored Pet Stats, -20 each.
- Group Food (~6 Party members within 10 yalms).
- A highly desired food choice--particularly in endgame content and scenarios. Only exists as singles and does not stack. As mentioned in the above description, a Marine Stewpot will work on up to an entire party as long as each member is within 10 yalms of the person using it.
- Any party member with an existing food effect on will not receive the effect of the stewpot.
- Purchased from the Auction House. Crafted only.
Defensive Options:
- File:Miso Ramen icon.png Miso Ramen
- Stats: HP+100, STR+5, VIT+5, DEF+10% (Max. 170), "Magic Def. Bonus"+5, Magic Evasion +10% (Max. 50),"Resist Slow" +10.
- Yes I know, you're not a tank. But sometimes you won't need magic stats and just need to survive whatever comes. Or you're one of the good ones going into melee when possible! Safety of Miso Ramen makes things easier.
- Purchased from the Auction House. Crafted only.
- Yes I know, you're not a tank. But sometimes you won't need magic stats and just need to survive whatever comes. Or you're one of the good ones going into melee when possible! Safety of Miso Ramen makes things easier.
Niche Melee Options:
 Grape Daifuku
- Stats: HP+20, STR+2, VIT+3, Acc.+10% (Max. 80), Atk.+10% (Max. 50), Rng. Acc.+10% (Max. 8o), Rng. Atk.+10% (Max. 50), "M. Atk. Bonus"+3,Mirrored Pet Stats, +25 each and "M. Atk. Bonus"+15
- Everyone loves this food! Mages maybe not as much as others but still, it's not exactly one of your best, but if you are going to get in the melee side of things, it covers Accuracy and Attack. While still having some tiny bit of Magic Attack Bonus.
- Purchased from the Curio Moogle for 4,000 gil.
- Everyone loves this food! Mages maybe not as much as others but still, it's not exactly one of your best, but if you are going to get in the melee side of things, it covers Accuracy and Attack. While still having some tiny bit of Magic Attack Bonus.
- File:Sublime Sushi icon.png Sublime Sushi
- Stats: HP+40, MP+20, STR+6, DEX+7, MND-3, CHR+6 Accuracy+10% (Cap: 100), Ranged Accuracy+10% (Cap: 100), Resist Sleep+1
- Very rarely you will ever use sushi on a mage, but if doing some mildly easy content and want to go melee you might need some accuracy. It's a bit of a reach, but there's been situations where this was useful. Even if only for extremely rare situations.
- Purchased from the Auction House. Crafted only.
- Very rarely you will ever use sushi on a mage, but if doing some mildly easy content and want to go melee you might need some accuracy. It's a bit of a reach, but there's been situations where this was useful. Even if only for extremely rare situations.
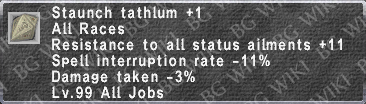
Medicines
 Echo Drops
- Useful for when silenced and no one else can (or is able to) Silena you. Keep these stocked.
- Purchased from the Curio Moogle for 700 Gil.
- Useful for when silenced and no one else can (or is able to) Silena you. Keep these stocked.
 Remedy
- Echo Drops could suffice but you should be carrying remedies anyway. 12 a month are free from ambuscade but it's not like they cost much. If you're in the wrong arts it's just faster to use an item. Keep these stocked.
- Purchased from the Curio Moogle for 3,000 Gil.
- Echo Drops could suffice but you should be carrying remedies anyway. 12 a month are free from ambuscade but it's not like they cost much. If you're in the wrong arts it's just faster to use an item. Keep these stocked.
 Reraiser /
  Hi-Reraiser
- Nothing wrong with keeping extra sources of Reraise in your pocket. Especially if you;re out of MP or don't have the time to cast. Keep these stocked.
- Purchased from the Curio Moogle for 1,000 and 1,500 Gil.
- Nothing wrong with keeping extra sources of Reraise in your pocket. Especially if you;re out of MP or don't have the time to cast. Keep these stocked.
 Panacea
- Sometimes you are overwhelmed with a number of debuffs (like an Impact) that need Erase and this is much faster than erasing them. Keep these stocked. Don't be a cheapskate.
- Purchased from the Curio Moogle for 20,000 Gil.
- Sometimes you are overwhelmed with a number of debuffs (like an Impact) that need Erase and this is much faster than erasing them. Keep these stocked. Don't be a cheapskate.
 Vile Elixir /
  Vile Elixir +1
- You know what sucks hard? Getting sublimation dispelled when you barely have MP left. A single Vile Elixir or HQ can save you in those situations. Keep these stocked. Don't be a cheapskate.
- Purchased from the Curio Moogle; 20,000 Gil for NQ. 40.000 Gil for HQ.
- Often cheaper to buy off the Auction House.
- You know what sucks hard? Getting sublimation dispelled when you barely have MP left. A single Vile Elixir or HQ can save you in those situations. Keep these stocked. Don't be a cheapskate.
- File:Coalition Ether icon.png Coalition Ether
- So you've chugged all your Vile Elixirs. And some of your party members' as well. Sublimation is down. You still need more. These are 1-second use, 150 MP emergency Ethers that you can slam all day with no Medicated effect to show for it. Only the most hardcore will carry these, but they will be the ones never running out of MP.
- Purchased from Ujlei Zelekko; 2,500 Bayld each.
- These do not stack. Your inventory weeps.
- So you've chugged all your Vile Elixirs. And some of your party members' as well. Sublimation is down. You still need more. These are 1-second use, 150 MP emergency Ethers that you can slam all day with no Medicated effect to show for it. Only the most hardcore will carry these, but they will be the ones never running out of MP.
 Holy Water
- Yes you can Cursna and with decent gear it is better than holy water, it is useful to have them just for oh shit situations. Worst case scenario you use them on another job. Keep them stocked.
- Purchased from the Curio Moogle for 1,000 Gil.
- Yes you can Cursna and with decent gear it is better than holy water, it is useful to have them just for oh shit situations. Worst case scenario you use them on another job. Keep them stocked.
 Antacid
- Rarely you will need to switch food, but for example if doing multiple bosses in Odyssey and changing from mage to another role, you will need some of these.
- Purchased from the Curio Moogle for 1.000 Gil.
- Rarely you will need to switch food, but for example if doing multiple bosses in Odyssey and changing from mage to another role, you will need some of these.
- File:El. Pachira Fruit icon.png El. Pachira Fruit
- Effect: 1hp/tick Poison Effect for 2 minutes.
- Yes Sublimation wakes you up when charging. But sometimes you don't want to pop Sublimation just to stay awake and you know the mobs you're fighting will spam sleep. Poisoning yourself is a good option. This is really useful in Odyssey and against Bumba.
- Purchased from the Ghemi Sinterilo for 154 Gil in Kazham.
- Yes Sublimation wakes you up when charging. But sometimes you don't want to pop Sublimation just to stay awake and you know the mobs you're fighting will spam sleep. Poisoning yourself is a good option. This is really useful in Odyssey and against Bumba.
Abilities and Traits
|
| ||||||||||||||||||||||||||||||||||||||||||||||||||||||||||||||||||||||||||||||
Merits
| Group 1 | |||
|---|---|---|---|
| Name | Description | Level | Notes |
| Grimoire Recast | Shorten recast time of Light Arts and Dark Arts by 2 seconds. | 5/5 | With how fast-paced content is in 2022, getting caught out in the wrong Arts and having it on cooldown can be crippling. A 10 second shorter recast can make a difference, and has more value than 50 MP or enhanced duration of Modus Veritas. |
| Modus Veritas Duration | Increase duration of effect for Modus Veritas by 10%. | 0/5 | Modus Veritas is a dead Job Ability and has next to no use. |
| Helix magic Acc./Atk. | Increases magic accuracy by 3 and magic attack bonus by 2 for Helix spells. | 5/5 | Helix spells are a major source of your damage, getting them unresisted with maximum magic attack bonus is what you want. |
| Max Sublimation | Increases the maximum amount of MP available by Sublimation by 10. | 0/5 | 50 more MP is not going to make or break you, Scholar does not have serious MP issues even without this. |
| Group 2 | |||
|---|---|---|---|
| Name | Description | Level | Notes |
| Altruism | Light Arts Stratagem. Increases the accuracy of your next white magic spell. Increases magic accuracy by 5. | 3-4/5 | Useful for when you absolutely need to land that Silence (or Paralyze/Slow). |
| Focalization | Dark Arts Stratagem. Increases the accuracy of your next black magic spell. Increases magic accuracy by 5. | 5/5 | An absolute must have. When combined with Pedagogy Mortarboard +3, this provides an enormous bonus to magic accuracy. Excellent to use to ensure a Helix lands unresisted, or simply for nuking against targets with high Magic Evasion. |
| Tranquility | Light Arts Stratagem. Your next white magic spell will generate less enmity. Reduces enmity by 10. | 0/5 | Enmity is usually not a big deal, and it is mostly sorted by gearing correctly usually. If you are truly desperate for enmity, still don't put points into this, as it's not worth it. |
| Equanimity | Dark Arts Stratagem. Your next black magic spell will generate less enmity. Reduces enmity by 10. | 0/5 | Enmity is usually not a big deal, and it is mostly sorted by gearing correctly usually, even for black magic spells. Skip. |
| Enlightenment | Optimizes both white and black magic capabilities and allows access to both addenda for your next spell. Recast 5 min. +5 bonus to INT and MND. | 1/5 | You generally want access to this, for the times you are in the opposite art of what you want to cast or don't want to burn a strategem on Addendum. The INT/MND bonus is not a consideration here at all. One point to have access is more than enough. |
| Stormsurge | Storm-type spells grant a bonus to attributes associated with their element. Initial bonus value: +3. Increase bonus value by 1. | 1/5 | Given how high our stats are these days, an extra +~12 of a stat is going to be negligible. You can put one point into it if you like, but if you don't have it nobody will even notice the difference. |
Immanence Skillchains
- As a part of the Dark Arts side of Scholar, Immanence is the key ability that allows for self-skillchains via spell casting. Frequently asked questions (FAQs) pop up time to time such as "How do I set up my Immanence macros?" and "What spells create which skillchains?" So here's a straight forward section with said information.
- Please note:
- Closing a skillchain with Tier I spells is fastest, but also leads to the shortest skillchain window... You should close with a Tier II, at the very least.Closing with a helix gives the longest possible magic burst window.
- The exception to this rule is: if closing with a Helix, cast a Tier I Helix so as not to overwrite the effect of a Magic Bursted Helix II.
- In either case, Fast Cast gear is your best friend. Especially when you're on the clock in events like Odyssey and Sortie.
- Skillchain Damage+ gear affects a closing Immanence skillchain. It's can be an extra 5~10K damage. Every bit counts. If you have it, use it.
- Closing a skillchain with Tier I spells is fastest, but also leads to the shortest skillchain window... You should close with a Tier II, at the very least.Closing with a helix gives the longest possible magic burst window.
Level 1
- Liquefaction: Stone > Fire, or Thunder > Fire.
- Scission: Fire > Stone, or Aero > Stone.
- Reverberation: Stone > Water, or Luminohelix > Water.
- Detonation: Stone > Aero, or Thunder > Wind.
- Induration: Water > Blizzard.
- Impaction: Water > Thunder, or Blizzard > Thunder.
- Transfixion: Noctohelix > Luminohelix.
- Compression: Blizzard > Noctohelix.
Level 2
- Fragmentation: Blizzard > Water
- Fusion: Fire > Thunder
- Gravitation: Aero > Noctohelix
- Distortion: Luminohelix > Stone
How it looks in a Macro
- Here is an example of what an Immanence macro should look like:
- /ja “Immanence” <me> <wait1>
- /ma “Fire” <t> <wait5>
- /ja “Immanence” <me> <wait1>
- /ma “Thunder” <t>
- Using a standard macro, this leaves 2 lines open for announcing "Opening" and "Closing".
- In cases when opening with a Helix, set the wait period to 7 seconds.
Support Jobs
|
Equipment
Weapons
Staves
File:Eminent Staff icon.png Eminent Staff
|
It's a staff.
|
| File:Chatoyant Staff icon.png Chatoyant Staff366px link= | Fantastic option when light weather/lightsday will give it a buff. Consider getting one as you will always have the weather up. It's also fantastic to get a starter cure set going since the flat 10% cure potency helps. The NQ of this staff is effectively the same, providing all the same core benefits. If you are on a budget, consider Iridal Staff instead.
|
| File:Keraunos icon.png Keraunos366px link= {{#replace:INT +17, MAB/MAcc +20|,| }} |
If you happen to have this for your BLM might as well use on SCH...
|

|
The ambuscade staff, generally it's more useful on other jobs like WAR, MNK for Cataclysm due to those jobs not getting amazing staves for magic dmg. Retribution is not the best ws to use so the bonus is a bit meh. It's not bad to use just not likely to be one of your top choices for content as it's in a bit of an awkward spot. Could still use it to melee unless you have something else on hand tho. It might not be one of your top priorities to spend a pulse on but if you have extras might as well make it.
|
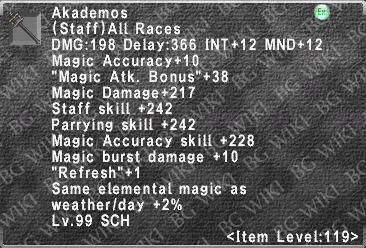
File:Akademos icon.png Akademos {{#replace:Path A or C|,| }} |
It gets obsoleted soon if you do more content but it's a very solid starter
|
 {{#replace:Lots of options check Oseem|,| }} |
It's not the best staff to use or augment but it's easy to get when starting out and easy to roll a somewhat okay augment. SMN uses this quite significantly so you could have one with passable augs if not optimal. Wouldn't spend much gil to try and get good stuff on it for SCH but even with no augs/smn augs, it does work at the beginning.
|
| File:Serenity icon.png Serenity366px link= {{#replace:MP +50, Cure Spellcasting Time -10%, Enhancing Magic +10, Cure potency +5%|,| }} |
Sinister Reign drop, not specifically worth farming but you might end up with one to begin with. Augmented or not it's a solid early weapon and if you get it max augments it's solid for a while. Eventually it's replaced by better options tho so don't waste too much time chasing it.
|
File:Marin Staff +1 icon.png Marin Staff +1 {{#replace:R15) INT/MND +10, Acc/MAcc +40, MAB +40|,| }} |
A really solid staff when augmented, BLMs love it for nuking so you should too.
|
 {{#replace:R25) Acc/MAcc +10, MAB +25|,| }} |
Decent staff with a variety of stats, some refresh, some burst DMG II, some fast cast. Doesn't excel at anything but it's solid. Works well with other weapon options all considered. If you only play mages the RP is alright to put in, but Mpaca gear is better than the weapons usually.
|
File:Contemplator +1 icon.png Contemplator +1 {{#replace:R15) Magic Accuracy +70, Enfeebling Magic Skill +20, MND +10|,| }} |
Coming from Tumult Curator it's not super easy to farm but it is really good for a variety of reasons. It is worth having if you can get it and it's useful on most mage jobs to a degree. The MACC and Enfeebling skill is a solid 90 more accuracy on your debuffs, the refresh is a nice plus, and those extremely rare moments you rest for mp it is useful for.
|

|
For meleeing it is quite compelling, triple attack is not very easy to get on SCH gear, has STR, high acc/atk. Being all jobs you're likely to use it on something else at some point but it's tricky to get due to where it drop from. Also it's not particularly great so it gets obsoleted on other jobs mildly quickly. Obviously does nothing for casting so make sure it's only for smacking things good. |
Clubs

|
It is an option for some niche applications, if you have one due to playing RDM/GEO/BLU might as well consider it an option as it is serviceable for some uses. Keep in mind staves are often much better due to access to Myrkr but still. Somewhat uninteresting on SCH due to all the other good options. Getting a Kaja Rod early can be beneficial but there's plenty of alternatives if you cannot. Don't prioritize it over other jobs gear unless you plan on using it more on other jobs (such as RDM or BLU).
|
| File:Bolelabunga icon.png Bolelabunga366px link= | A fantastic beginner SCH weapon option to buff up your regen before you get a SU4/5 and has some nice regen/refresh for idling if you're really desperate and have nothing else. While eventually it gets replaced, it's worth chasing at first. Also usable on other jobs so a nice tool to have.
|
 {{#replace:Lots of options check Oseem|,| }} |
Another "nice to have but not exactly worth chasing". It has some niche uses but it's quite good at those uses. Other jobs use it slightly more (mainly GEO for the indi duration), so you might have one laying around. I wouldn't say it's worth chasing as SCH but it's very much usable.
|
| File:Rubicundity icon.png Rubicundity366px link= {{#replace:Magic Accuracy +10, Magic Atk. Bonus +10,Conserve MP +7, Dark Magic Skill +10|,| }} |
Super annoying to farm from Sinister Reign and getting it with max augs is even worse, still, it is useful for drain/aspir and that's it. Worth remembering it exists if you own it while farming better items.
|
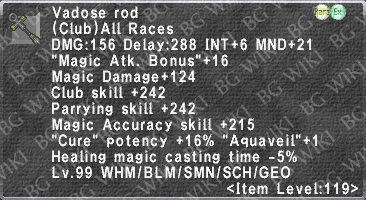
 {{#replace:DMG:+10, "Mag. Atk. Bns."+25, Accuracy+10 Mag. Acc.+10|,| }} |
The club to use for nuking especially when augmented. It will pretty much beat most other weapons and should be a high priority if you nuke often on SCH as you should. Since SCH can't use Bunzi gear might as well max one of the best weapons. At R30, the Enmity -5 makes it an arguably better Club for casting Cures when not under the effect of Aurorastorm.
|

|
A fantastic option that's slightly annoying to farm. The +30% cure potency is massive and gets you easily close to the cap. When doing Luminohelix II is the best choice by far, access to Dispelga is useful in various circumstances. I could say lots more on this but I think every SCH should have it as it's quite versatile and strong. |
Dagger
| File:Malevolence icon.png Malevolence366px link= {{#replace:Magic Accuracy +10, Magic Atk. Bonus +10, Fast Cast +5%, Intelligence +10|,| }} |
Sinister Reign augmented items can be an extreme pain to farm, but this dagger is quite interesting as it can be equipped by SCH, and is very strong for Aeolian Edge. While it is not very common to use since Cataclysm exists and staves are just easier you might happen to use this in some circumstances. Maybe not worth going out of your way to get a perfect one but if you have one from other jobs such as RNG might as well be prepared to use it. |
Ultimate Weapons
{{#replace:DMG: +26, Omniscience: Damage +15%, Accuracy +30 Magic Accuracy +30|,| }} |
The SCH mythic. In truth it's not the best and greatest, having no INT or MND at all, but it has a lots of upsides making it worth thinking about if you're a dedicate SCH. For Myrkr and most of the magic weaponskills such as Cataclysm it's amazing. High magic accuracy helps a lot landing spells on SCH and again with weaponskills to get capped damage (also physical accuracy! for some reason...). The biggest downsides is that Bunzi's Rod maxed out is so strong for nukes that will make this weapon feel somewhat niche. Also it's damn expensive for what it provides...
|
{{#replace:DMG: +10, "Myrkr" potency +10%, MP +30|,| }} |
The empyrean, another weird staff for SCH, it handles on its own your Fast Cast needs pretty much, and has a massive truckload of MP, that you will lose once you swap to another (better) weapon. And that's it. No int, no mnd, no macc, no acc, pretty much nothing else besides all the fast cast you want. Sure it buffs Myrkr but still... you pretty much make this for collecting and fast cast, up to you if it's worth.
|
{{#replace:DMG: +8, Shattersoul: Damage +10%, Accuracy +30 & Magic Accuracy +30|,| }} |
Some people are skeptics of this weapon and when it's suggested lots of people scoff at the staff as if it's a meme, and again it's mildly niche, but the +30 occult acumen and focus on melee with the tp bonus it's an interesting weapon to use. If your group can do aeonics, might as well get it at some point. Shattersoul is interesting but Tupsimati would probably serve it better. If you're doing melee/ws this is a nice stand in instead of the eye watering expensive mythic.
|
| File:Musa icon.png Musa366px link= {{#replace:Path C: "Regen" potency +25, "Cure" potency +25%,"Fast Cast"+10%|,| }} |
The ultimate weapon in disguise, Path A and B are just simply not that interesting unless you want multiples, and Path C is just the best one by far for your first and likely only Musa. If you can't afford it Pedagogy Staff is almost the same and very worth considering. If you are into SCH you will want either of them but keep in mind you need SU4/5 to use them and augments are strongly worth doing.
|
| File:Opashoro (Level 119) icon.png Opashoro (Level 119)366px link= | You'd think the prime weapon is useless, what does it even do besides losing you TP? Well it can wake you up! Which SCH can do naturally with Sublimation. Not a big deal like other jobs but who knows how this'll look like in a few updates. You need a damaging (i.e. not shield or instrument) prime weapon for future missions and if you wanna gamble on staff ultimate weapons... historically not sure how would you fare but be my guest! |
Prioritizing Equipment
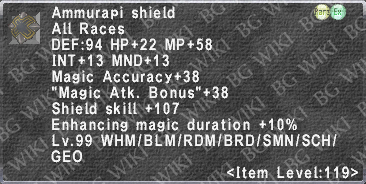
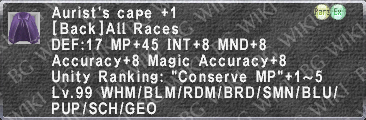
- In terms of JSE capes you will want most likely the following Lugh's Capes ideally:
- General purpose with 30 int, 20 macc/mdmg, 10 mab, 5% DT (or 10% PDT).
- A MND focused cape for mnd enfeebling, 30 MND, 20 macc/mdmg and free other stats. Could put 10% Fast Cast on this but likely you'll have other options such as Fi Follet Cape +1 R15, or Perimede Cape. Enmity -10 is a good alternative.
- A TP cape with 30 dex, 30 acc/20 atk, 10 Store TP, 5% DT (or 10% PDT). This could also double up as an Occult Acumen cape if you don't want to make a specific one
- As many WSD capes you prefer with different stats. An example would be for Cataclysm/Earth Crusher 30 int, 20 macc/mdg, 10% WSD, 5% DT (or 10% PDT). Omniscience would benefit from a MND version of this for example.
- Outside of the ambuscade cape Bookworm's Cape have amazing augments of +20 helix effect duration and 10 regen potency. It is possible to get both on one but far easier to make it in 2 capes. These are probably more important than most lugh's capes above.
- Realistically the Fi Follet Cape +1 and Aurist's Cape +1 R15 both would save you a lot of hassle of making JSE ambuscade capes.
- Pedagogy Staff and Argute Stole +1 are very fine substitutions for their higher quality variants. Sometimes you have to gear on a budget and it's better to have those than nothing at all. Assume that every time you see those in the guide you can substitute without much of a performance loss for general play. Aim to upgrade when possible.
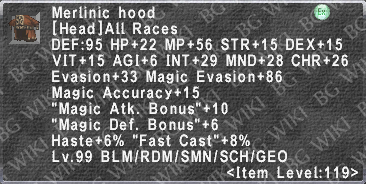
Artifact Armor
| File:Acad. Mortar. +3 icon.png Artifact Armor | ||
|---|---|---|
| Item | Upgrade? | Notes |
| File:Acad. Mortar. +3 icon.png Acad. Mortar. +3366px link= |
Yes | Great for fast cast and best piece for sublimation, fantastic for dark arts enfeebles. |
| File:Acad. Gown +3 icon.png Acad. Gown +3366px link= |
Must | Great for dark arts enfeeble, stuns, great piece for drain/aspir, and myrkr mp return too! |
| File:Acad. Bracers +3 icon.png Acad. Bracers +3366px link= |
Yes | Highest fast cast on hands, and MACC when needed |
| File:Acad. Pants +3 icon.png Acad. Pants +3366px link= |
Yes, but later | A strong piece to use in some Cure midcast sets, it helps quickly cap Cure Potency I, allowing for other, more valuable stats in others slots. Also used in Cursna set. |
| File:Acad. Loafers +3 icon.png Acad. Loafers +3366px link= |
Yes, but later | Used for stuns while in dark arts and enfeebles for MACC |
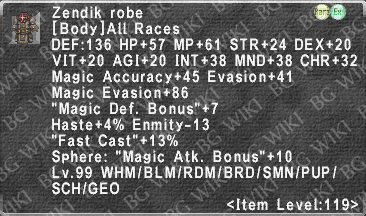
Relic Armor
| Item | Upgrade? | Notes |
|---|---|---|
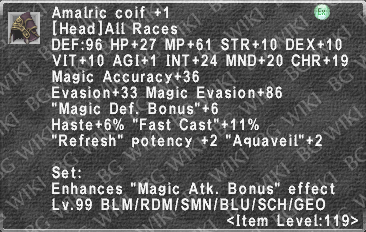
Peda. M.Board +3366px link= {{#replace:Adds "Enh. 'Altruism' and 'Focalization'"|,| }} |
Must | Grimoire spellcasting -% breaks the Fast Cast cap. Combined with Focalization merits, provides a ludicrous amount of Magic Accuracy. |
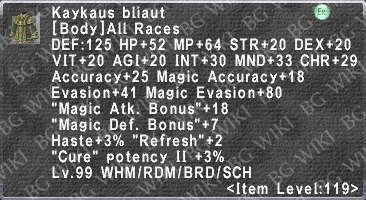
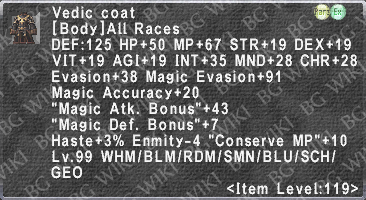
Peda. Gown +3366px link= {{#replace:Adds "Enhances 'Enlightenment' effect"|,| }} |
Must | Best sublimation, great for cursna, has the highest (12%) enhancing duration on body |
Peda. Bracers +3366px link= {{#replace:Adds "Enh. 'Tranquility' and 'Equanimity'"|,| }} |
Must | Best healing hands in a lot of circumstances, Usually getting cure potency II is difficult and these hands are really nice for it, and some healing skill on top of that. The tranquillity/equanimity is not really a consideration but it's there. |
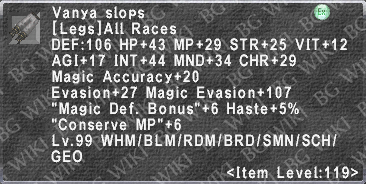
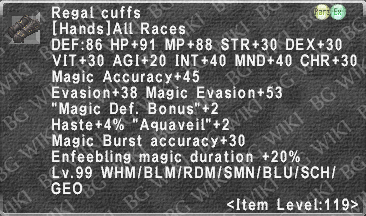
Peda. Pants +3366px link= {{#replace:Adds "Enhances 'Tabula Rasa' effect"|,| }} |
Must | Best drain/aspir piece, extends the duration of Tabula Rasa by 30 seconds. A must have. |
Peda. Loafers +3366px link= {{#replace:Adds "Enhances 'Stormsurge' effect"|,| }} |
Maybe | Good for alacrity dark arts stuns if in need of MACC. The bonus to Stormsurge is minor. If you need FC or any of the other stats it's worth doing as it's also probably a cheap upgrade anyway. |
| Divergence Weapon | ||
|---|---|---|
| Item | Upgrade? | Notes |
| File:Musa icon.png Musa366px link= |
N/A | Strongest Regen Potency+ and Enhancing Duration+ weapon in one slot. Is a space saver for Curing as well. |
| Divergence Neck Accessory | ||
|---|---|---|
| Item | Upgrade? | Notes |
| File:Argute Stole +2 icon.png Argute Stole +2366px link= {{#replace:R15/20/25: INT/MND+10/12/15 Magic DMG+15/20/25 Helix Due.+6/8/10%|,| }} |
N/A | The HQ1 and HQ2 have use cases for Free Nuking and Helixes. Obviously, the HQ2 is best. Don't bother with the NQ... |
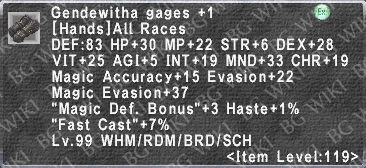
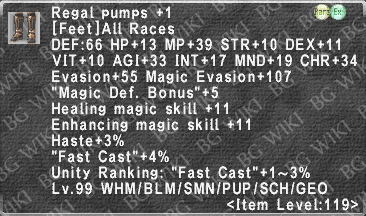
Empyrean Armor
| File:Arbatel Bonnet +3 icon.png Empyrean Armor | ||
|---|---|---|
| Item | Upgrade? | Notes |
| File:Arbatel Bonnet +3 icon.png Arbatel Bonnet +3366px link= |
Must | Highest potency for regen and other nice buffs to ebullience and rapture. With ebullience you can get quite some stronger nukes so it's worth having even if the rapture side is barely ever used. |
| File:Arbatel Gown +3 icon.png Arbatel Gown +3366px link= |
Yes | At +2/3 receives a nice chunk of DT, can also be great for nuking in specific high end sets. While it is replaceable by other comparable bodies for nuking it's worth making for the high DT and refresh in idle. |
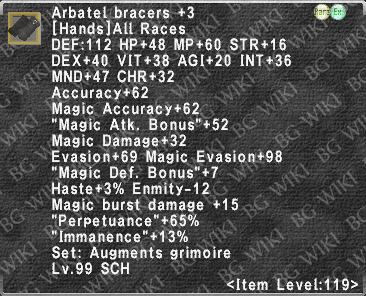
| File:Arbatel Bracers +3 icon.png Arbatel Bracers +3 
|
Must | Best buff for perpetuance for those long SCH buffs, especially regen. Even better if used for pre-buffing and changing job after. |
| File:Arbatel Pants +3 icon.png Arbatel Pants +3366px link= |
Must | These are an excellent Magic Accuracy piece, sporting an effective +99 Magic Accuracy when casting in the correctly aligned Arts. The +28 Enfeebling Skill makes these a powerhouse choice for debuffs. Ridiculous Magic Evasion (168) and -12% DT are just icing on the cake. The bonus to Penury and Parsimony are there, but not the reason to be using these pants. |
| File:Arbatel Loafers +3 icon.png Arbatel Loafers +3366px link= |
Must | The +2 upgrade made this the best feet for sch nuking and at +3 is just great. MBB II is really nice to have and Klimaform makes capping nukes dmg somewhat easy with good gear, the other stats are just icing on the cake. High mp piece for myrkr is nice and since you're getting these might be worth saving a slot on whatever is better for MP anyway. |
| Empyrean Armor Accessories | ||
|---|---|---|
| Item | Upgrade? | Notes |
| File:Savant's Earring icon.png Savant's Earring366px link= |
N/A | Still useful Idle earring for Sublimation use. Your Mileage May Vary, but still recommended. |
| File:Arbatel Earring +2 icon.png Arbatel Earring +2  {{#replace:Magic Accuracy+16~20 Enmity-6~10 INT/MND+7~15|,| }} |
N/A | Middling earring with niche use. YMMV. If you manage to get one, keep it just in case. |
Idle & Sublimation


Fast Cast
- Fast Cast +80% is the gear cap. Ideally, mix the gear you can obtain up to Fast Cast +80%.
- Please keep in mind:
- Arts Stance: Light Arts & Dark Arts, respectively--they cut effective cast and recast time of magic spells aligned with the current Arts Stance by 10%. While increasing the cast and recast of spells aligned with the opposite Arts Stance by 20%.
- It should be mentioned that on the more advanced side of the spectrum, "Wrong Arts" Fast sets can be created for situations where casting in the opposing Arts Stance is necessary.
- Grimoire Spellcasting: Peda. M.Board +3 and Acad. Loafers +3 (and their previous versions) let you cast beyond the normal 80% Fast Cast cap via a separate multiplier. Creating sets around Grimoire Spellcasting can be incredibly rewarding in the long term.
- Doesn't stack with the stratagems that affect casting time and have to be in correct art!!
- Quick Magic: A niche stat allowing for instantaneous spell casts and no recast after. Has a gear cap of 10%.
- Be cautious on when to use this stat though... Unless using, <ahem> tools, you likely won't gain full benefit of your Pre- and Midcast sets when Quick Magic procs. That being said, if you do plan on putting Quick Magic gear in your sets, your best returns will be in a hybrid Precast/Midcast set.
- Hvergelmir (Level 119 III), the Empyrean Staff, has a Fast Cast stat of +50%; but is obviously asking a lot of anyone who isn't already extremely dedicated to the job.
- Arts Stance: Light Arts & Dark Arts, respectively--they cut effective cast and recast time of magic spells aligned with the current Arts Stance by 10%. While increasing the cast and recast of spells aligned with the opposite Arts Stance by 20%.
Fast Cast Sets
|


Healing Magic
- Cure Potency occurs in three stacking categories: Cure Potency I & II (Cure from the caster), and Cure Potency Received (player target of the Cure).
- Cure Potency caps at 50%.
- Cure Potency II caps at 30%.
- Cure Potency Received caps at 30%.
- I would strongly encourage people read the Cure Formula page to get a better understanding of how the different Cures work, and how stats effect them.
- The sets below won't consider cures received, but I thought to repeat it here since I've seen some confusion in game personally.
Some Tips and Advice:
- Scholar has access to Aurorastorm I & II, which provide an additional multiplier to the Cure Formula.
- Chatoyant Staff, Hachirin-no-Obi and Twilight Cape during light weather and especially on Lightsday are by far some of the strongest pieces in your Cure casts.
- Make sure you understand why Chatoyant Staff appears in certain sets without weather/day. Chatoyant Staff has +10% cure potency, which might be helpful when you're starting out.
- If you don't have a Janniston Ring +1, a Naji's Loop is reasonable alternative (mainly for cure II potency). Or it can be a starting piece if you have nothing else at the very least.
- If for any reason you are not using one of the Aurorastorms, you should strongly consider Conserve MP options, such as Shinjutsu-no-Obi +1 R15 or Luminary Sash.
- There are also various earring options such Magnetic Earring and Calamitous Earring. Magnetic is one of the best options, but comes at the cost of other optional scenario earrings.
- Please Note: Scholar has native Conserve MP tier II, equal to a 28% proc rate before gear!
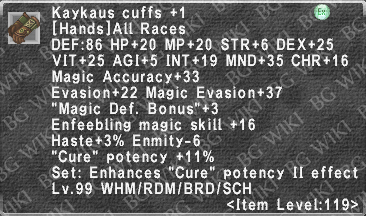
- Augments for both Vanya and Kaykaus are not set in stone.
- For example some other paths than the one chosen might be more useful to save gil/space to use in both Precast and Midcast.
- MND vs Healing skill vs Enmity- could be other considerations.
- In general make your best judgment on what you need, as these are only recommendations.
Healing Gear Sets
|


Cursna
- Healing magic skill does contribute to Cursna, so that's why it's used in the gear. Check the spell page for some formula examples and how much it benefits exactly.
|


Regen
Even though Regen is classified as Enhancing Magic, it is still a "Healing" spell, and one of the largest boons a Scholar can offer to a party in the Healer role. Regen can persist across zones unlike several buffs. For example in content such as Odyssey Sheols A,B, & C; Master Trials; Ambuscade; Etc. Pre-buffing with a Scholar externally, can make many encounters SIGNIFICANTLY easier.
- Gear or other effects that lists +X seconds, effectively apply to the base value of the spell's duration, and are multiplied by all other terms, making them very potent when used in conjunction.
- For example, Light Arts as SCH main at level 99 provides +24 potency and +48 seconds duration, and the Job Points for Light Arts provide +60 more seconds which are some of the biggest upgrades you can get.
- Lugh's Cape is +15 seconds of base duration and Telchine Chasuble is +12 seconds making them extremely strong too.
- Bookworm's Cape can be augment with +10 regen potency if you need the most potency possible.
- Musa is the best in slot weapon for both duration and potency.
- Pedagogy Staff is extremely close for duration and potency, and very slightly weaker than Musa (difference of 5%).
- +65% Duration from fully upgraded Arbatel Bracers +3, and +25% Potency from fully upgraded Arbatel Bonnet +3 on Regen V far outweigh any competition on these slots regardless of most arguable situations.
- Only ever consider using full duration gear if you are pre-buffing for specific battle fields that do not wipe buffs.
- Generally speaking, using Telchine with +10% Duration will provide more HP over time, but using +3 potency augments will yield slightly safer results.
- Please see Musa Talk/Discussion page, Regen Spell for Regen Potency information and Enhancing Magic Duration for the formulas.
- Fill in the empty slots with Conserve MP.
- As stated at the top of the Healing section, Scholar has a native tier II Conserve MP trait, equal to 28% activation. Meaning a maximum of 72% in Conserve MP gear caps its activation.
Regen Gear Sets
|
Enhancing
- Reaching 500 Enhancing skill will cap most enhancing spells--notably Barspells. 500 Enhancing skill should be fairly obtainable with Light Arts but you may want to consider what to do if you have to cast your buffs in Dark Arts for any reason.
- At 500 skill and above, Aquaveil prevents 3 spell interruptions.
- Stoneskin caps at 350 HP absorbed, though some items will bypass the cap and allow for up to 475 HP absorbed. Check the spell page for more specifics.
- This gear will only buff Stoneskin on yourself, not your party when used with Accession.
|
Enfeebling
|


Nuking
Notes
* Notes on Weather and Day Magic Affinty:
- Given Scholar's unique -storm line of spells, here is a basic run down of weather (and day of the week) alligned effects on magic damage in context with the nuking magic damage equation.
- Matching single weather and spell proc: +0.1
- Matching double weather and spell proc: +0.25
- Matching double weather and day spell proc: +0.35
* General Notes and Information:
- If you want to fully optimize your damage, keep in mind:
- Low tier nukes benefit from Magic Damage;
- High tier nukes benefit more from Magic Attack Bonus.
- In the future, the sets herein may be expanded to cover these optimizations...
*In-depth Notes and Information:
- Scholar's relationship with nuking is slightly more complicated than, say, Black Magic. This is due to Scholar’s native Elemental Magic Skill level and access to high tier (Tier IV & V) Elemental nukes being tied to Dark Arts. Here is a quick break down of Scholar's Elemental Skill levels based on Neutral/Light Arts and Dark Arts:
| Skill | Rank | Level 99 Skill | ★Master | ★ML50 |
|---|---|---|---|---|
| Elemental Skill (Neutral) | D | 334 | 370 | 420 |
| Elemental Skill (Dark Arts) | B+ | 404 | 440 | 490 |
- As can be seen, the difference in skill level is significant. While there are reasons/scenarios for one to heal in Dark Arts stance, there is next to no reason/scenario where one would be nuking in a neutral or Light Arts stance. Elemental Skill level also plays a role in personal Magic Açcuracy when nuking. Which brings us the next point on determining Magic Accuracy in a fight.
Admittedly, I'm summarizing this from the Community Black Mage Guide, as it has an excellent write up on the matter. Credit goes to Spicyryan.
- In order to determine your total Magic Accuracy, you need to add up your Elemental Skill, Magic Accuracy "Skill" from Weapon; Magic Accuracy from gear; Abilities (if you are using them); Gifts; Buffs; Debuffs; and Food. The sum total of the aforementioned stats will give you a rough number as a starting point to determining your Magic Accuracy and therefore your Magical Hitrate.
- Simply put: Magical Hitrate is a % based on player Magic Accuracy versus enemy Magic Evasion. Just like Physical Hitrate, Magical Hitrate caps at 95%. But in the case of magic casting, that 5% results in a resist.
- If your Magical Hitrate is 50% or more, then magic accuracy +1 is equivalent to hit rate +1%.
- If your Magic Hitrate is less than 50%, then magic accuracy +1 is equivalent to hit rate +0.5%.
- Any Magic accuracy that raises you to the 50% mark then returns to being 1:1.
- For example: Your Magical Hitrate is 40% and you gain 40 magic accuracy, your hitrate becomes 60%.
- Simply put: Magical Hitrate is a % based on player Magic Accuracy versus enemy Magic Evasion. Just like Physical Hitrate, Magical Hitrate caps at 95%. But in the case of magic casting, that 5% results in a resist.
- So this is where the real legwork begins..
- Alongside Enemy Magic Evasion is one of the biggest determining factors of Magical Hitrate: dINT (the difference" between Player and Monster Intelligence stats), as well as Elemental Resistance (also known as Resistance Rank).
I hope you've been following this far.
- dINT plays a very important role in the Magic Accuracy of all nukes and INT based enfeebles.
| dINT and Magic Accuracy+ | |||||||
|---|---|---|---|---|---|---|---|
| dINT | <-70 | -70 ~ -31 | -30 ~ -11 | -10 ~ +10 | +11 ~ +30 | +31 ~ +70 | >+70 |
| MAcc+ Per INT | 0 | 0.25 | 0.5 | 1 | 0.5 | 0.25 | 0 |
| Range Total | +0 | +10 | +10 | +20 | +10 | +10 | +0 |
| MAcc+ Total | +0 | +0-10 | +10-20 | +20-40 | +40-50 | +50-60 | +60 |
Now, once your INT has become Magic Accuracy, it affects your magic hit rate in the same way as above. For example:
- Your Magical hitrate is 65%.
- dINT is +30, and you gain 19 INT.
- Your hit rate is now 69%.
- dINT is -38 and you gain 19 INT.
- Your hit rate is now 72%.
- dINT is +30, and you gain 19 INT.
- Your magic hit rate is 45%.
- dINT is -50 and you gain 20 INT.
- Your hit rate is now 47%.
- dINT is -10 and you gain 20 INT.
- Your hit rate is now 60%.
- dINT is -50 and you gain 20 INT.
Resistance Rank is the final and most important portion of determining Magic Accuracy, Magical Hitrate, as well as the damage of your nukes. Please see the table below:
| Estimated Magic Accuracy Requirements | ||||||||||
|---|---|---|---|---|---|---|---|---|---|---|
| Level | 30% | 40% | 50% | 60% | 70% | 85% | 100% | 115% | 130% | 150% |
| 124 | 1,005 | 892 | 831 | 814 | 778 | 756 | 755 | 753 | 736 | 729 |
| 125 | 1,041 | 925 | 862 | 843 | 828 | 784 | 779 | 775 | 758 | 750 |
| 126 | 1,078 | 958 | 893 | 872 | 852 | 812 | 804 | 797 | 780 | 772 |
| 127 | 1,114 | 991 | 924 | 901 | 863 | 840 | 829 | 818 | 801 | 793 |
| 128 | 1,154 | 1,024 | 955 | 930 | 891 | 868 | 854 | 840 | 823 | 814 |
| 129 | 1,185 | 1,057 | 986 | 959 | 920 | 896 | 879 | 862 | 844 | 835 |
| 130 | 1,219 | 1,090 | 1,017 | 988 | 948 | 924 | 904 | 883 | 869 | 856 |
| 131 | 1,257 | 1,123 | 1,048 | 1,017 | 977 | 952 | 928 | 905 | 889 | 878 |
| 132 | 1,293 | 1,156 | 1,079 | 1,046 | 1,005 | 980 | 953 | 926 | 911 | 899 |
| 133 | 1,329 | 1,189 | 1,110 | 1,075 | 1,034 | 1,008 | 978 | 948 | 933 | 920 |
| 134 | 1,365 | 1,222 | 1,141 | 1,104 | 1,060 | 1,036 | 1,003 | 970 | 955 | 941 |
| 135 | 1,402 | 1,255 | 1,172 | 1,133 | 1,089 | 1,064 | 1,028 | 991 | 977 | 962 |
| 136 | 1,438 | 1,288 | 1,203 | 1,162 | 1,118 | 1,092 | 1,052 | 1,013 | 999 | 984 |
| 137 | 1,475 | 1,321 | 1,234 | 1,191 | 1,147 | 1,120 | 1,077 | 1,034 | 1,021 | 1,005 |
| 138 | 1,510 | 1,354 | 1,265 | 1,220 | 1,175 | 1,148 | 1,102 | 1,056 | 1,043 | 1,026 |
| 139 | 1,547 | 1,387 | 1,296 | 1,249 | 1,204 | 1,176 | 1,127 | 1,078 | 1,065 | 1,047 |
| 140 | 1,582 | 1,420 | 1,327 | 1,278 | 1,232 | 1,204 | 1,152 | 1,099 | 1,087 | 1,068 |
| 141 | 1,618 | 1,453 | 1,358 | 1,307 | 1,260 | 1,232 | 1,176 | 1,121 | 1,109 | 1,090 |
| 142 | 1,654 | 1,486 | 1,389 | 1,336 | 1,288 | 1,260 | 1,201 | 1,142 | 1,131 | 1,111 |
| 143 | 1,690 | 1,519 | 1,420 | 1,365 | 1,317 | 1,288 | 1,226 | 1,164 | 1,153 | 1,132 |
| 144 | 1,726 | 1,552 | 1,451 | 1,394 | 1,345 | 1,316 | 1,251 | 1,186 | 1,175 | 1,153 |
| 145 | 1,762 | 1,585 | 1,482 | 1,423 | 1,374 | 1,344 | 1,276 | 1,207 | 1,197 | 1,174 |
| 146 | 1,798 | 1,618 | 1,513 | 1,452 | 1,402 | 1,372 | 1,300 | 1,229 | 1,219 | 1,196 |
| 147 | 1,834 | 1,651 | 1,544 | 1,481 | 1,430 | 1,400 | 1,325 | 1,250 | 1,241 | 1,217 |
| 148 | 1,870 | 1,684 | 1,575 | 1,510 | 1,459 | 1,428 | 1,350 | 1,272 | 1,263 | 1,238 |
| 149 | 1,906 | 1,717 | 1,606 | 1,539 | 1,487 | 1,456 | 1,375 | 1,294 | 1,285 | 1,259 |
| 150 | 1,943 | 1,750 | 1,637 | 1,568 | 1,515 | 1,484 | 1,400 | 1,315 | 1,307 | 1,280 |
- Values in the table are based off of: [1].
- Resistance Ranks are linear per level while the various ranks for that level are exponential increases as resistance increases.
- Final table data is credited to Thefoxdanger.
- There was not enough data collected for the 20% and 25% ranks, but it is safe to say the curve gets steep.
- Keep in mind, the table is estimated values built off of another table of very well estimated values. Expect that you may possibly be off by ~10 magic accuracy at a given time.}}
TL;DR
- Magic Hit Rate caps at 95%, and a miss is simply a resist, which breaks down into various values.
- The value of Magic Accuracy from INT depends on dINT. This value ranges between +0 ~ +1.
- Resistance Ranks (aka Resistance Tiers) can dramatically impact Magic Accuracy, so plan accordingly!
Corresponding pages:
Free Nuking
Entry Tier
- These two sets are seriously the most bare minimum sets you could even conceivably nuke in.
- Your damage will be terrible, but in the immortal words of Ralph Wiggam, "I'm helping."
|


Mid Tier
|


High Tier
|
Situational Nukes
|


Utility Nuking Sets
|


Magic Bursting
|
Helixes
- Use appropriate Magic Affinity gear for specific elements!
- Pixie Hairpin +1 and Archon Ring for Noctohelix II and Kaustra.
- Marin Staff +1 for Anemohelix II.
- Daybreak and, if you have it, Weatherspoon Ring +1 for Luminohelix II.
- Quanpur Necklace potentially for Geohelix II but keep in mind Argute Stole +2 is likely better.
|


Dark Magic
Drain/Aspir
- Notable Aspir targets include PLD-specific mobs like Crabs & Crawlers; BLM-specific mobs such as Worms; and Beastmen pets in Dynamis - Divergence.
- Remember, neither Drain or Aspir works on undead targets.
|


Stun
- In some circumstances, you want to midcast in some amount of Fast Cast or gear Haste for Stun. This is up to you to know when it's appropriate, and more importantly, have more than one stun gear set. Generally speaking, if you don't need a faster recast you want to make sure Stun lands accurately (like Zerde). A faster recast means nothing if you didn't land a key stun!
|
Damage Taken Set
|


Melee/Weaponskill Sets
|


Misc Sets
- While these sets may not seem important they will help you a lot over time, some might be tricky to use properly but worth thinking about.
|


_description.png)
_description.png)
_icon.png)
_description.png)