|
|
A Bard guide by Funkworkz
Recent Updates
| November 23rd, 2022
|
|
|
- Major update of the guide.
- Changed sub job and merit point recommendations.
- Incorporated Empyrean +2/+3 armor everywhere.
- Revamped Idle sets.
- Created tanking (Enmity+) set and a Banish set.
- Added Evasion+ set from FFXIAH thread.
- Created a walkthrough section to teach players how to properly apply 3rd/4th/5th songs.
- Added thoughts about the Miracle Cheer.
- Fixed many typos.
- Shitload of other small changes.
|
| April 13th, 2022
|
|
|
- Revamped the Lullaby set wording. After adding Master Levels, it made no sense. Also removed all "BiS" terms.
|
| February 12th, 2022
|
|
|
- Section about Master Levels, and slight changes to Lullaby sets to incorporate Master Level 30.
|
| January 20th, 2022
|
|
|
- Notes about song duration, and the shame about Ballad+.
|
|
File:Obamiwannabuffya header2.jpg
|
| This guide is an expansion of my previous Gearsets page I had on here before. I dive deeply into gearsets that you will want to work towards for Bard, as well as cover Merits, Job Abilties, and Job Points.
If you do not know the first thing about Bard, I recommend watching Ruaumoko's 42 minute video on YouTube and then return to this guide.
|
Recommended Game Adjustments
Controversies aside, I recommend the following settings and game adjustments to assist you in your job as a Bard.
Windower Addons / DAT Swaps
- XIView - This set of icon DAT swaps will change bard song effects to be color coded. You will be able to look at a glance and see what effects your party members have. As an example, we use these icons on the Song Potency page here on BGWiki.
- Remember, you may need to re-install these files after Version Updates.
- Timers - This addon shows timers on all of your party members. In laggy situations, it can be inaccurate.
- Distance - Useful for making sure AoE songs will land on players. Maximum distance with Horn is 9.9 yalms, displayed as 9.9 with the addon when targeting a party member.
- DParty - See the distance that you are away from your party members. It is shown by the party list.
- Pianissimo is not affected by this addon.
- aecho - A silenced Bard cannot sing or heal
- Gearswap - This addon is needed to properly use Idle/Precast/Midcast sets to their fullest extent. Although it is possible to use gearsets, Gearswap just makes it easier and more reliable for you.
- It is best to start with a LUA somewhere online and replace the gear with yours. Remember to edit the correct file on your computer (Not one on your desktop lol) and //gs reload after making a change. //gs export will help build your sets by exporting what you are currently wearing. Do this for armor with augments especially.
- PartyBuffs - Shows buff icons near the party member names. Uses icon swaps if you have XIView installed too.
- Shortcuts - Easily cast spells on players and monsters. Examples include "/silence" "/reraise" "/haste" etc.
- You can add songs to this addon yourself. By default, it does not come with songs in it.
In-Game Configuration
- Turn on Config > Misc 3 > Status Icons > Party Icon Display
- The plugin PartyBuffs is basically the same thing.
- Turn on Config > Misc 3 > Status Icons > Timer Display
- Use this to verify your song timers. The timers on yourself are the same timers your melee have. Of course, if you gave yourself a different song this point is moot.
Merit Points

Below are my recommendations for Merit Point Bard choices.
Group 1
Lullaby Recast - Although this sounds good at first, Lullaby has an overall recast cap that is easily hit with Equipment Haste and Magic Haste. Meriting this category does not further reduce the recast time, therefore is not beneficial.
Finale Recast - Same as above. There is a minimum recast time on Finale that is easily hit. Meriting this is unnecessary.
Minne Effect - This is a good choice for 5/5. Minne has seen a huge comeback since Odyssey has been released. Recommended
Minuet Effect - Also useful for the higher-level monsters we are fighting now. Typically, DD have two Minuet on them at any time. 5/5 Minuet merits will translate to an extra +10 attack. With Soul Voice, this is +20 attack. It is even more if they have a third Minuet for zerg situations. Because Minuet is almost always sang, these merits will see a better return in the end. Recommended
Madrigal Effect - I used to recommend this to everybody. With the addition of Reforged Empyrean Armor +2/+3, accuracy is plentiful and easy to stack and it is safe to skip Madrigal nowadays. If you need to pop a Madrigal on party members for an evasive NM, your DD really sucks if they rely on these +5 additional accuracy on top of the 114 that Blade Madrigal (with Madrigal+9) provides.
Don’t forget that if you are planning on singing a Madrigal for some kind of boss fight, it only costs a mere 15 merits to max this effect from 0, plus another 15 to put them back into Minuet for one night. You will earn 30 merits back before you realize they are missing.
Group 2
Troubadour - This ability increases your casting time by 1.5x, but also doubles the duration of songs. Adding additional upgrade levels to the ability increases song accuracy. I highly recommend maxing this ability to 5/5. This effect gives you an essential Elemental Seal effect on all songs while the ability is active. Recommended
Nightingale - This ability decreases your song spellcasting and recast times of songs. Maxing this ability to 5/5 grants all your songs a 100% Quick Magic effect, and it stacks with Troubadour. This is a necessity to quickly cast songs and rotate parties in end game content and is a necessity to 5/5. Recommended
Con Anima & Con Brio - Used to be Sirvente and Dirge spells. These new Job Traits are nice as they are calculated in a separate step after Damage Taken, but they are not worth meriting over NiTro (Nightingale and Troubadour). It also means sacrificing your idle head and hand slot to boost these merits with relic pieces, and nobody wants to do that.
Job Points

Although you want to max out all categories and attain Master, below are my recommendations on what order to dump your Job Points.
- Minuet Effect - Attack +20 per Minuet when maxed. You'll benefit from this bonus during CP parties, so max it first.
- Song Accuracy Bonus - We are assuming this is the same as Magic Accuracy, just worded differently. No definitive testing has been done, so it is the consensus that this is Magic Accuracy +20.
- Requiem Effect - DoT +3 per upgrade, for a maximum of an additional +60 DoT per second! This group exponentially raises the DoT of Requiem, turning it from insignificant to a substantial DoT!
- Lullaby Duration - +20 second duration to Lullaby when maxed.
- Marcato Effect - +20 second duration to songs cast when under Marcato effect. This stacks with all Song+ gear as well as other Job Point categories.
- Clarion Call Effect - +40 second duration to songs when the ability is active. Greatly extends the duration to Soul Voice songs, as the abilities are generally paired together.
- Minne Effect - Defense +20 per Minne used when maxed.
- Tenuto Effect - Tenuto, albeit useful, is not as important as maxing as other categories first.
- Pianissimo Effect - Adds Fast Cast when Pianissimo is active. We max out our Fast Cast in our Precast sets, so this is irrelevant.
- Soul Voice Effect - Same as above.
Magic Skill
Bard has three types of Magic Skills:
You might be thinking, nobody sings without an instrument. This is true. Singing Skill is combined with either Wind Skill if you are using a Wind instrument, or with String skill if using a string instrument. The combined total skill of the two is what is used in calculating song potency and song offensive accuracy. String skill has a direct effect on the total radius of AoE offensive and defensive songs.
The highest demand song is Honor March which caps at 900 combined skill. With Job Points it is very easy to reach this, and we do not have to make any gear considerations if you are master. This guide assumes you are. We go further into the great "Skill vs Macc vs CHR" debate later in the debuff sets section.
Skillup
If you are under capped once you hit 99, which you probably will be, there is a great way to skillup your three bard skills.
Head to Ceizak Battlegrounds after getting Ionis. Find the Bight Uragnites on any of the beaches. Equip the type of instrument you need to skill up, and spam your Threnody songs on the monster. You can rotate between the elements instead of wait for the recast of a single one. Keep the monster slept to avoid any danger of damage. They will not wake up since Threnody does not deal damage. Offensive spells have much quicker skill gains than defensive songs, while also having a much shorter casting time. Note you can also find them in the less popular Yahse Hunting Grounds if there are none available in Ceizak.
Be sure to also look at the Skill Increase Rate page for other easy bonuses to snag. These effects all generally stack on each other.
Master Levels for Bard are beneficial in a couple ways.
- First and foremost, Curaga III is an enormous boost to our curing capabilities. A well geared and knowledgeable Bard is capable of main curing an Odyssey segment farming run now. Depending on your party setup, White Mage is almost a full time sub job now for support situations.
- Extra string skill allows us to hit the next tier of Horde Lullaby II for one extra yalm AOE range. This does not affect Horde Lullaby, as Bard easily caps that range without any gear. See the Lullaby section in this guide for details.
- Extra magical skill is also wonderful for song accuracy situations in high end content such as Sortie basement bosses.
- Dagger and Sword skills, as well as overall stat increases are great for damage dealing situations.
- Stat and skill increases help with a defensive aspect.
Food Options
Magic Accuracy Options:
Defensive Options:
- File:Miso Ramen icon.png Miso Ramen HP+100 STR+5 VIT+5 DEF+10% (Max. 170) "Magic Def. Bonus"+5 Magic Evasion +10% (Max. 50) "Resist Slow" +10
 Om. Sandwich HP+11% (Max. 150), VIT+7, MND+7, Accuracy+11% (Max. 80), DEF+11% (Max. 120), Enmity+4 Om. Sandwich HP+11% (Max. 150), VIT+7, MND+7, Accuracy+11% (Max. 80), DEF+11% (Max. 120), Enmity+4
Offensive Options
 Grape Daifuku: HP+20 STR+2 VIT+3 Acc.+10% (Max. 80) Atk.+10% (Max. 50) Rng. Acc.+10% (Max. 80) Rng. Atk.+10% (Max. 50) "M. Atk. Bonus"+3 Grape Daifuku: HP+20 STR+2 VIT+3 Acc.+10% (Max. 80) Atk.+10% (Max. 50) Rng. Acc.+10% (Max. 80) Rng. Atk.+10% (Max. 50) "M. Atk. Bonus"+3- File:Gyudon icon.png Gyudon: Enmity-5 "Double Attack"+5% Weapon skill damage +5%
 Red Curry Bun: HP+25 STR+7 AGI+1 INT-2 Attack+23% (Max. 150) Ranged Attack+23% (Max. 150) "Resist Sleep"+3 "Demon Killer"+4 HP recovered while healing +2 MP recovered while healing +1 Red Curry Bun: HP+25 STR+7 AGI+1 INT-2 Attack+23% (Max. 150) Ranged Attack+23% (Max. 150) "Resist Sleep"+3 "Demon Killer"+4 HP recovered while healing +2 MP recovered while healing +1
- If you have a full party, stats on this increase to the HQ bun effect.
Hybrid Options:
Songs
Rather than repeating almost all the information already available on the wiki, please review the Song Potency page for all the information you need on song strength.
By clicking on a song surname, such as Minuet, you'll be able to see the items and equipment that enhances those songs. All those details are mentioned later too.
As a new bard, you will want to pick up one of the following instruments while working towards your Daurdabla. Both options give an additional song.
Additional Songs Explanation
There are a few important notes to remember before we get into this.
- Clarion Call songs always take the third song slot. Instruments that grant additional songs always take the fourth and fifth song slots, unless Clarion Call is not active. In that case, they take the third and fourth song slots.
- The purpose of dummy songs is that you must apply additional songs with the instrument that grants such ability. Besides the Miracle Cheer, the instruments that provide such songs do not also provide potency to songs. This is where the term "dummy songs" come from, since they are just "placeholders". They are overwritten with full strength songs.
- You only need to sing these "dummy songs" if the party member lost one in some way. Death, dispel, worn off naturally, zoned, etc. Remember that this only applies to that party member. If everyone else has 4 songs, there's no reason to give dummies to everyone. Pianissimo these back up individually.
- The term "Slot" used in this guide is only for mindset purposes when applying songs. Example: If your "second slot" song is dispelled on a character when they had five songs applied, you cannot simply use Daurdabla to put it back up since it was your fourth slot song. This situation will overwrite your least duration song. You must have the Clarion Call effect active to reapply a fifth song (in your "third song slot").
- Songs are not always the same length after applying your midcast set. This is because some songs have more “Song+” than others. Also remember that if you are Job Master, Marcato also gives duration to whatever song you pair up with it. Usually it is Honor March, so it ends up being naturally a longer duration.
- When you sing a song on a party member who already has their maximum number of songs (regardless of instrument), the song that has the LOWEST duration is always overwritten.
- The one exception to this is if you re-sing a song that is already on that player. In this case, that song is then overwritten because a player cannot have two of the same buff on them. This is regardless of the effect’s remaining duration on that player, or the potency that you are re-singing the song in. You will not receive a “has no effect” message when you overwrite a song like this.
- Finally, do not rely on the Timers plugin for overwriting songs. I have had many situations where the plugin timer is incorrect because it did not accurately pick up the gear you were wearing. This is even worse in laggy areas like Odyssey. The in-game timers feature is much more reliable even though it does not show seconds remaining. Be sure to turn it on in your settings. Even though you will not be able to judge which songs will be overwritten with this plugin, you will at least know full duration songs were put up on your DD since they are usually being sung.
I will create a hypothetical situation to demonstrate how to properly apply a set of 5 songs on your DD, 5 on support, and 5 on your tank.
- Step 1: create "dummies", because we do not have any songs up right now. Sing in any order: Victory March, Honor March, Minuet IV, Minuet V, Knight's Minne V.
- The goal is to get the maximum number of songs you can sing onto your entire party. We also do not want our dummy songs to be stupid. Songs like Paeon and/or Goblin Govotte are pointless. We want to sing useful songs so melee can begin fighting instead of standing around. A 0 potency Valor Minuet V still grants 124 Attack. It is hard to argue that a 6/tick Paeon is better than that.
- This is where I tell you that your lua should have a toggle to equip either your multi-song instrument or full-strength instruments, while skipping your midcast set. Manually controlling this is less messy as well.
- Step 2: Use Nightingale + Troubadour. Sing in this order so your DDs are all buffed first and will have their maximum damage potential: Minuet IV > Minuet V > Minne V > Victory March > Marcato + Honor March.
- Because your songs are typically the same length (if you listen to my advice later in this guide and do not use Brioso Slippers +3 for Madrigal/Prelude), we want to sing the songs that we want to overwrite first. This is Minuet since mages do not need it, and tanks do not usually care about it. By the time you sing all 5 songs on your DD, Minuet will have the lowest timer by a few seconds compared to the rest.
- Step 3: Pianissimo Minne IV > Pianissimo Ballad III on your tank.
- Tank is next in this step. Both songs should overwrite both Minuets on the tank. They will end up with Minne x2, March x2, and Ballad.
- Step 4: Pianissimo Ballad II > Pianissimo Ballad III on your supports, repeat or replace these songs with others if needed/requested, such as Etudes.
- Support will end up with March x2, Minne x1, and Ballad x2
- If you are playing a support/healer role rather than offensive role, you may be able to hit just the support and yourself without having to use Pianissimo in this step. That way you will also receive Ballads.
In situations where a song is dispelled from a party member:
- Step 1: Hit your multi song instrument toggle.
- Step 2: Pianissimo then Re-sing the song that was dispelled on that person.
- Step 3: Hit your multi song instrument toggle. (You will then be singing with your potency gear/instrument)
- Step 4: Pianissimo then Re-sing the song that was dispelled on that person. You may have a short recast timer, but it will be negligible if you keep your fast cast gear on for Step 3.
Job Abilities
Pianissimo - This ability allows you to cast a song on a single target. Since all Bard songs are now AoE, this ability lets you easily cast on a single party member instead of isolating them from the group to cast an AoE song. The recast is only 5 seconds, so you can use this ability any time.
Tenuto - This ability allows you to control what songs always stay on yourself. It is best used with songs such as Ballad to keep your MP high in main healing situations. The recast is 5 seconds, so again you can use this any time. It is best used before singing songs on other players.
Clarion Call - Adds an additional song effect. This ability always takes the third song slot. Keep this in mind when pairing it with Daurdabla and other multi song effect instruments. These instruments will always take the 4th and/or 5th slots when you have Clarion Call active. Additionally, keep in mind that it is possible to keep your Clarion Call song on party members indefinitely. After you activate the ability and sing, keep the song active by not letting it wear off. You can then simply continue to overwrite the song until it wears off, the song is dispelled, the player is KO'd, or they change zones.
Soul Voice - Our ability that doubles song effects. It stacks with any type of "Song+" equipment and Merits.
Job Ability Enhancement Equipment
The following three pieces of gear are incredibly nice to have. They offer extensions on the amount of time the following abilities are active. For survivability, it is recommended to use at least the Item Level 119 variants.
Whether your using the +2 augmented piece or the +3 Item Level 119 piece, there is no difference in the strength of the augments on these items. They are all listed here for ‘’clickability’’.
Soul Voice - File:Brd. Cannions +2 icon.png Bard's Cannions +2 File:AugRank.png / File:Bihu Cannions icon.png Bihu Cannions / File:Bihu Cannions +1 icon.png Bihu Cannions +1 /  Bihu Cannions +2 / Bihu Cannions +2 /  Bihu Cannions +3 Bihu Cannions +3
- Extends Soul Voice’s ability duration by 30 seconds
Troubadour - File:Brd. Jstcorps +2 icon.png Bard's Justaucorps +2 File:AugRank.png / File:Bihu Justaucorps icon.png Bihu Justaucorps / File:Bihu Jstcorps +1 icon.png Bihu Justaucorps +1 /  Bihu Justaucorps +2 / Bihu Justaucorps +2 /  Bihu Justaucorps +3 Bihu Justaucorps +3
- Extends Troubadour ’s ability duration by 4 seconds per merit level, for a maximum of 20 additional seconds
Nightingale - File:Brd. Slippers +2 icon.png Bard's Slippers +2 File:AugRank.png / File:Bihu Slippers icon.png Bihu Slippers / File:Bihu Slippers +1 icon.png Bihu Slippers +1 /  Bihu Slippers +2 / Bihu Slippers +2 /  Bihu Slippers +3 Bihu Slippers +3
- Extends Nightingale ’s ability duration by 4 seconds per merit level, for a maximum of 20 additional seconds
Support Jobs
Always remember: ‘’shit’s situational’’ when picking your sub job. In today’s game, your sub always depends on the needs of your party with the content you are playing.
 White Mage White Mage
Healing can be very beneficial as a Bard. Subbing WHM grants the ability to help your party's healer and keep member’s top notch. With the addition of Master Levels, Curaga III gives Bard the ability to be a main healer in Odyssey Sheol A/B/C farms if properly geared and you can keep Ballad up on yourself.
-na spells and Erase can be incredibly helpful to have and use on your party if your healer is busy. Silence should not be disregarded either, as it is pretty easy to land in your debuff set. Landing it helps pull in those pesky casters who decide to stay at a distance and not gather on your tank. Not to mention landing Silence helps prevent your party from getting Sleepga’d.
With the addition of Sortie and the King Ranperre's Tomb Locus monsters , we are once again fighting a significant amount of Undead monsters again. Being able to Banish monsters as Bard can significantly help your party kill more efficiently. Bard even has four pieces of Banish+ enhancing gear that they can equip.
 Red Mage Red Mage
Fast Cast is not as beneficial anymore these days with how easy it is to reach the cap for Bard. Convert has some good utility, but you will not have curaga access which is typically more beneficial. You will also be missing out on -na spells and Erase. You will also have access to Frazzle, Distract, and Silence. With your high Magic Accuracy set, it is relatively easy to land these. They could be significant to help on NMs if you do not have a Red Mage in the group to land the Tier II versions of the spells.
Phalanx is by far the best reason to sub Red Mage. It may certainly keep you alive during Dynamis - Divergence/Omen/Sortie pulling/sleeping. I recommended acquiring a Phalanx+ set via the Dark Matter Adventurer Campaigns on a set of Chironic gear.
 Dancer / Dancer /  Ninja Ninja
Ninja grants Dual Wield III delay reduction and shadows. Utsusemi might have legitimate utility in some situations, but they are few and far between anymore.
Dancer gives things like Steps, Sambas, and Waltzes that may be a legitimate way to keep your party alive while also being able to dish out damage if your party needs a little more.
 Warrior Warrior
Bard has Fencer II, but the effect is negligible with TP Bonus +300 and Critical Hit Rate +5%.
 Paladin Paladin
Paired up with your DT sets, this gives Bard an option for pulling in Omen and Odyssey without getting immediately slaughtered. The downside is that you need to make a rule in your LUA file to lock your DT set, or else you will die if you pull and switch to precast/midcast.
Gear Sets
See below for my recommended gear sets.
Idle
New 99 Bard
Don’t spend too much time trying to augment your armor. Your time is better spent getting into Sortie with a DD job and working towards your Fili Attire Set +2.
Experienced Idle
This set is overkill on damage taken reduction, so feel free to swap some accessories around.
Hands
Volte Gloves and Volte Bracers are both good options for this set if you are lucky enough to have a pair of either.
If not, stick with Fili Manchettes +2.
Main/Ranged
Only the instruments can get Regen, and only the dagger can get Refresh. Both get PDT, so swap depending what you prefer.
Dark stone augments overall suck, so I just throw on HP/MP. I have not yet gotten PDT-5 on the Linos. I am not entirely sure it is
possible. -4 is sufficient, as your only missing 1% now with the rest of the set.
Ideal Idle
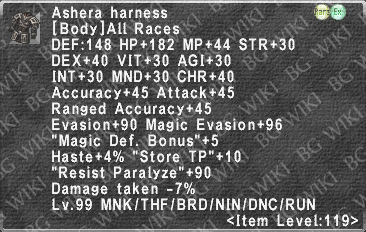
Body
The Ashera Harness has lost its shine due to so many other - Damage Taken options we have post 2022 FFXI, some of which have higher MDB and base stats. While the Volte Doublet offers solid Magic Evasion, MDB, as well as Refresh, it is hard to get just like the Ashera Harness. I recommend sticking with Inyanga Jubbah +2 until you get the Ashera or Volte Doublet. The Paralyze resistance on Ashera is nothing to scoff at. Additionally, the Bunzi's Robe has the highest Magic Evasion/INT/MDB combo available.
Stats for the above set
- Damage Taken -52%
- Magic Evasion +701
- Evasion+476~+486
- Refresh +1
- Regen +9
|
Explanation and Reasoning
I am going to list a new 99 set, experienced set, and my ideal set with additional armor considerations. Work towards the "Ideal" set, starting with the set on the top of the section with each slot. There is a lot of flexibility here, so feel free to make a combination of all these sets and options that suits you the best. Regardless of your choices, your focus for your Idle set should be the following order:
- Damage Taken
- Physical Damage Taken - Add up your Damage Taken, and supplement Physical Damage Taken to hit the 50.0% cap.
- Magical Damage Taken - Add up your Damage Taken, and supplement Magical Damage Taken to hit the 50.0% cap. Technically you only need 31% MDT if you have Shell V on you. That being said, I would still wear my MDT items regardless because of the Magic Evasion even when aiming for 31%.
- Magic Evasion - Never underestimate this stat. Stacking it on top of, and in conjunction with DT will cause you to resist many status ailments and take next to no magical damage.
- Magic Defense Bonus - A less understood stat, but still nice to have.
- Refresh
- Everything else, such as Regen
Weapon and Shields
I was extremely excited for the  Daybreak when it was first added to the game. I soon found that when switching gear, you blink on every action and lockstyle no longer works worth a damn. Sure, you can say everyone should be using BlinkMeNot but I rather not die from someone who doesn't use it fail to cure me when pulling in Dynamis. I stick to daggers in my sets on this page. Feel free to use the Daybreak, as it is an amazing club with the very high Magic Evasion available on a weapon as well as Refresh. Daybreak when it was first added to the game. I soon found that when switching gear, you blink on every action and lockstyle no longer works worth a damn. Sure, you can say everyone should be using BlinkMeNot but I rather not die from someone who doesn't use it fail to cure me when pulling in Dynamis. I stick to daggers in my sets on this page. Feel free to use the Daybreak, as it is an amazing club with the very high Magic Evasion available on a weapon as well as Refresh.
Dagger main hand options that have beneficial idle set stats:
- File:Ipetam icon.png Ipetam - Evasion+22, File:AugRank.png Max:
- Snow: Magic Evasion+15
- Leaf: Physical Damage Taken -4-5% OR Magical Damage Taken -4-5% OR Refresh+1
- Dusk: HP & MP +30~40
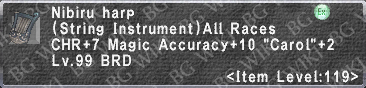
 Skinflayer - Evasion+22, File:AugRank.png Physical Damage Taken -3% Skinflayer - Evasion+22, File:AugRank.png Physical Damage Taken -3% Odium - Evasion+13, Magic Evasion+13, and Death resistance. Odium - Evasion+13, Magic Evasion+13, and Death resistance.- File:Nibiru Knife icon.png Nibiru Knife - Evasion+29, File:AugRank.png Path D: Magic Evasion+20
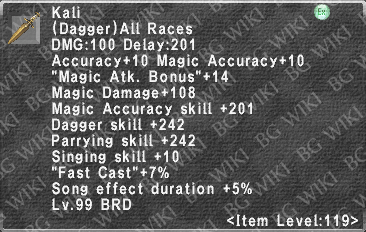
 Sangoma - Evasion+22, Refresh+1, Regen +1 Sangoma - Evasion+22, Refresh+1, Regen +1- File:Kali icon.png Kali - Path C gives Refresh +1
- File:Barfawc icon.png Barfawc - Very expensive, but if you can afford it then go for it. It will provide Damage Taken -12% with four songs up, as your songs are always up. You can make multiple other equipment swaps if you have this dagger.
- File:Chocobo Knife icon.png Chocobo Knife - Wonderful option if you are lucky enough to win one, and actually choose that weapon compared to other picks from the Mog Bonanza.
- File:Nibiru Harp icon.png Nibiru Harp - Path D has Magic Evasion +20, PDT -3% and MDT-3%. Again, you will blink if you use this as your idle piece. Just keep that in mind.
There are only three Item Level shields for Bard to consider.
 Genmei Shield Genmei Shield
- Even if you do not need the PDT, still has the highest Shield Skill for Bard along with block chance +6.
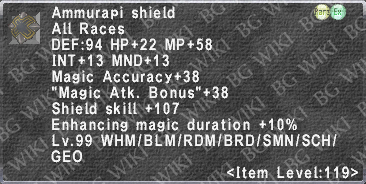
 Ammurapi Shield Ammurapi Shield
- INT+13 and MND+13 to add to your dSTATS. Not much else for Idle.
 Culminus Culminus
- SIRD 10% if you are looking for a build. Highest HP and MP for shield choices.
Armor Considerations
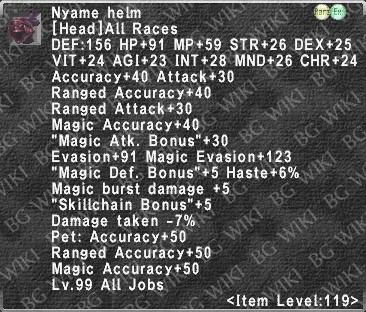
 Nyame Armor Set Nyame Armor Set
- The reason I do not want to put these pieces in the "Ideal" set is due to how much HP+ is on them. While at first glance this seems like a good thing, you will almost always dip down below 75% HP with your gear changes. Not only is this annoying for your healers, it is dangerous in situations where adds could aggro low HP.
- Culminus
- HP and MP on this piece, as well as spell interruption down. Decent alternative to Genmei Shield if you have Odyssey armor, but you will lose the Successful Block+6.
- File:Fili Calot +3 icon.png Fili Attire Set +3
- Wonderful defensive set with -Damage Taken and +Magic Evasion. Feet offer Movement Speed +18%. You can add in the body for an additional +5 Regen if you really want to, as long as you make up the DT elsewhere.
 Bihu Attire Set +3 Bihu Attire Set +3
- Decent Magic Evasion, but PDT only.
 Inyanga Armor Set +2 Inyanga Armor Set +2
- High Magic Evasion, but MDT only.
 Chironic Attire Set Chironic Attire Set
- Need to be lucky with augments, but they could be really good pieces. Lower Magic Evasion and it cannot be augmented higher.
- File:Mousai Turban +1 icon.png Mousai Attire Set +1
- Very high Magic Evasion on pieces, but not much else for idle. Also does not compare to Fili +2, which is not hard to get. OK stepping stone if NQ available on the AH.
- File:Volte Cap icon.png Dynamis - Divergence Jeuno Volte Set
- Treasure Hunter, high Magic Evasion, and Status Ailment resistances. Usually not worth going out of your way to obtain anymore these days.
 Dynamis - Divergence San d'Oria Volte Set Dynamis - Divergence San d'Oria Volte Set
- Refresh and high Magic Evasion. Usually not worth going out of your way to obtain anymore these days.
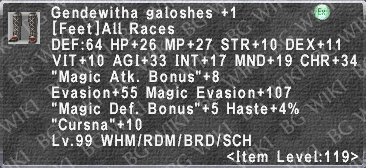
 Gendiwitha Attire Set +1 Gendiwitha Attire Set +1
- Obtainable early with Kupons, and offers decent starter -DT options.
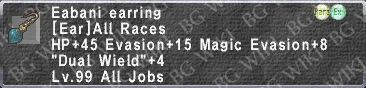
Earrings
Neck
Waist
Back
 Intarabus's Cape Intarabus's Cape
- You can pick a different Resin augment rather than PDT/MDT/DT if you have enough in other slots. I recommend Magic Evasion (+15), Defense (+50) or Status Ailment Resistance (+10).
|
Precast - Songs
New 99 Bard
Getting into the swing of things
Experienced
|
|
Total: 65%
Song Spellcasting Time -26%
Fast Cast +39%
|
|
|
Ideal Precast
|
|
Total: 81%
Song Spellcasting Time -21%
550 JP Gift -5%
Fast Cast +55%
|
|
|
|
Explanation and Reasoning
The entire goal of a precast set is to have fast songs, but at the same time your swapping does not get you killed within that few second window when you are switching gear from idle, to precast, to midcast, and safely back to idle. Combined Fast Cast & Song Spellcasting Time stack with each other and cap at an overall -80%. Job traits are included in this cap.
These sets attempt to optimize Fast Cast, while at the same time using the best DT/PDT/MDT/MEVA gear to keep you alive when running in close to the enemy. Make it a priority to upgrade to Item Level 119 equipment as soon as possible as the extra stats help you to survive in events such as Ambuscade.
Weapon and Shield
The best Bard options for Fast Cast is the File:Kali icon.png Kali and the File:Vampirism icon.png Vampirism. Neither augment options on these daggers are of much benefit to Fast Cast sets, so they are not a big deal if they are maxed or not. Although harder to get, the Sangoma is a great alternative as it adds +1 Regen and +1 Refresh but only 4% Fast Cast. You do not get much benefit from those bonuses, however, as it is only equipped for a short time unless you use it for your idle set.
It is possible to cap at 80% without having to switch your main hand weapon, so if you can do that it is ideal to save your TP.
Bard only receives two options for defensive shields. Even if it is not item level tier, the File:Genbu's Shield icon.png Genbu's Shield is a great first or returner shield with the PDT-10% offered on it. The Item Level equivalent is the Genmei Shield which offers good defense and -10% PDT as well.
Head
File:Fili Calot +2 icon.png Fili Calot +2 offers the highest value of Fast Cast/Song Spellcasting Time down and now -Damage Taken. You'll also need the piece for other reasons, so work towards getting it. It should be your first Fili +2 piece you upgrade.
Body
The File:Inyanga Jubbah icon.png Inyanga Jubbah's final form is one of two of the best options for you "ideal" set. The  Inyanga Jubbah +2 has a large MDT -8% on it with 14% Fast Cast. The File:Brioso Justau. +3 icon.png Brioso Justaucorps +3 has Song spellcasting time -15%, but has other uses so you will still need it but not as a priority for Precast. Inyanga Jubbah +2 has a large MDT -8% on it with 14% Fast Cast. The File:Brioso Justau. +3 icon.png Brioso Justaucorps +3 has Song spellcasting time -15%, but has other uses so you will still need it but not as a priority for Precast.
Hands
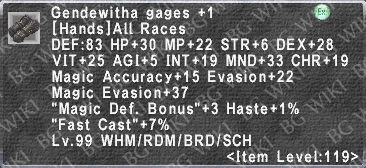
Due to the ease of obtaining a piece of Yorcia Skirmish Armor with a Kupon A-SYW, the  Gende. Gages +1 will take you all the way to "Ideal". Obtaining perfect augments is difficult. You will always obtain PDT- and some form of additional stat. If you obtain Song Spellcasting Time -5%, take it regardless of the other stats. Although perfect stats are nice, you only use these hands for a limited time for precast, and our main focus is capping your Fast Cast. Gende. Gages +1 will take you all the way to "Ideal". Obtaining perfect augments is difficult. You will always obtain PDT- and some form of additional stat. If you obtain Song Spellcasting Time -5%, take it regardless of the other stats. Although perfect stats are nice, you only use these hands for a limited time for precast, and our main focus is capping your Fast Cast.
Legs
Get the File:Orvail Pants +1 icon.png Orvail Pants +1 as soon as you complete the 1-119 guide. After that the main options for legs are the  Ayanmo Cosciales at first and quickly upgrade them to Ayanmo Cosciales at first and quickly upgrade them to  Ayanmo Cosciales +2. Work on Domain Invasion to get yourself the File:Kaykaus Tights icon.png Kaykaus Tights or File:Kaykaus Tights +1 icon.png Kaykaus Tights +1 if you can afford them. Another option is Ayanmo Cosciales +2. Work on Domain Invasion to get yourself the File:Kaykaus Tights icon.png Kaykaus Tights or File:Kaykaus Tights +1 icon.png Kaykaus Tights +1 if you can afford them. Another option is  Gende. Spats +1, although harder to get and your better off using your Kupon on the Gages instead. Augmenting them with an additional -5% casting time makes them a strong contender for "ideal". The final option, albeit very difficult to obtain, is the Gende. Spats +1, although harder to get and your better off using your Kupon on the Gages instead. Augmenting them with an additional -5% casting time makes them a strong contender for "ideal". The final option, albeit very difficult to obtain, is the  Volte Brais. Putting these in allows you some leniency elsewhere. Thank you Asura.Jokes for the tip. Volte Brais. Putting these in allows you some leniency elsewhere. Thank you Asura.Jokes for the tip.
Feet
Due to the ease of obtaining a piece of Allouvion Skirmish Armor with a Kupon A-ASYW, I listed File:Telchine Pigaches icon.png Telchine Pigaches here as a mid set option. If you choose another option with that Kupon, the File:Bihu Slippers +1 icon.png Bard's Slippers +1 or Fili Cothurnes +2 are your goal until you can get Telchine from Skirmish another way. The other option is Bihu Slippers +3. For "ideal" after maxing your augment, your looking at +3% Fast Cast/+5 Magic Evasion with Telchine, vs +5% PDT with Slippers. After taking augment cost into account, you may be spending more on maxing Telchine based on your luck than making Bihu +3 feet. Once you can afford the upgrade, get the Fili Cothurnes +3.
Earrings
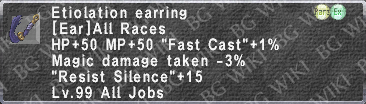
There are only four options for your Precast set. The easiest two earrings to obtain are the File:Loquac. Earring icon.png Loquacious Earring (2% Fast Cast) if you have Limbus access, and the File:Aoidos' Earring icon.png Aoidos' Earring. Your other two options are the expensive, but purchasable right away File:Enchntr. Earring +1 icon.png Enchntr. Earring +1 and the  Etiolation Earring. The Etiolation is only 1% Fast Cast when all other earrings are 2%. It does offer Magic damage taken -3% and Resist Silence +15, making it double as a great Idle piece.
If you cap out your set at 81%, throw in your Fili Earring +1/+2 for extra survivability in your precast. If you do not have it do not fret. Keep any other DT piece on if you are capped. Etiolation Earring. The Etiolation is only 1% Fast Cast when all other earrings are 2%. It does offer Magic damage taken -3% and Resist Silence +15, making it double as a great Idle piece.
If you cap out your set at 81%, throw in your Fili Earring +1/+2 for extra survivability in your precast. If you do not have it do not fret. Keep any other DT piece on if you are capped.
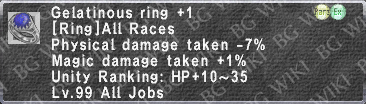
Rings
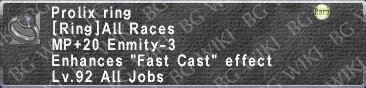
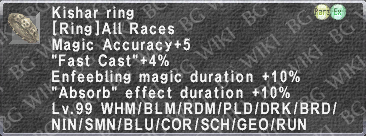
As with every other job, Bard makes wonderful use of the  Defending Ring. In fact, it is just about a full time piece for the job. Begin your quest to get one for yourself right after hitting 99. For the other slot, the File:Prolix Ring icon.png Prolix Ring is a good start, and can be purchased right away. Otherwise your only other worthwile option is the Defending Ring. In fact, it is just about a full time piece for the job. Begin your quest to get one for yourself right after hitting 99. For the other slot, the File:Prolix Ring icon.png Prolix Ring is a good start, and can be purchased right away. Otherwise your only other worthwile option is the  Kishar Ring from Omen midboss. Kishar Ring from Omen midboss.
Back
Ambuscade capes are just too good and available not to recommend early on. When making your Intarabus's Cape there is nothing else that should be tempting in the Abdhaljs Sap category other than Fast Cast for you to choose, so this will save an inventory slot by just reusing your idle cape.
Waist
File:Aoidos' Belt icon.png Aoidos' Belt is the easiest Fast Cast item to get for the slot, followed by  Embla Sash from Domain Invasion. If you do not need further Fast Cast, the best defensive option is File:Flume Belt +1 icon.png Flume Belt +1 (or NQ) for PDT. You may be asking where the File:Witful Belt icon.png Witful Belt is. I do not like Quick Magic because of situations where you may lag, Gearswap will not put on your duration+ gear quick enough. This will cause you to have to recast the song that did not get boosted effects. I prefer to keep capped Fast Cast so I know how long my songs will take to cast. Embla Sash from Domain Invasion. If you do not need further Fast Cast, the best defensive option is File:Flume Belt +1 icon.png Flume Belt +1 (or NQ) for PDT. You may be asking where the File:Witful Belt icon.png Witful Belt is. I do not like Quick Magic because of situations where you may lag, Gearswap will not put on your duration+ gear quick enough. This will cause you to have to recast the song that did not get boosted effects. I prefer to keep capped Fast Cast so I know how long my songs will take to cast.
|
Midcast - Songs
Explanation and Reasoning
Your goal for your midcast set is to boost your songs first and foremost with any available "Song+" or "All Song+" gear that is accessible. The second objective is to stack as much song effect duration as possible in other slots, but at the same time keeping your songs somewhat similar in maximum length.
The equipment sets here do not incorporate much of the "Song+" gear, with the exception of the File:Moonbow Whistle icon.png Moonbow Whistle.
There is no known cap on either Song Duration or "Song+" gear. The only limitation is how much is available in the game and obtaining said pieces.
See the Song Potency page here on BGWiki for details on Song Potency and items that increase that potency. For the most part, they are all mentioned here but without details found on other wiki pages such as strength of the songs.
The "Set" bonus on Bard's Empyrean armor is often overlooked. It offers small stat bonuses based on the element of the song that is sung, and stacks with subsequent songs. See Fili Attire Set for details on that.
Blank Slots
The slots here that do not have anything equipped should carry over from your Precast sets. I left them open as no beneficial effects can be gained for Midcast purposes, so the idea is to keep your DT gear equipped in those slots until you can reach the "Ideal" tier in any particular slot. You should easily hit 900 skill naturally once you obtain Job Master, so there is no need to consider skill for party buff songs.
Song Specific Swaps
As found on the Song Potency page, swapping in "Song+" gear increases the potency and duration of appropriate songs. Besides instruments, the gear below helps increase potency. As far as Instruments, you will want to work towards your File:Gjallarhorn (Level 99) icon.png Gjallarhorn (Level 99). It is not nearly as expensive as it was in the past. Not many songs can reach +4 with other instruments, and your inventory will love you.
For a beginner instrument, pick up an Eminent Flute. Also buy yourself a File:Linos icon.png Linos with your Kupon W-ASCC. Work towards either a File:Linos icon.png Linos File:AugRank.png Augment of All Songs +2 resulting in All Songs +3, or your File:Gjallarhorn (Level 99) icon.png Gjallarhorn (Level 99). The File:Linos icon.png Linos can receive an All Songs+2 augment, but it can cost as much as a base File:Gjallarhorn (Level 99) icon.png Gjallarhorn if you are unlucky.
- File:Ballad Icon.png Ballad, I do not recommend swapping in File:Fili Rhingrave icon.png Fili Rhingrave/+1/+2/+3, even though it offers another tick of ballad. The reasoning is that Inyanga Shalwar +2 needs to be swapped out for that 1 MP/tick ballad. Doing this causes problems overwriting correct songs on your mages, because the shortest duration song is the one overwritten, and when you use the Fili Rhingrave/+1/+2/+3, it is always Ballad. While it is still possible to do, you will be lowering your other song durations too much to compensate. This will not let you ride Nitro to Nitro comfortably. In laggy situations like Odyssey or Dynamis, some songs will probably end up dropping off, forcing you to bust out your Daurdabla again to put them back up. If we happen to get another Ballad+ tier somewhere in the future, this situation will change and Fili Rhingrave/+1/+2/+3 might be recommended again.
- File:Minne Icon.png Minne, swap in File:Mou. Seraweels +1 icon.png Mousai Seraweels +1 - If you do not have the +1, do not bother. You will run into the same problem as Ballad above since this is the leg slot. These legs are good, buy them and max out your Minne merits to 5/5.
- File:Minuet Icon.png Minuet, no swap required, File:Fili Hongreline icon.png Fili Hongreline/+1/+2/+3 already grants +1.
- File:Madrigal Icon.png Madrigal, swap in Intarabus's Cape, and File:Fili Calot icon.png Fili Calot/+1/+2/+3 already grants +1. For Madrigal, I also recommend swapping your Fili Cothurnes/+1/+2/+3 in instead of your Brioso Slippers +3. This is because you get an extra +1 from your Intarabus's Cape vs other songs, so Madrigal is naturally longer than the rest. Like Ballad above, this will cause problems overwriting the songs if your mages get hit by them. PS: You will also give your melee an extra DEX due to the set bonus, which usually results in another +1 Accuracy too! Yay!
- File:Prelude Icon.png Prelude, swap in Intarabus's Cape. For Prelude, like Madrigal above, I also recommend swapping your Fili Cothurnes/+1/+2/+3 in instead of your Brioso Slippers +3. This is because you get an extra +1 from your Intarabus's Cape vs other songs, so Prelude is naturally longer than the rest. Like Ballad above, this will cause problems overwriting the songs if your mages get hit by them.
- File:March Icon.png March, no swap required, File:Fili Manchettes icon.png Fili Manchettes/+1/+2/+3 already grants +1.
- Although you need to sing Honor March with the
 Marsyas, you can still swap in the hands, and they will boost the song. Honor March will be your longest song because of the Marsyas duration bonus, which is OK. I usually pair it with Marcato. It also benefits mages with the Magic Haste it gives. Because it is the longest song you have, you have less worry about overwriting it. Marsyas, you can still swap in the hands, and they will boost the song. Honor March will be your longest song because of the Marsyas duration bonus, which is OK. I usually pair it with Marcato. It also benefits mages with the Magic Haste it gives. Because it is the longest song you have, you have less worry about overwriting it.
- File:Scherzo Icon.png Scherzo, swap in File:Fili Cothurnes icon.png Fili Cothurnes/+1/+2/+3
- File:Carol Icon.png Carol, swap in File:Mousai Gages icon.png Mousai Gages/+1
- File:Mambo Icon.png Mambo, swap in File:Mousai Crackows icon.png Mousai Crackows/+1
- File:Etude Icon.png Etude, swap in File:Mousai Turban icon.png Mousai Turban/+1
- File:Paeon Icon.png Paeon, swap in
 Brioso Roundlet/+1/+2/+3 Brioso Roundlet/+1/+2/+3
Note: There are additional swaps for offensive spells, but this section is only for party buff songs. Other party songs not mentioned here do not have any additional equipment modifiers.
|
New 99 Bard
Getting into the swing of things
Experienced
Ideal Midcast
|
Carnwenhan
The File:Carnwenhan icon.png Carnwenhan is a wonderful weapon for Bard. It is Bard’s Mythic Weapon, and the main benefit gained from the weapon is its Increases song effect duration V stat. This extends song duration by 50% of the original amount. Party buff songs, which normally last for 3 minutes flat with no bonuses, turn into 4 minutes 30 seconds. "Song+" equipment as well as Song Effect Duration gear extends this time further. The "V" tier is gained from the Level 99 version and does not get higher after that. You will still want at least the 119 III version though, as it is also the best option for offensive spells. These are discussed further in the next section.
Miracle Cheer
The newest instrument for Bard, the File:Miracle Cheer icon.png Miracle Cheer, only comes from the Mog Bonanza. At first glance, this instrument seems inferior to Gjallarhorn. While it is indeed +1 song potency less, songs put up with this instrument are all set to a straight 15-minute duration. It does not stack with other Song Duration gear, so this means you do not need the Carnwenhan for party buffs when you are using this instrument.
This instrument’s main appeal is when you use it in conjunction with Soul Voice. You are able to have a Soul Voice duration of around 18-18.25 minutes for your entire party. Now compare this to Soul Voice without this instrument. Your song duration would be around 14-15 minutes. To achieve 18 minute songs with a Miracle Cheer, a Bard would use Soul Voice and Clarion Call to then put up all of their songs. After about 3 minutes, reapply songs before your Soul Voice wears off. Soul Voice lasts for 3.5 minutes with the Relic +2 body’s +30 second effect, and it will should take around 20 seconds to reapply songs on your party. You will still need to use NiTro with Honor March before SV wears off.
If you manage to have your abilities reset during your event via Corsair, your party will then have 36.5 minutes of Soul Voice. That is more than half of one Sortie run, or an entire Odyssey farm run if no deaths or dispels occur in either. That additional time where you do not need to recast Soul Voice could mean the difference between winning a short 15 minute Sheol Gaol boss.
The two downsides of this instrument are the +1 less potency you have for songs, and Honor March will still be shorter than your other songs since you need to cast it with Marsyas. I have broken down song potency below to compare both instruments with maximum potency attainable and Soul Voice active. Merits are not accounted for in the examples below.
| Song
|
Miracle Cheer (+3)
|
Gjallarhorn (+4)
|
| Valor Minuet V
|
420
|
446
|
| Valor Minuet IV
|
380
|
402
|
| Knight's Minne V
|
734
|
774
|
| Dragonfoe Mambo
|
258
|
272
|
| Blade Madrigal
|
216
|
228
|
Not missing much huh?
If you do not have Soul Voice up, then I would stick with Gjallarhorn+Carnwenhan. It is worth mentioning that Miracle Cheer does solve the problem with Ballad having a lower duration than other songs. I talk about this issue in the song specific swaps section.
Singing non-Soul Voiced songs with a combination of both instruments will allow you to manipulate which songs will not be overwritten. For instance, if you put up Ballad on your tank with the Miracle Cheer, subsequent songs will not overwrite it if sung with the Gjallarhorn.
Loughnashade (Prime Horn)
At first glance, the File:Loughnashade (Level 119 III) icon.png Loughnashade (Level 119 III) seems to totally replace the Gjallarhorn (Level 99) and the Daurdabla (Level 99). While their primary uses are condensed into one new instrument, the originals still have purposes.
The Daurdabla (Level 99) can still be used as a great AoE Horde Lullaby II instrument. The Gjallarhorn (Level 99) also has skill+ that the Loughnashade is missing, solidifying it's throne as the best debuff instrument.
It is yet to be seen how strong the new song Aria of Passion will be.
The File:Loughnashade (Incomplete) icon.png Loughnashade (Incomplete) is worth purchasing one because it is an easy way to quickly wake yourself up from Sleep!
|
Midcast - Lullaby
Explanation and Reasoning
Before we begin this section, Bard's String Skill Cap as Job Master with 8/8 String Merits is 425. This does not include Master Levels. Keep that number in mind, as we will be discussing it at length.
For content such as Dynamis Divergence, Odyssey, and Sortie, you should be using a String Instrument for sleeps. String instruments have a naturally wide AoE compared to Wind Instrument's fixed AoE. The range you have depends directly on ONLY your String Instrument Skill. Duration is less important in this content, as monsters will usually be attacked by party members before they naturally wake up from your song duration expiring. This is usually true even if it is shorter.
- Horde Lullaby I has an 8 yalm radius, centered around the target you cast on, at a pitiful 154 String Skill. Singing Skill has no affect for Lullaby AoE. This being said, it is best to cast that song in maximum Magic Accuracy equipment most of the time. For situations where you need longer sleeps or when you use 5/5 Troubadour, it is best to use maximum duration.
- Horde Lullaby II is a different story. In order to attain the maximum radius of 8 yalms, centered around the target you cast on, you need an estimated 648 String Skill. This is currently impossible to obtain, so instead we aim for String Skill level 567 for the next highest radius of 7 yalms. This skill number includes natural skill, assumes you have maximum string skill merits, have some master levels, and all your midcast equipment up to par.
- Note: Single target Lullaby songs should be cast with File:Gjallarhorn icon.png Gjallarhorn or Marsyas for maximum Magic Accuracy and Duration. There is no point to cast single target songs with a harp.
The downside to String is that there is a naturally higher resist rate on your songs. With high end magic accuracy equipment this drawback is negligible and rarely makes a difference in the modern era of the game. The only time you might see a change is on high level Notorious Monsters, which are rarely susceptible to sleep anyway. In this case you would be obtaining 100% magic accuracy with your 5/5 Troubadour ability.
Options for Lullaby with String Instruments include:
Options for Lullaby with Wind Instruments include:
- File:Gjallarhorn icon.png Gjallarhorn - Great MACC, naturally higher Wind accuracy, and All Songs +4. Only downside is not as wide of an AoE range.
- Marsyas - +50% Song Duration. Technically this is more than Gjallarhorn, but less accuracy and the same narrow AoE range. Macc is irrelevant if you are using 5/5 Troubadour.
Note: To obtain String Skill level 486 for Horde Lullaby II 6 Yalm AoE with the "All Lullaby NOT Horde II" set below while using File:Blurred Harp +1 icon.png Blurred Harp +1, you must have Master Level 12. If you do not have Master Level 12 yet, alternatives to the set below include File:Harfner's Sash icon.png Harfner's Sash and  Gersemi Earring (instead of Dignitary's). Be sure to look at your Magic Skill menu with your midcast to ensure you are at least at String Skill 486. Gersemi Earring (instead of Dignitary's). Be sure to look at your Magic Skill menu with your midcast to ensure you are at least at String Skill 486.
|
|
Midcast - Debuff
New 99 Bard
|
Explanation and Reasoning
For song debuffs you want to focus on the following stats in your sets:
CHR vs Magic Accuracy vs Wind/Singing Skill has never been solidified as to what stat is "the best" for Bard. Charisma seems to matter the most when the enemy is of significantly higher level. Remember that you can also cast Bewitching Etude on yourself for a quick amount of CHR, but you cannot pull MACC or Skill out of nowhere. The "ideal" set here offers the best CHR/MACC/Skill/Duration combination available.
Many people do not realize that Song Duration also applies to debuffs. That being said, it is wonderful to have your File:Carnwenhan icon.png Carnwenhan for this set. Not only for Magic Accuracy but also for debuff durations.
Enfeebles
Notably, Silence is an enfeebling spell that Bards will cast quite a lot. This is especially true in Dynamis - Divergence. With our insanely high Magic Accuracy that we can obtain on our gear, we have a very high ability to silence a lot of enemies.
These sets are also what I recommend for progressing in your offensive enfeebles, except you can obviously put in a ranged or ammo piece. You can use your Fast Cast Linos and add Magic Accuracy +15 or more to it with Snowdim Stones.
Remember, use Wind Threnody II before casting Silence. This will help you and your group's odds.
Weapon
The File:Kali icon.png Kali will do great for a long time; indefinitley if you do not create a Mythic. There are runner ups, such: Max File:AugRank.png File:Malevolence icon.png Malevolence,  Tauret, and File:Barfawc icon.png Barfawc but they do not have the Song Duration +5% as the Kali does. Remember Song Duration+ affects debuffs too! Tauret, and File:Barfawc icon.png Barfawc but they do not have the Song Duration +5% as the Kali does. Remember Song Duration+ affects debuffs too!
Your weapon is an obvious choice for Best in Slot. Augmenting your mythic only benefits you further, but it is expensive. Afterglow Horn offers zero benefit, so do not bother.
Shield
The Genbu's Shield is easy to get and can be Augmented. If you do not have a steady Omen group that can kill bosses, the Ammurapi Shield might be far off for you. If this is the case, I recommend trying to augment your File:Genbu's Shield icon.png Genbu's Shield with Tatter and Scrap Synergy. The Genbu's Shield will last you until your Ammurapi.
Head/Body/Hands/Legs/Feet
Even though Inyanga is technically not "New 99 Bard", there are no other sets worthwhile for Debuffs. The NQ or +1 set should be your first goal, as it will be upgraded to +2 eventually.
The Inyanga +2 set will treat you well until you get into Omen and upgrade your Artifact gear. It will also double as a few slots for your Idle sets.
Bard is lucky when it comes to our Reforged Artifact Armor +3. The job benefits greatly from the Set bonus, as well as just how great the stats are. Paring both up makes these pieces a must have for anyone who is serious about gearing up. With the addition of Reforged Empyrean Armor +3, the body/hands/legs have been replaced. Even though we lose two set bonuses, the benefits outweigh the losses. This also allows us to use the Regal Earring to regain a set bonus tier and remain at 3/5.
Earrings
With the addition of the File:Fili Earring +2 icon.png Fili Earring +2, our earring choices change around quite a bit. I recommend swapping out the  Regal Earring, since you are only receiving dCHR +10 as the Set bonus caps at 5 for Reforged Artifact Armor +3. Even a low augment File:Fili Earring +1 icon.png Fili Earring +1 beats it out. If you only have an NQ File:Fili Earring icon.png Fili Earring, it needs to be pretty much cap augments to be worth wearing in this set. Regal Earring, since you are only receiving dCHR +10 as the Set bonus caps at 5 for Reforged Artifact Armor +3. Even a low augment File:Fili Earring +1 icon.png Fili Earring +1 beats it out. If you only have an NQ File:Fili Earring icon.png Fili Earring, it needs to be pretty much cap augments to be worth wearing in this set.
Until you get your hands on at least a File:Fili Earring +1 icon.png Fili Earring +1, use the Regal Earring and  Dignitary's Earring combo. Dignitary's Earring combo.
Neck
Again, the File:Moonbow Whistle icon.png Moonbow Whistle is just too easily accessible to not pick up right away. Save your money for a +1!
Rings
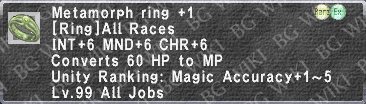
The Stikini Ring +1 was king for quite awhile for Bard due to its somewhat earlier introduction in the 119 era. Although the great Magic Skill debate continues with this ring, it has a contendor now with Odyssey's File:Metamor. Ring +1 icon.png Metamorph Ring +1.
Stikini +1: Wind Instrument Skill +8, Singing Skill +8, Magic Accuracy+11 vs Metamorph +1 File:AugRank.png: CHR+16, Magic Accuracy +11~15
Skill vs Stats vs Macc opinions will differ amoungst the playerbase. One theory is that Skill 199 or lower is Skill +1 = MAcc +1.0 whereas Skill 200 or higher is Skill +1 = Macc +0.9.
I would say if you already have two Stikini +1s, do not bother with the Metamorph +1. If you have or need a Metamorph +1 for another job, then by all means use it in your Debuff set to save an inventory slot. Nobody will mock either decision you make, as long as you are in the top Unities.
Back
Ambuscade capes win again for this slot category. You can reuse your main Bard cape as it meets the criteria for Debuff songs.
Waist
The  Luminary Sash was king for Magic Accuracy in the waist slot until Odyssey was released. Now we have the augmented File:Acuity Belt +1 icon.png Acuity Belt +1, with no regards to the base stats. A capped out belt gives us +15 Magic Accuracy from the Augment. Luminary Sash was king for Magic Accuracy in the waist slot until Odyssey was released. Now we have the augmented File:Acuity Belt +1 icon.png Acuity Belt +1, with no regards to the base stats. A capped out belt gives us +15 Magic Accuracy from the Augment.
Until you get this, the Luminary Sash is the runner up waist piece, but it is from Neak so it could be difficult to obtain unless it drops during an Aeonic run. Other honorable mentions are the File:Ovate Rope icon.png Ovate Rope & File:Porous Rope icon.png Porous Rope.
Song Specific Swaps
As found on the Song Potency page, swapping in "Song+" gear increases the potency and duration of appropriate songs. Besides instruments, the gear below helps increase potency.
|
Getting into the swing of things
|
Experienced
|
Pre Empyrean +3 Debuff Set
Post Sortie Debuff Set
|
Other Spells
Precast - All Spells (not songs)
This is a jack of all trades Precast set for all spells that are not songs. This will save you precious inventory and you do not have to monkey around with "spell-specific casting time -" gear. Feel free to substitute options, but make sure you hit 80% without considering Red Mage sub. I have some DT things thrown in to help with a little survivability.
Other Fast Cast options
|
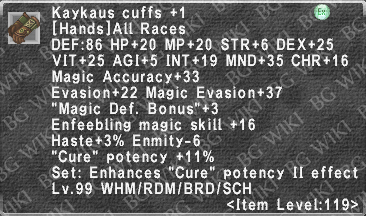
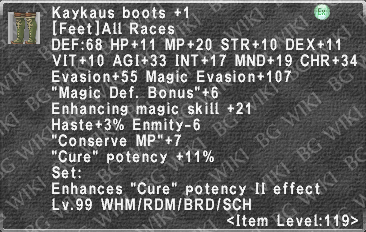
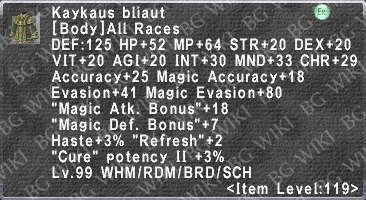
Midcast - Cure - Kaykaus +1 set
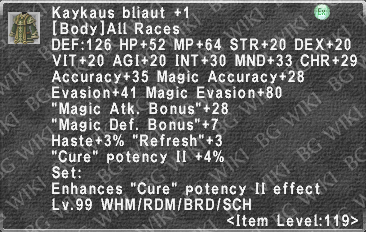
If money is no object, Kaykaus +1 gives us the most Cure Potency II equipment we can get. The set bonus ranges from +4~10% based on amount of pieces you have. 5/5 grants +10% Cure Potency II. A lot of these Kaykaus +1 pieces can also be used for Precast, if you have them.
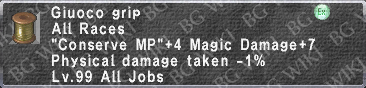
The full +1 set gives us 44% Cure Potency by itself, not counting any Cure Potency II. Paired with the Path D augment on the body, that alone caps you. That makes the Daybreak less useful for this set, except for MND+30. I recommend switching to options for Conserve MP, which the best set would be Grioavolr File:AugRank.png and Giuoco Grip. This will cause blinking for cures, though. The only other viable option for main hand would be an augmented Ipetam which can get Conserve MP with Leaf stones.
This set below has Conserve MP +93/100. (with perfect File:AugRank.png)
|
|
- Grioavolr
- Giuoco Grip
- Pemphredo Tathlum
- Kaykaus Mitra +1
- Path A: MP+80, MND+12, "Magic Accuracy"+20 OR Path B: MP+80, "Cure" Spellcasting time -7%, Enmity-6
- Kaykaus Bliaut +1
- Path D: MP+80, "Cure" Potency+6%, "Conserve MP"+7
- Kaykaus Cuffs +1
- Path D: MP+80, "Conserve MP"+7, "Fast Cast"+4%
- Kaykaus Tights +1
- Path A: MP+80, MND+12, "Magic Accuracy"+20 OR Path B: MP+80, "Cure" Spellcasting time -7%, Enmity-6
- Kaykaus Boots +1
- Path A: MP+80, MND+12, "Magic Accuracy"+20 OR Path B: MP+80, "Cure" Spellcasting time -7%, Enmity-6
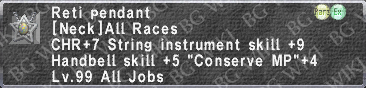
- Reti Pendant
- Calamitous Earring
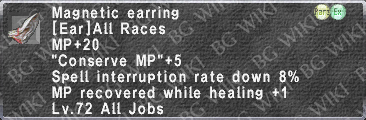
- Magnetic Earring
- Jann. Ring +1
- Mephitas's Ring +1
- [1] "Conserve MP" +15 [2] INT+5
- Shinjutsu-no-Obi +1
- [1] "Conserve MP" +15 [2] "Fast Cast" +5%
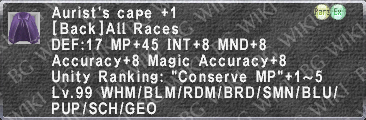
- Aurist's Cape +1
- [1] Accuracy & Magic Accuracy +25 [2] INT/MND +25
|
|
|
Midcast - Cure - Some Kaykaus +1
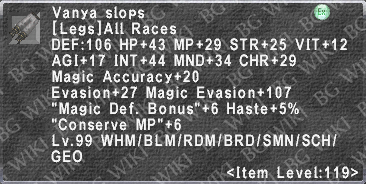
The first piece of Kaykaus +1 you should obtain is obviously the body, as it has natural Cure Potency II without the need for a set bonus. Ideally it would be best if you pair it with just one other +1 piece to get the set bonus. Legs and Hands tend to be the cheapest secondary option, but that might not be the case on your world.
The feet are used for an Enhancing set, so they are a wonderful piece to pick up. They don't quite beat Vanya Clogs, however, due to the +40 Healing Magic Skill obtainable on them even with the additional Cure Potency II set bonus. The difference is only about 10 HP for Cure IV, though.
Try for the set below on your way to 5/5.
This set has Conserve MP +96/100.
|
Midcast - Cure - Starter set
- Linos can obtain Cure Potency +1~6% with Leafdim stones. Our other ranged/ammo options are pretty much only Pemphredo Tathlum. Depending on your other gear pieces, it may me best to use Linos here for extra Cure potency if needed. Snow and Dusk augments for Linos are not beneficial for cure potency purposes.
|
Midcast - Stoneskin/Aquaveil
Stoneskin keeps you alive. Paired with PDT/MDT and Magic Evasion, your mileage with Stoneskin is incredible. The pieces below will grant you additional Stoneskin potency.
Aquaveil prevents interrupts during spells (NOT songs, as they cannot be interrupted). Instead of the waist item below, equip an Emphatikos Rope instead during Aquaveil casts.
350 HP Base Stoneskin + 95 HP additional from the equipment above. Total Stoneskin will be 445 HP damage absorbed.
- At 119, it is incredibly easy to cap Stoneskin's base 350 HP absorption. No enhancing magic or MND needs to be considered, and anything over the cap is not useful for the effect.
- Bard cannot use Stone Mufflers, which enhance Stoneskin further.
- Stone Gorget offers +30 HP, which is the same as the Nodens Gorget. Obtain either for the same effect.
|
Midcast - Barspells (Enhancing +)
When a White Mage is not available for your party, Bard can use Barspells to help keep party members alive from various damaging spells. Pairing Carols together with similar elements strengthens Barspells even further.
The set below offers 154 Enhancing Magic skill. We also only obtain level 49 skill from WHM subjob and merits, which is 155. The total Enhancing magic we can get is 309. Plugging this into the formula gives us barspells of 102 resistance. Add the bonus of 15 from the Shedir Seraweels grants us a maximum total of 117 for our Barspells.
|
Midcast - Cursna (Doom)
Very important to help remove doom from your party members.
Be sure to read the Cursna page for details on removing Doom, and for formula information. The idea is to stack Healing Magic skill anywhere you cannot get a Cursna+ piece, but since Bard does not have native Healing Magic skill, stacking healing magic really wont push you to any futher tiers. There are options for body and legs, but neither are Item Level.
Focus on the Cursna+ gear in the list below.
If you do not have the File:Hieros Mittens icon.png Hieros Mittens, then use  Inyan. Dastanas +2 for a beefy +20 Healing Magic skill boost. Inyan. Dastanas +2 for a beefy +20 Healing Magic skill boost.
- Debilis Medallion = 15
- Haoma's Ring = 15
- Menelaus's Ring = 20
- Gende. Galosh. +1 = 10
- Oretan. Cape +1 = 5
- Hieros Mittens = 10
|
Evasion
Could be useful for Odyssey.
Main and Sub can be swapped for Nibiru Knife x2 with File:AugRank.png Path A: Acc+20, Att+15, Eva+20. These offer +51 more Evasion vs above, but less DD potential.
Evasion set by Asura.Wotasu, FFXIAH
|
Banish Set
Merge your MACC set with this set in your LUA, so these pieces overwrite the slots in your MACC set. These Banish+ pieces are all that Bard can wear.
|
Tanking Sets
These sets can be helpful for tanking the add during the Arebati fight. Use your generic Idle set for this, but these Precast and Midcast sets are special.
Once we learn more about definitive values of VE and CE on each song, I will create a spreadsheet and add it here. Until then, it seems best to spam all of your offensive songs to generate hate.
Precast – Tanking
The only change from the “Ideal Precast” set listed above is if you do not have a File:Fili Earring +2 icon.png Fili Earring +2. You will need to add Damage Taken -5% to your File:Intarabus’s Cape icon.png Intarabus’s Cape to cap. This way Wilbur will not push your face in due to lag and song casts as you will always have 50% DT.
Click Here to skip to the Precast section with this set.
Midcast - Enmity+ set
Below is a max Enmity+ build for Bard, while still having Physical Damage Taken -50%.
Be mindful to reinvest any merits into Enmity+ before the fight. Enmity+ caps at +200 from gear. Bard cannot get close to that, but we have some things to work with.
Keeping up File:Sirvente Icon.png Sirvente on yourself is important for doing this, as well as File:Minne Icon.png Minne songs. You also need to ensure that you have capped Magic Haste with either the haste spell or File:March Icon.png March. If you can spare it, a File:Mambo Icon.png Mambo might also be beneficial depending on your party.
Remember to swap back into your idle set. This set is only for casting songs (Midcast).
Stats on the above set:
- Enmity+72 (and Merits +5)
- Damage Taken -18%
- PDT -33% (Capped when combined with DT)
- Haste +27% (Cap)
Earring Alternatives: Titanis Earring, Pluto's Pearl
Ring Alternatives: Eihwaz Ring, Pernicious Ring
There are belts with +1 more enmity, but we need to use this one to cap Equipment Haste.
The Intarabus’s Cape can have AGI, HP, or Evasion instead of VIT, but I figure VIT is better since we are not going for Evasion. Those Crits suck.
DD Bard
I am not going to post any sets at the moment, but I may later. I am not going to pretend to know all aspects of Bard melee builds and what is best for dual/single wielding.
I will refer you to the following resources to help with your DD sets:
Out of date sets here
|


_description.png)
_icon.png)
_icon.png)
_icon.png)
_icon.png)
_description.png)