Batcher's 99 WHM Gear Guide
|
|
Introductions
Hi! My name is Batcher! I play on Asura Server and you may have seen me around! I like to help people and this guide is meant to serve as a goal for career white mages who intend to master white mage and play at an optimal level while still being conscious of their gear. Tremendous credit must go to Cronagh's On Healing Hands Guide and the rest of the FFXI community. This guide, while similar, will take a different approach to gear. I want to make sure I emphasize this is not a budget-guide or a BiS guide. This is how I gear my WHM. Let's just jump into it.
Regarding Subjobs, this guide will assume you are utilizing Scholar. I understand RDM/BLM/SMN/DNC all have different viabilities and uses, but for the sake of this guide we are going on the idea that you are playing a standard support role with an arsenal to ensure MP management and cure strength.
Note: Hover over augment icon to see which augments I recommend!
Gear Sets
|
Idle Set Physical and Magical Damage taken has a cap of 50%. The "Damage Taken %" applies against this cap as well. Shellra V applies a maximum of -27.34% Magic Damage Taken (After merits), so you only need %22.66 via gear which is very easy with Inyanga. Finally, White Mage doesn't really need +refresh as much as we needed it in the past, but we can get a healthy +8 Refresh via gear. I didn't differentiate a starter/mid set here because there really isn't a purpose for buying or spending time on niche pieces. If you already have pieces that have PDT, DT, MDT, or refresh, use that otherwise get the NQ versions of the pieces listed here and utilize a reforged body with at least +2 refresh until you can +2 the inyanga stuff. |


|
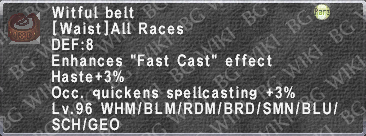
Precast Set The majority of guides will indicate a fast cast set, a recast set, a quick cast set and a cure casting time Set to accomplish specific actions. The following set is able to accomplish everything you need in those sets. Cure Casting Time and Fast Cast all fall under the umbrella of the 80% gear cap. It is a 1% = 1% ratio so since we are able to hit our caps via this gear, we do not need it. That being said, as you build this set you can substitute any pieces of gear to hit your 25% Haste, 80% FC, and Quick Magic caps. Reference: Cronagh on CCT and FC. I recommend you use this set for precast of all magic, and midcast it for Reraise, Arise/Raise and any other spell that you need to cast as soon as possible that doesn't depend on potency. |


|
|
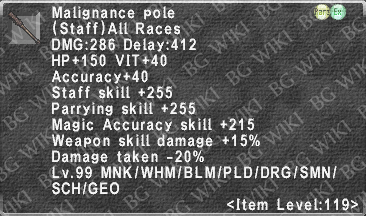
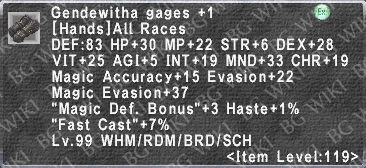
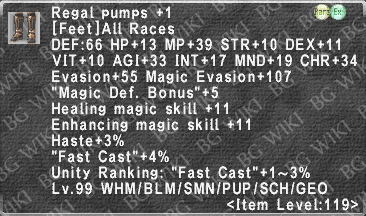
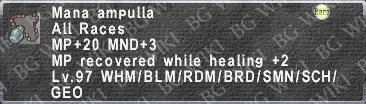
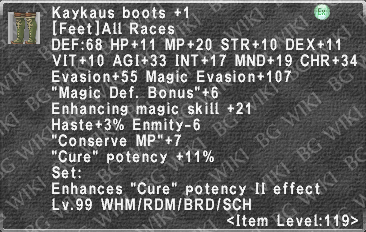
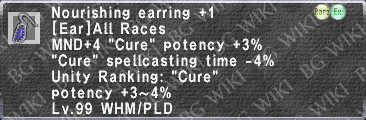
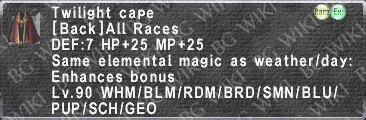
Cure Set Cure Potency has a 50% cap from gear. Cure Potency II likely has a cap, but its unreachable at this time (Maybe 50%?). The cure potency job gifts do not add potency % but instead increase your overall "cure power", so you still need 50% cure potency through gear. Healing Magic caps at 500. With a 424 skill cap and 26 points via Job Points Gifts, you need only +50 Healing Magic via gear to reach the cap. The benefits of the buffs to Afflatus Solace via this gear is incredibly important. It buffs the Stoneskin effect that gets placed on players and trumps any other piece of gear we would put in that slot so make sure to get the Alaunus's Cape and Ebers Bliaud ASAP. With Scholar as a subjob, you gain access to Aurorastorm. This spell creates light weather around you and your party called 'Auroras'. This effect normally means that you have a -chance- to gain a 10% cure potency above the 50% cap. The Hachirin-no-Obi ensures this effect is 100%. The Chatoyant Staff adds an additional 10% cure potency that the obi now guarantees giving you a whopping 15% above the existing 50% cap making this the ideal curing set. |


|
|
Curaga Cure Swap Curaga is a very curious spell. It utilizes the old cure formula so while single target cures benefit from extra healing magic skill (1:1 power), curagas get more from MND (1:3 power), so its important to stack MND/VIT in places where you can afford to lose some cure potency (never go under cap). Additionally, because Curagas dont apply stoneskins via Afflatus Solace, the following set removes the afflatus solace pieces and instead utilizes pieces that pump MND + Cure Potency II. |

|
Status Cleanse SetGet a Yagrush. Any 119 content is inevitably going to be full of AoE debuffs and going 1 by 1 or relying on Divine Seal every few minutes is simply impractical. A Yagrush ensures that EVERY -NA spell and Erase is performed on all nearby targets. Every. Single. Time. Seriously... Get a Yagrush. The good news is that the 75 version is all you REALLY need, and every upgrade after is just icing on the cake. So get to doing Nyzul and dont forget to rank up with Naja! The other pieces are responsible for increasing the chance of the "Divine Caress" ability which makes your -na spells give a "buff" against being inflicted by the same debuff for x amount of time. Ashitacast/Gearswap: Midcast this set into your -na and erase spells (Excluding Cursna, see the other section. Additionally, make sure you set your Precast/FastCast set to be the baseset of this set. Theres an argument to be made that it is better to stack ConserveMP over Recast/speed of cast, but I hold firm that having the ability to cast quickly in dangerous situations is the better move. |
|
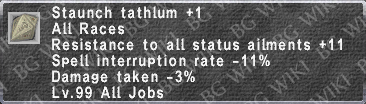
Cursna SetIn 2016, SE Confirmed that Cursna has a 26% success rate with 500 Healing Magic Skill and subsequent points above 500 help the success rate. As such, we need to pump as much healing magic skill as possible. The only concession I am making here is using Kaykaus Mitra +1 instead of Vanya head with augments. We are talking 4 Healing Magic Skill for a piece of gear we ONLY use for this, so I think its a fair trade for inventory space. The BiS item here is Gambanteinn with its +100 Cursna. I honestly don't see any but the most senior of white mages taking the time to build this AND yagrush, so using Gada is just fine. However, if you have reached the pinnacle of your gear, then this is the final goal for you. Ashitacast/Gearswap: Midcast this set into your Cursna spellcast. |

Set Goals
|
Enhancement SetWhite Mage has a base C+ Enhancement Magic Skill. With Scholar's Light Arts, we are able to push it to B+ and as 420, we only need +80 Enhancement Magic Skill to cap. The following set will serve as the baseset for all enhancement related sets (Regen, Bars, Boosts, etc) so don't freak out that the other sets don't include key pieces as they already exist here. Besides hitting the cap, this set focuses on extending the length of enhancement buffs. 5min Hastes, 50min prot/shell, 5min regens are no joke. We also sprinkle some conserveMP in here as a lot of these buffs sometimes get executed alongside Accession. Ashitacast/Gearswap: Within Ashitacast/GearSwap, make this set be the baseset for the spell-specific sets below, otherwise midcast this set for all your other enhancing magic. The notable exception here is Haste, as it does not benefit from potency as such you are better off midcasting it with your precast/recast set to ensure you can cast it as soon as possible. |
|
|
|
|
Spell-Specific Enhancement SetAshitacast/Gearswap: Midcast these sets for the specific spells. Make special note that only bar elemental spells like barwatera and barfira are affected by the bar set, for things like barparalyzra, just use the base enhancement set. |
|
Enfeebling SetAgain, most guides will indicate you have a Divine Set, a MND set, and an INT set. You are welcome to do this but since I created this build, I have not found a need. This set focuses on getting as much enfeebling skill, magic acc, and MND/INT as possible. Ashitacast/Gearswap: Midcast this set into your enfeebling and divine spells with the exception of repose and flash. For those, you should midcast your fastcast set. |


_description.png)